• Home
  • News
  • Software
  • Knowledge
  • MMO
  • Tips
  • Security
  • Network
  • Office
AnonyViet - English Version
  • Home
  • News
  • Software
  • Knowledge
  • MMO
  • Tips
  • Security
  • Network
  • Office
No Result
View All Result
  • Home
  • News
  • Software
  • Knowledge
  • MMO
  • Tips
  • Security
  • Network
  • Office
No Result
View All Result
AnonyViet - English Version
No Result
View All Result

Instructions for using Magic Editor on Pixel 8 and Pixel 8 Pro

AnonyViet by AnonyViet
November 21, 2023
in Software
0

Do you already own a Pixel 8 or Pixel 8 Pro? If so, you’ll be experiencing an exclusive feature of Google Photos Magic Editor. This is an extremely advanced photo editing tool that allows you to remove unwanted objects, change the color of objects, and add realistic photo backgrounds.

Join the channel Telegram belong to AnonyViet 👉 Link 👈

What is Magic Editor?

Magic Editor is a feature provided by Google Generative AI, uses machine learning to recognize objects in photos and make necessary changes. The results are often stunning, and can make your photos look like they were taken by a professional photographer. Importantly, its interface is very intuitive and easy to use.

How to use Magic Editor on Pixel 8 and Pixel 8 Pro

Step 1: Open the Photos app on your Pixel 8 or 8 Pro and select the photo you want to edit.

Step 2: Now, tap on ‘Edit’ on the bottom row > Click on the Magic Editor icon on the bottom left corner.

Instructions for using Magic Editor on Pixel 8 and Pixel 8 Pro 2

In Magic Editor, there are many ways to edit your photos.

Change the sky

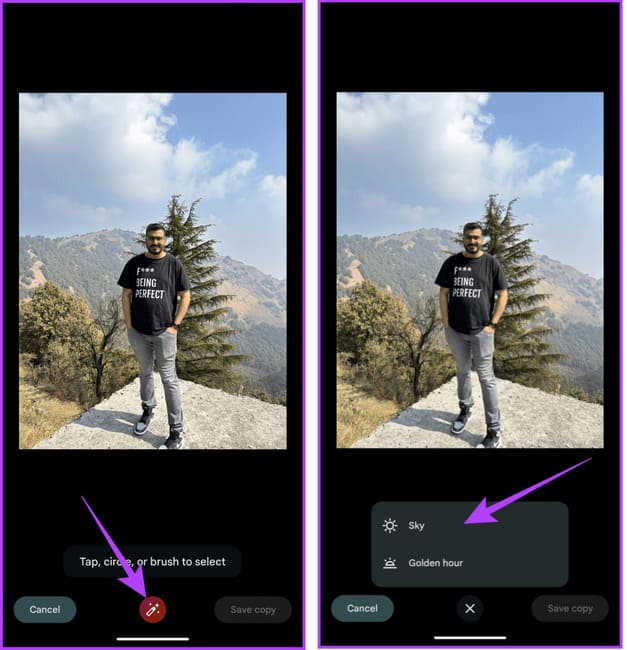
Step 1: First, with the example shown, you can change the sky in the background. To do that, tap the wand icon and select ‘Sky’ or ‘Golden hour’.
Magic Editor
Tap on the wand icon > Select ‘Sky’ or ‘Golden hour’.

Both options will change the sky in the photo. The first option will give you a variety of looks, while ‘Golden hour’ will change the sky to orange, simulating the golden hour at sunrise or sunset.

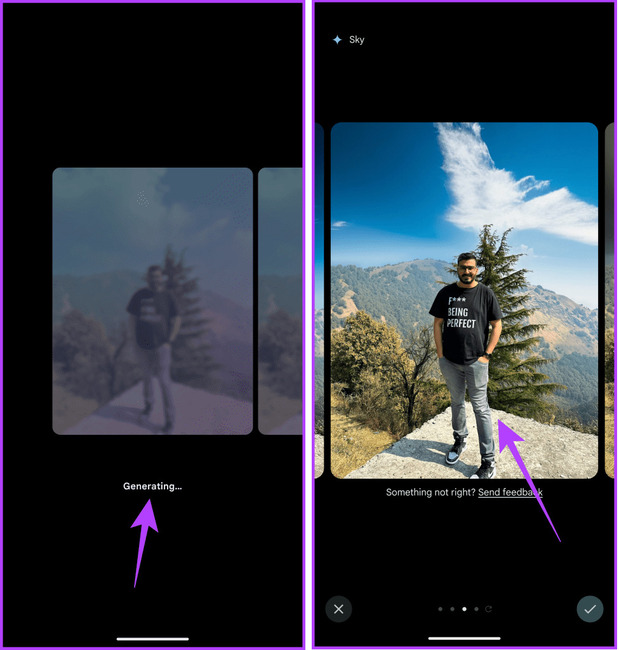
Step 2: The application will generate 4 results for you to choose from. If you like a photo, click on the check mark in the lower right corner.
Magic Editor
The application will generate 4 results for you to choose from

Additionally, you can scroll to the end and ask the app to generate additional results.

Change the position and size of the subject

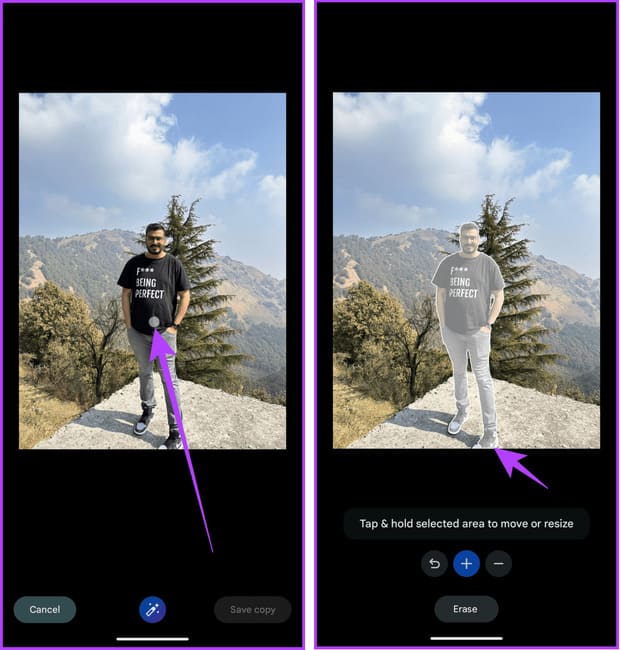
Step 1: Magic Editor also allows you to adjust and change the position of a person or object in a photo. To do that, tap the person or object you want to edit.
Magic Editor
Magic Editor helps change subject position

The application will automatically identify and highlight the subject. In case it misses any details, you can add them by tapping on them.

Step 2: Touch and hold the subject, then drag it to another location. In addition, you can also change the size of that subject.
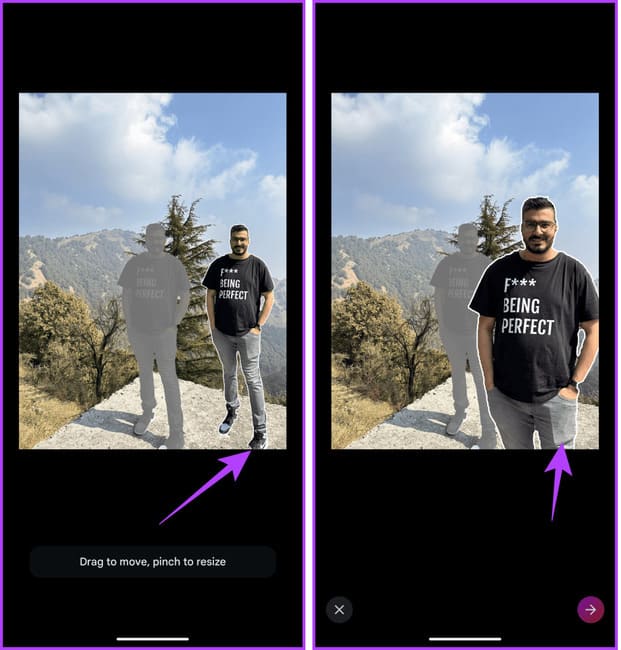
Magic Editor
Drag the subject to another location

Step 3: Once you’re satisfied with your changes, tap the arrow in the lower right corner.
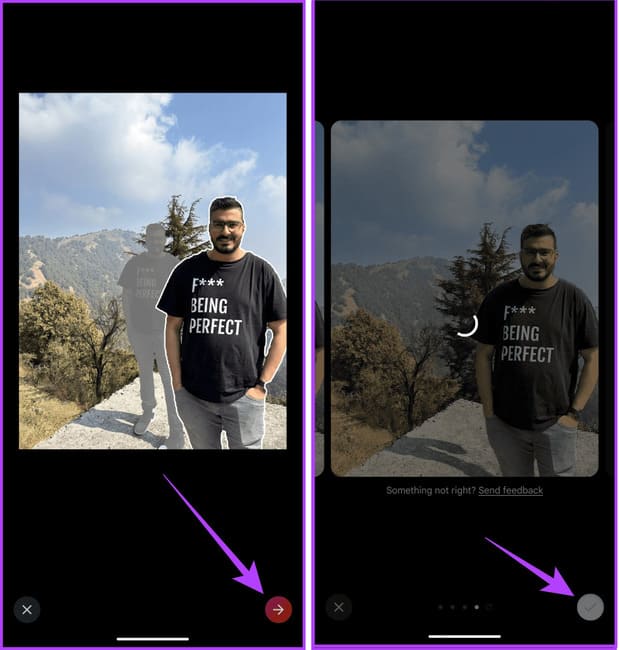
Magic Editor
Tap the arrow in the lower right corner.

Step 4: Touch the check mark to select the result you like.

Delete object

Since Magic Editor is an upgraded version of Magic Eraser, you can use it to erase objects or people from photos.

Step 1: You just need to touch the object or person > Press ‘Erase’ to delete.
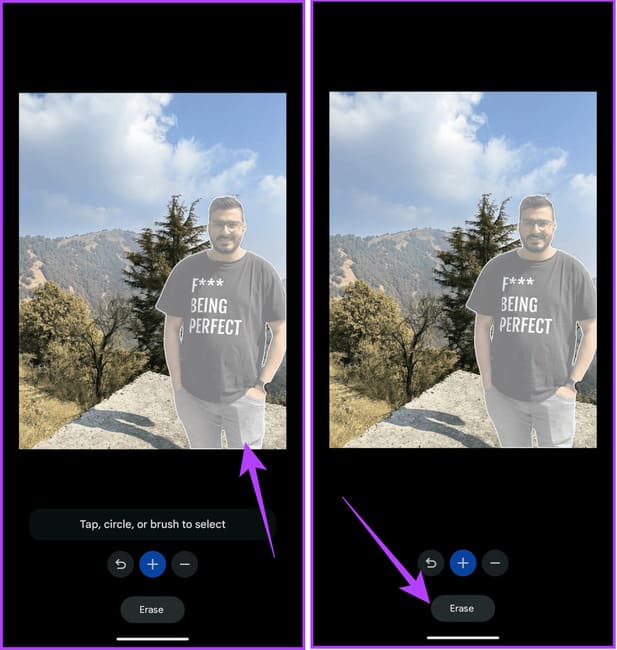
Magic Editor
Magic Editor can also delete objects in images

Step 2: The application will generate many results. You can browse and see which one you like and then tap the check mark in the lower right corner to apply.
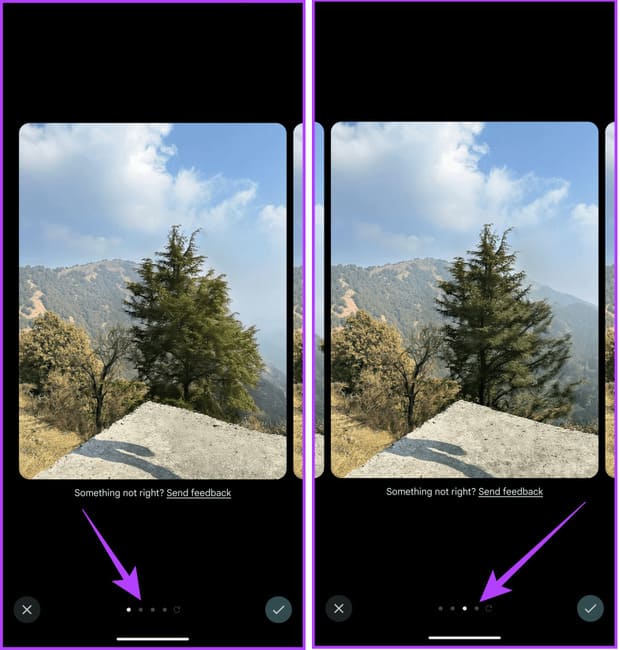
Magic Editor
Tap the check mark to apply

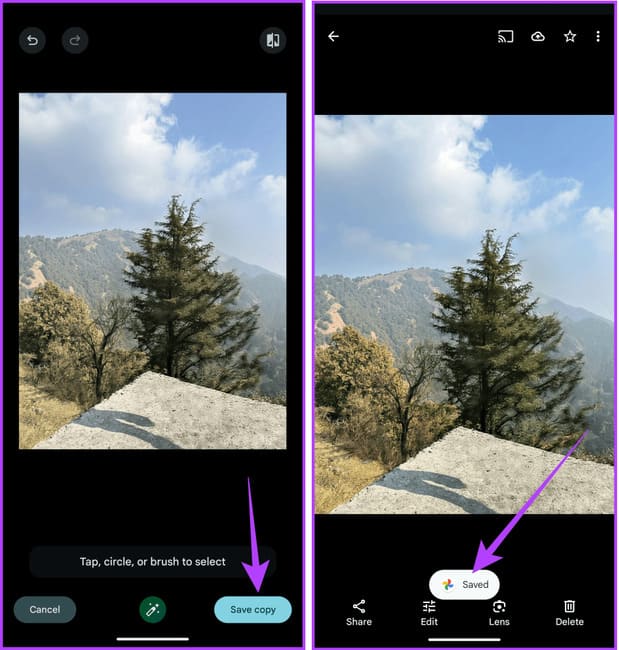
Step 3: After making all the changes, tap Save copy
Magic Editor
Click Save copy

Google Photos will save a copy of the edited photo. It will also automatically back up photos to your cloud storage. You will receive a Saved notification afterwards.

Epilogue

Magic Editor of Google Photos is a powerful tool provided by Google. It can help you take your photography skills to the next level. With Magic Editor, you can remove unwanted objects from photos, change the background, and resize various elements. If you have a Pixel 8 or 8 Pro, try using Magic Editor!

Rate this post

Tags: editorInstructionsMagicPixelPro
Previous Post

4 unique AI tattoo creation tools you should not miss

Next Post

How to split Samsung screen in half for both work and entertainment

AnonyViet

AnonyViet

Related Posts

How to handle when your phone number is registered by someone else on Zalo
Software

How to handle when your phone number is registered by someone else on Zalo

October 27, 2025
How to use Comet: The AI ​​assistant that helps you do everything on the web
Software

How to use Comet: The AI ​​assistant that helps you do everything on the web

October 25, 2025
What’s special about ChatGPT Atlas? Things to know before installation
Software

What’s special about ChatGPT Atlas? Things to know before installation

October 23, 2025
Instructions for installing CapCut Pro for iPhone for free
Software

Instructions for installing CapCut Pro for iPhone for free

October 22, 2025
Instructions for installing Scarlet iOS to install all IPA files without being revoked
Software

Instructions for installing Scarlet iOS to install all IPA files without being revoked

October 22, 2025
Instructions on how to create an aquarium on the iPhone screen
Software

Instructions on how to create an aquarium on the iPhone screen

October 18, 2025
Next Post
How to split Samsung screen in half for both work and entertainment

How to split Samsung screen in half for both work and entertainment

0 0 votes
Article Rating
Subscribe
Login
Notify of
guest

guest

0 Comments
Oldest
Newest Most Voted
Inline Feedbacks
View all comments

Recent News

How to add emoji to Macbook folder to easily distinguish

How to add emoji to Macbook folder to easily distinguish

October 30, 2025
What is Direct Connect AWS? Benefits when businesses use Direct Connect AWS

What is Direct Connect AWS? Benefits when businesses use Direct Connect AWS

October 29, 2025
Activate Dolby Vision HDR Windows 11 to experience ultimate visuals

Activate Dolby Vision HDR Windows 11 to experience ultimate visuals

October 29, 2025
How to download Facebook Messenger messages to your computer

How to download Facebook Messenger messages to your computer

October 29, 2025
How to add emoji to Macbook folder to easily distinguish

How to add emoji to Macbook folder to easily distinguish

October 30, 2025
What is Direct Connect AWS? Benefits when businesses use Direct Connect AWS

What is Direct Connect AWS? Benefits when businesses use Direct Connect AWS

October 29, 2025
Activate Dolby Vision HDR Windows 11 to experience ultimate visuals

Activate Dolby Vision HDR Windows 11 to experience ultimate visuals

October 29, 2025
AnonyViet - English Version

AnonyViet

AnonyViet is a website share knowledge that you have never learned in school!

We are ready to welcome your comments, as well as your articles sent to AnonyViet.

Follow Us

Contact:

Email: anonyviet.com[@]gmail.com

Main Website: https://anonyviet.com

Recent News

How to add emoji to Macbook folder to easily distinguish

How to add emoji to Macbook folder to easily distinguish

October 30, 2025
What is Direct Connect AWS? Benefits when businesses use Direct Connect AWS

What is Direct Connect AWS? Benefits when businesses use Direct Connect AWS

October 29, 2025
  • Home
  • Home 2
  • Home 3
  • Home 4
  • Home 5
  • Home 6
  • Next Dest Page
  • Sample Page

new88 trang chủ shbet trang chủ f168 trang chủ qq88 nhà cái 78win

No Result
View All Result
  • Home
  • News
  • Software
  • Knowledge
  • MMO
  • Tips
  • Security
  • Network
  • Office

new88 trang chủ shbet trang chủ f168 trang chủ qq88 nhà cái 78win

wpDiscuz
0
0
Would love your thoughts, please comment.x
()
x
| Reply