• Home
  • News
  • Software
  • Knowledge
  • MMO
  • Tips
  • Security
  • Network
  • Office
AnonyViet - English Version
  • Home
  • News
  • Software
  • Knowledge
  • MMO
  • Tips
  • Security
  • Network
  • Office
No Result
View All Result
  • Home
  • News
  • Software
  • Knowledge
  • MMO
  • Tips
  • Security
  • Network
  • Office
No Result
View All Result
AnonyViet - English Version
No Result
View All Result

iPhone messages don’t appear on Mac: Causes and how to fix

AnonyViet by AnonyViet
March 1, 2026
in Knowledge
0

iPhone messages don’t appear on Mac is a problem that causes headaches for many iOS 26 and macOS Tahoe users. This causes you to miss many important notifications while working on the computer. Don’t worry, the tips below will help you reconnect in no time.

📢 Join the channel Telegram belong to AnonyViet


👉 Go to Telegram AnonyViet

Update new articles, cool tools and IT tips fastest

Fix iPhone messages not appearing on Mac

To solve this problem, users need to sequentially perform the basic to advanced checking steps below to ensure the synchronization system operates correctly.

1. Check your account and network connection

The first thing to do is verify whether the devices are “seeing” each other through the account and internet connection.

Step 1: Enter Settings on iOS 26 and System Settings on macOS Tahoe, make sure your iPhone, iPad, and Mac are signed in to the same Apple Account. If different, sign out and sign back in with the main account.

Step 2: Connect all devices to the Internet. Both Messages in iCloud and Text Message Forwarding require a stable network. If you’re using a VPN, try turning it off.

Step 3: Restart the entire device to remove temporary system errors and help messages sync from the beginning.

Step 4: Update the software to the latest version if you are running early builds of the operating system.

2. Make sure forwarding is enabled

Messages only appear on your Mac if you’ve given them permission. Note that Text Message Forwarding is already built into Messages in iCloud, so there’s no need to turn on both. However, if you don’t use iCloud for messages, you must turn on manual forwarding.

For Messages in iCloud:

Step 1: On iPhone/iPad, go to Settings > [Tên bạn] > iCloud > Messages and turn on Use on this iPhone. Press Sync Now If the data is old.
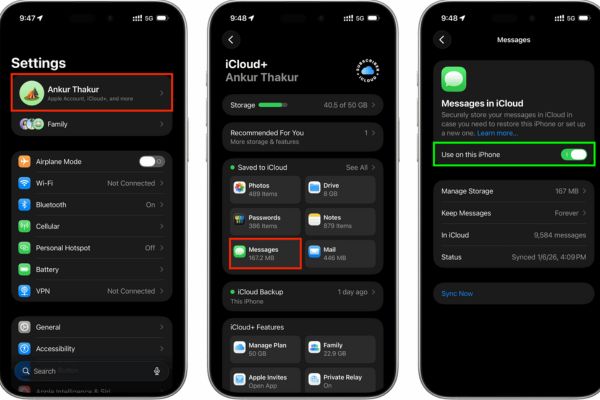
iPhone messages don’t appear on Mac: Causes and how to fix
Turn on Use on this iPhone

Step 2: On Mac, enter System Settings > [Tên bạn] > iCloud > Messages and turn on Use on this Mac. Press the button Sync Now if necessary.
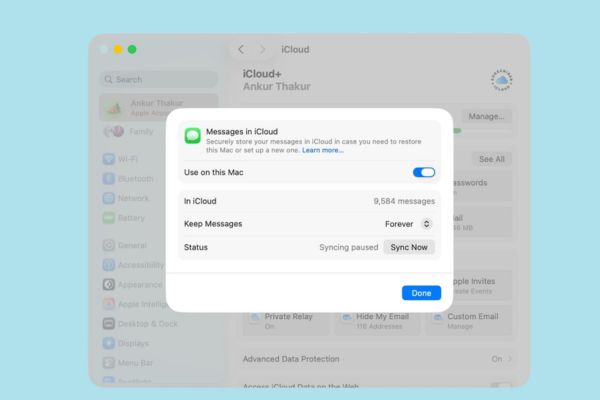
How to handle iPhone messages not appearing on Mac

For Text Message Forwarding (Manual):

Step 1: Open Settings on iPhone, select Apps at the bottom.

Step 2: Select Messages > Text Message Forwarding.

Step 3: Flip the switch ON for Mac or iPad want to receive news.

If device Mac does not appear in this list, please check the iMessage settings on that Mac to see if you are logged in to the correct account.
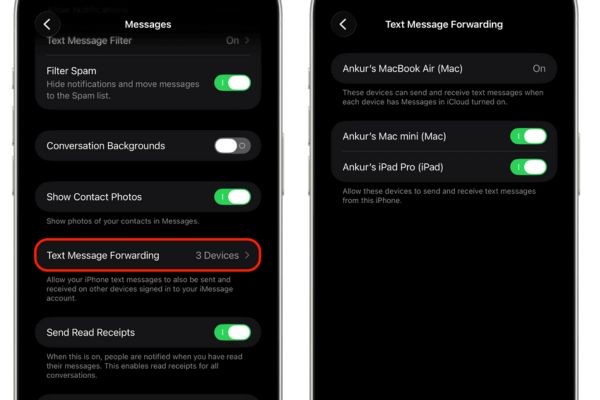
Go to Text Message Forwarding

3. Refresh iMessage connection

This is the most effective trick that has helped many users successfully fix errors when the above methods did not work. This procedure helps re-register the phone number with Apple servers.

Step 1: On iPhone, go to Settings > Apps > Messages > Send & Receive.
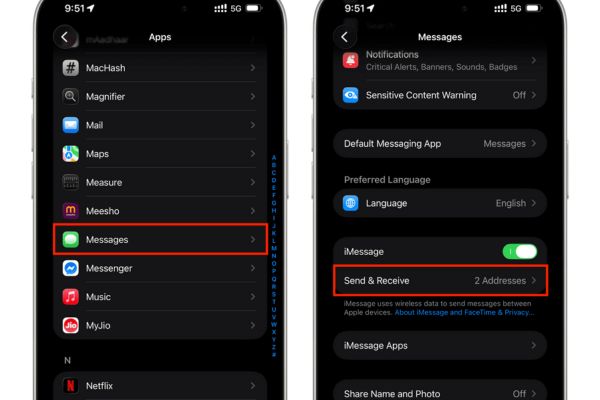
Go to Send & Receive

Step 2: Click on the currently selected phone number and select Remove to unsubscribe from iMessage. At the same time, uncheck the secondary emails, keeping only the main Apple Account email.
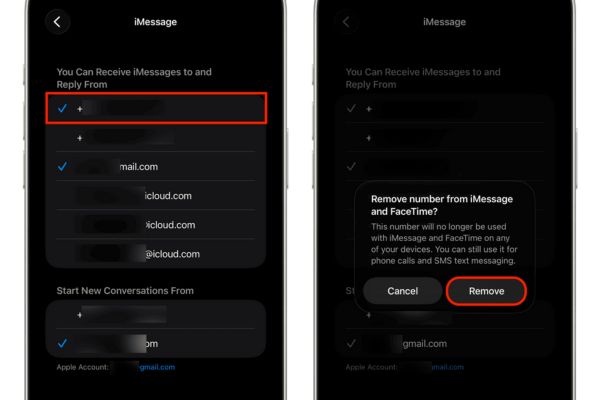
Select Remove to cancel registration

Step 3: Return to the previous screen, turn it off completely iMessage and wait about 30 seconds.
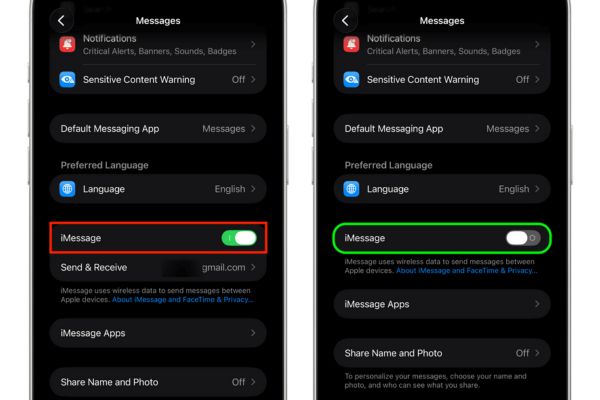
Turn off iMessage completely

At this time, the phone number will also automatically disappear from the Messages settings on Mac.
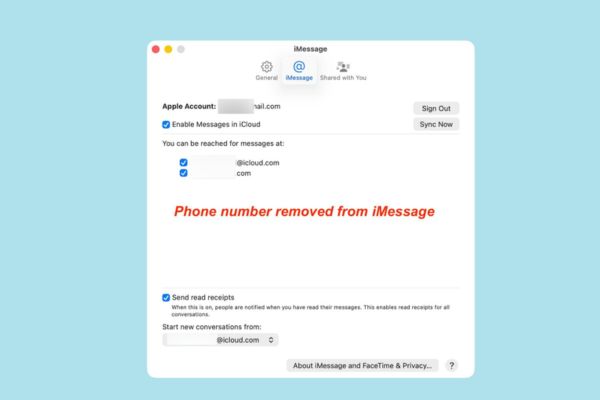
The phone number will also automatically disappear

Step 4: Turn it back on iMessage on iPhone. In the Send & Receive section, only email addresses are currently displayed.
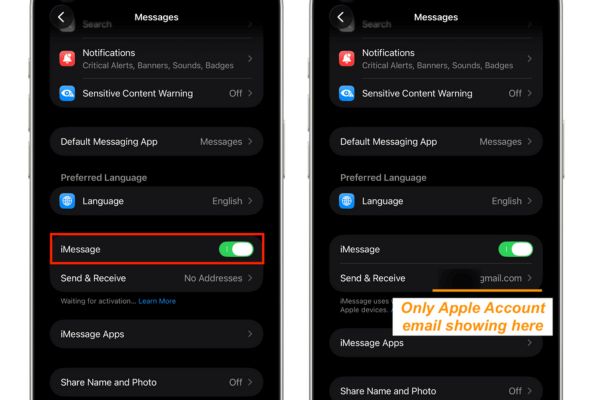
Turn iMessage back on

Step 5: Wait for notification”Device Added to Your Account” appears on Mac and iPad.

Notification "Device Added to Your Account" appear
The message “Device Added to Your Account” appears

Step 6: Go back to the section Send & Receive on iPhone, tap the phone number to re-register.
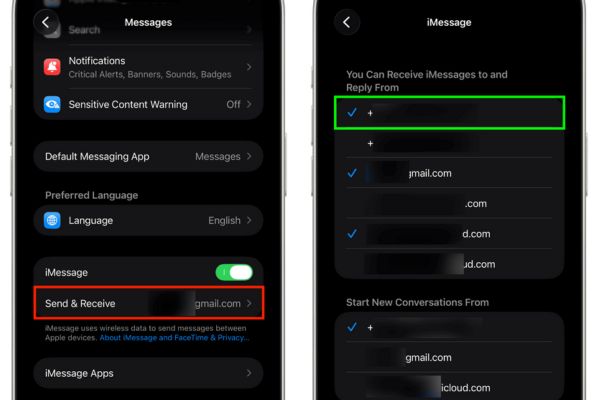
Go back to the Send & Receive section

Step 7: Check on Mac, make sure phone number and email are selected in the Settings section of the Messages app.

Once done, ask a loved one to try sending an SMS or RCS message. This message will appear simultaneously on both iPhone and Mac, allowing you to reply directly from your computer.
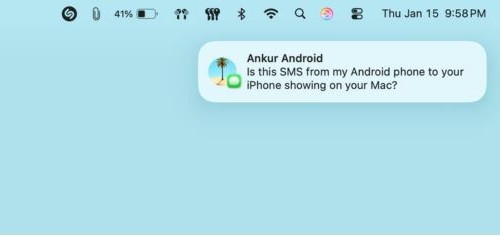
Ask a relative to try sending an SMS or RCS message.

4. Sign out of all devices

If all of the above steps still don’t solve the problem, try signing out of your Apple Account from all devices and signing in again. This resets the entire session and often fixes the most stubborn sync errors.

Conclusion

Thus, status iPhone messages don’t appear on Mac It can completely be fixed with a few simple installation steps. Don’t forget to check your network connection and Apple account regularly to avoid recurring errors. Wishing you success on iOS 26 and macOS Tahoe.

Tags: dontfixiPhoneMacmessages
Previous Post

How to block drive access on Windows 10

Next Post

Ứng dụng cầu nguyện của Iran bị hack, gửi thông điệp kêu gọi đầu hàng

AnonyViet

AnonyViet

Related Posts

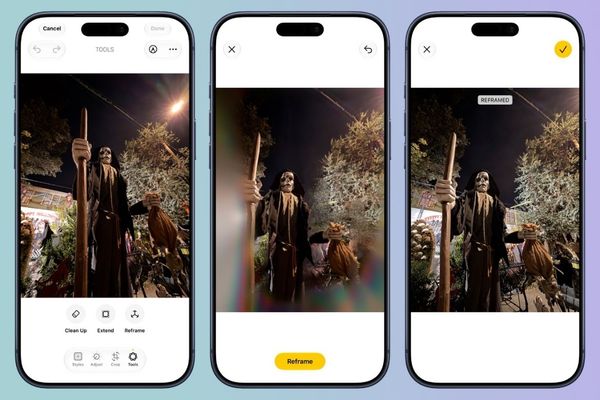
Super virtual way to change the photography angle using AI on iPhone
Knowledge

Super virtual way to change the photography angle using AI on iPhone

October 9, 2026
How to create Safari extension on iOS 27 and macOS 27
Knowledge

How to create Safari extension on iOS 27 and macOS 27

October 3, 2026
How to write the word Hoa Ki on Casio calculator
Knowledge

How to write the word Hoa Ki on Casio calculator

October 3, 2026
Instructions on how to increase the font size on Apple TV are extremely easy
Knowledge

Instructions on how to increase the font size on Apple TV are extremely easy

October 1, 2026
Instructions on how to turn off Write with Siri on iOS 27
Knowledge

Instructions on how to turn off Write with Siri on iOS 27

October 1, 2026
How to expand photos on iOS 27 with the latest Extend tool
Knowledge

How to expand photos on iOS 27 with the latest Extend tool

October 1, 2026
Next Post
Ứng dụng cầu nguyện của Iran bị hack, gửi thông điệp kêu gọi đầu hàng

Ứng dụng cầu nguyện của Iran bị hack, gửi thông điệp kêu gọi đầu hàng

0 0 votes
Article Rating
Subscribe
Login
Notify of
guest

guest

0 Comments
Oldest
Newest Most Voted

Recent News

15 cách tăng tốc Windows 10 nhanh như gió

15 cách tăng tốc Windows 10 nhanh như gió

October 14, 2026
Which social network accounts must be linked to VNeID before December 31, 2026?

Which social network accounts must be linked to VNeID before December 31, 2026?

October 14, 2026
How to create Guest mode Shortcuts for Chrome and Edge

How to create Guest mode Shortcuts for Chrome and Edge

October 13, 2026
Test what breed of dog you are through 10 multiple choice questions

Test what breed of dog you are through 10 multiple choice questions

October 13, 2026
15 cách tăng tốc Windows 10 nhanh như gió

15 cách tăng tốc Windows 10 nhanh như gió

October 14, 2026
Which social network accounts must be linked to VNeID before December 31, 2026?

Which social network accounts must be linked to VNeID before December 31, 2026?

October 14, 2026
How to create Guest mode Shortcuts for Chrome and Edge

How to create Guest mode Shortcuts for Chrome and Edge

October 13, 2026
AnonyViet - English Version

AnonyViet

AnonyViet is a website share knowledge that you have never learned in school!

We are ready to welcome your comments, as well as your articles sent to AnonyViet.

Follow Us

Contact:

Email: anonyviet.com[@]gmail.com

Main Website: https://anonyviet.com

Recent News

15 cách tăng tốc Windows 10 nhanh như gió

15 cách tăng tốc Windows 10 nhanh như gió

October 14, 2026
Which social network accounts must be linked to VNeID before December 31, 2026?

Which social network accounts must be linked to VNeID before December 31, 2026?

October 14, 2026
  • Home
  • Home 2
  • Home 3
  • Home 4
  • Home 5
  • Home 6
  • Next Dest Page
  • Sample Page

say88 tỷ lệ kèo nhà cái kèo nhà cái 5 febet

No Result
View All Result
  • Home
  • News
  • Software
  • Knowledge
  • MMO
  • Tips
  • Security
  • Network
  • Office

say88 tỷ lệ kèo nhà cái kèo nhà cái 5 febet

wpDiscuz
0
0
Would love your thoughts, please comment.x
()
x
| Reply