• Home
  • News
  • Software
  • Knowledge
  • MMO
  • Tips
  • Security
  • Network
  • Office
AnonyViet - English Version
  • Home
  • News
  • Software
  • Knowledge
  • MMO
  • Tips
  • Security
  • Network
  • Office
No Result
View All Result
  • Home
  • News
  • Software
  • Knowledge
  • MMO
  • Tips
  • Security
  • Network
  • Office
No Result
View All Result
AnonyViet - English Version
No Result
View All Result

5 settings to disable on Windows 11 to avoid being tracked

AnonyViet by AnonyViet
August 6, 2024
in Tips
0

Discover 5 settings to disable on Windows 11 to enhance gaming and productivity performance. Learn the simple steps to disable the settings and enjoy a smoother experience today!

Join the channel Telegram belong to AnonyViet 👉 Link 👈

How does Windows 11 track user data?

Windows 11 Like its predecessor, it continues to record a large amount of information from users. This process is largely silent and depends on user activity. Microsoft says that collecting this information helps the company better understand how customers interact with its products, with the aim of improving them.
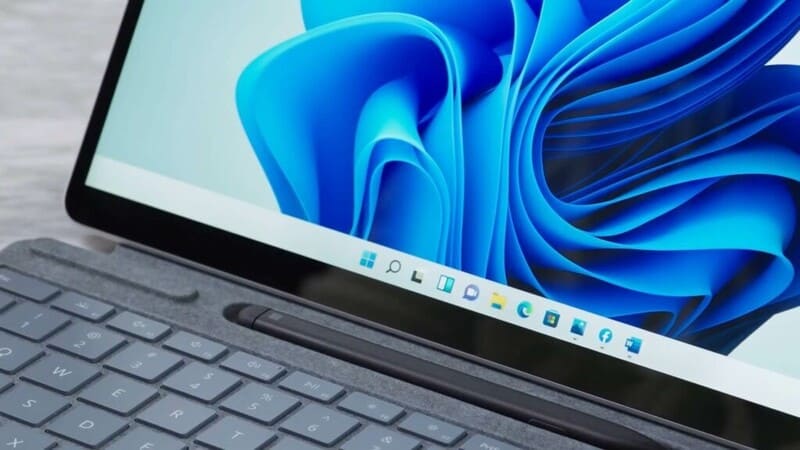
How does Windows 11 track user data?

Typically, Microsoft collects data such as location information, cookies, diagnostic feedback, and Microsoft Edge browser usage activity.

However, users can take some measures below to minimize this data collection and protect their privacy.

5 settings to disable on Windows

1. Turn off activity history

On Windows operating systems, the activity history feature allows you to track personal activities on your computer, including using applications, services, visiting websites or playing games, etc. This data is stored directly on your personal computer and if you log in with a Microsoft account and activate this feature, Windows will transfer that data to Microsoft.

Microsoft uses information from your activity history to provide you with personalized experiences and recommendations. Activity history includes items such as Voice, Search, Media, Location, Browse, Apps & Services. You can review, remove, or clear your activity history through Windows settings.

Step 1: You open Settings with the shortcut Windows + I.

Step 2: Select Privacy & security > Click on Activity History.
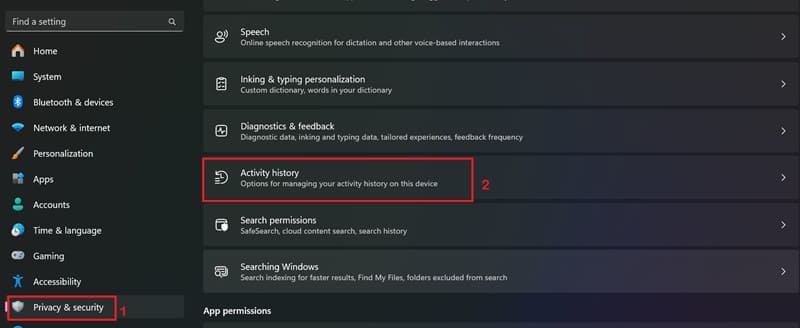
Click on the Activity History line

Step 3: Uncheck 'Store my activity history on this device'.
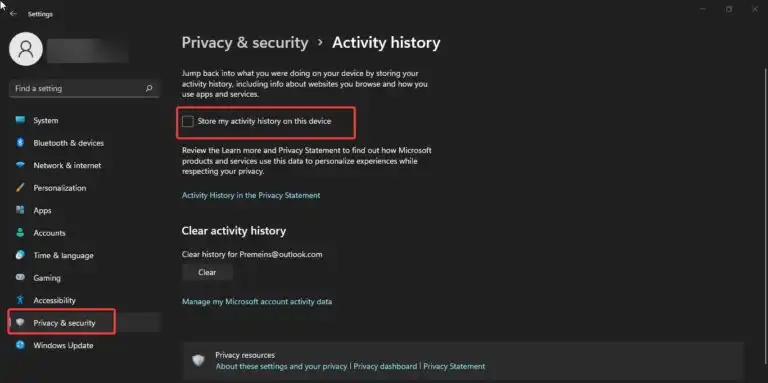
Uncheck 'Store my activity history on this device'.

This stops activity logging, and also limits Windows' ability to retain information about past activities on your device.

To clear your activity history, select the 'Clear' button in the Clear activity history section.

2. Turn off automatic collection of user data

Microsoft will silently collect data about your computer and your activities, so the data you use is no longer private. You can limit the data shared with Microsoft by doing the following:

Step 1: Go to Settings > Privacy & security > Diagnostics & feedback menu.
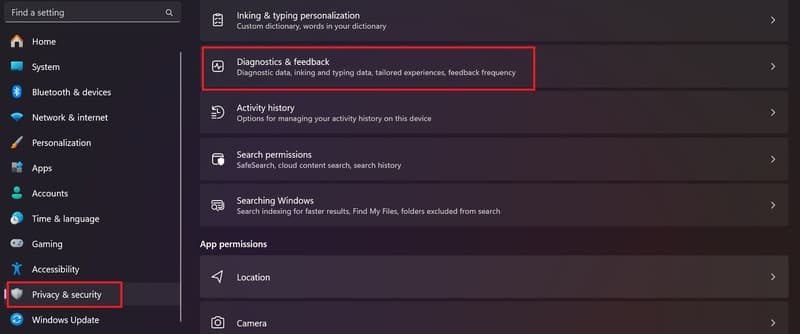
Go to Diagnostics & feedback

Step 2: Disable the 'Send optional diagnostic data' option.
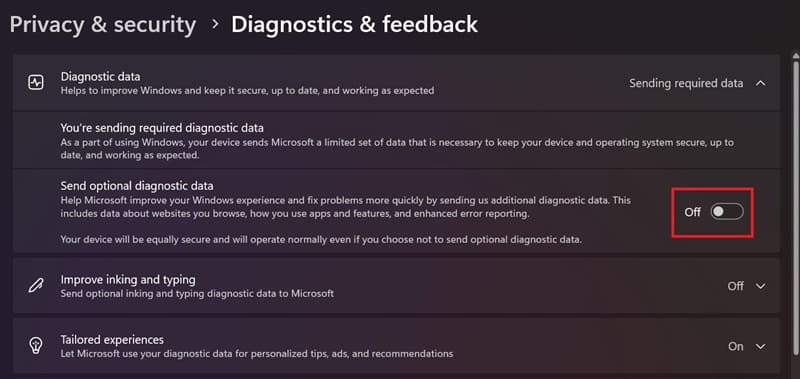
Disable the 'Send optional diagnostic data' option

Step 3: To delete the collected data, you need to select the Delete diagnostic data section and then press Delete.
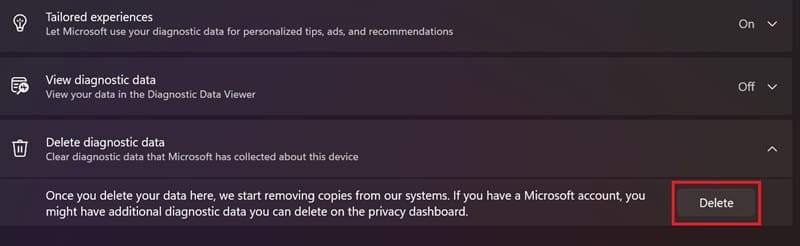
Press Delete
Press Delete

Are you annoyed by the many app ads appearing on the Windows 11 Start Menu? Here are the steps to help you turn them off:

Step 1: Go to Settings > Select Personalization > Select Start
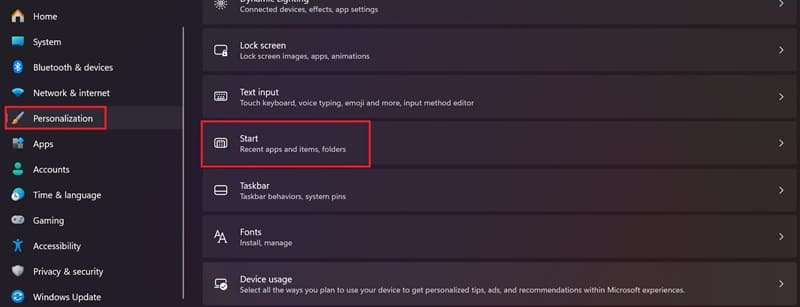
Turn off ads in Start Menu

Step 2: Disable the 'Show recommendations for tips…' line.
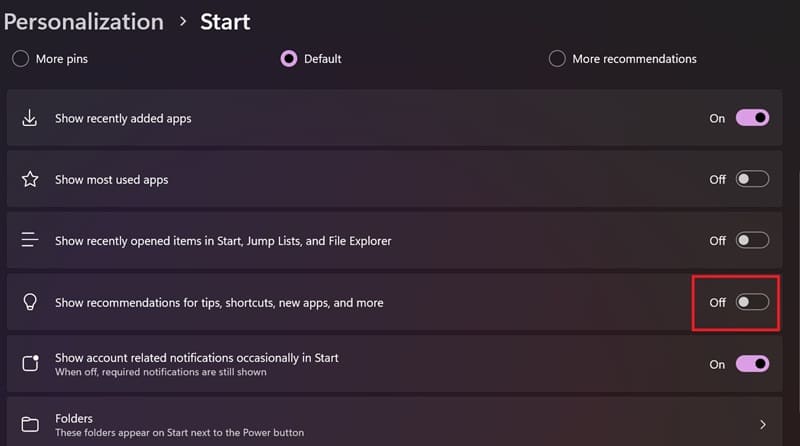
Disable the 'Show recommendations for tips…' line.

4. Turn off ad suggestions from third-party apps

Ad recommendations from third-party apps are one of the setting to disable on Windows 11. Here's how:
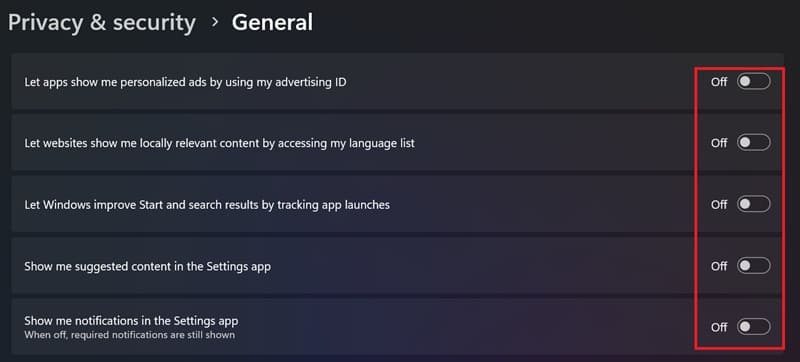
Step 1: Go to Settings > Select Privacy & security > Select General.
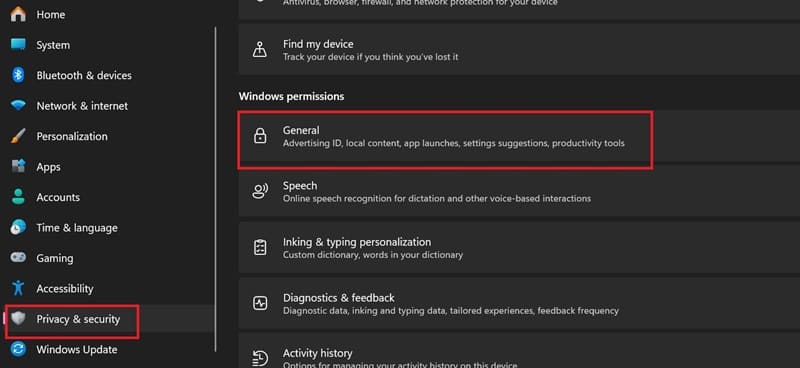
Turn off ad suggestions from third-party apps

Step 2: Turn off all the items here.

Turn off all the items here.

5. All third party services

Third-party applications often come with services that automatically run when Windows starts. Here's how you can disable unwanted third-party services:

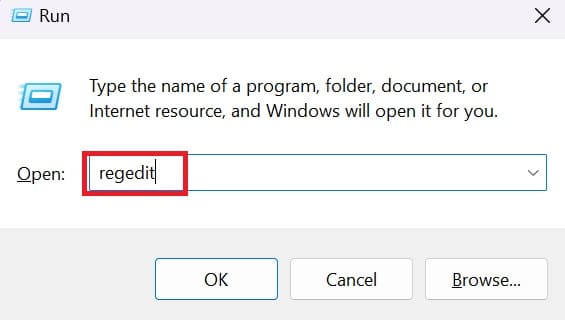
Step 1: Press the key combination Windows + R.

Step 2: Type msconfig > Press Enter.
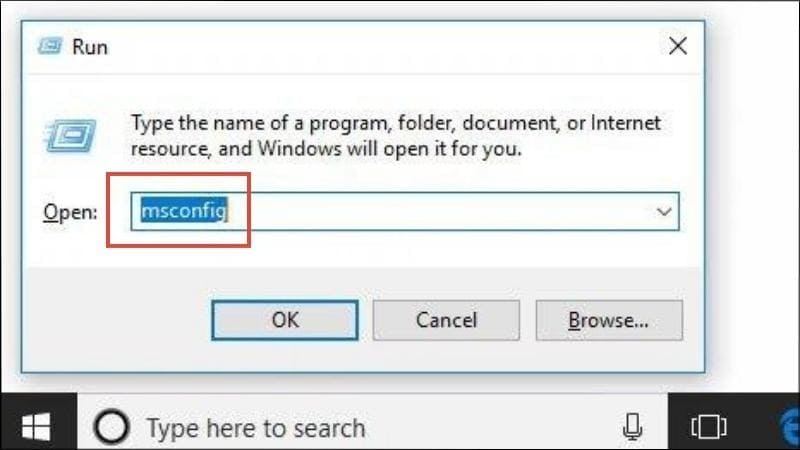
Type msconfig > Press Enter” width=”800″ height=”450″ srcset=”https://anonyviet.com/wp-content/uploads/2024/05/5-thiet-lap-can-tat-tren-windows-10.jpg 800w, https://anonyviet.com/wp-content/uploads/2024/05/5-thiet-lap-can-tat-tren-windows-10-300×169.jpg 300w, https://anonyviet.com/wp-content/uploads/2024/05/5-thiet-lap-can-tat-tren-windows-10-768×432.jpg 768w, https://anonyviet.com/wp-content/uploads/2024/05/5-thiet-lap-can-tat-tren-windows-10-750×422.jpg 750w” sizes=”(max-width: 800px) 100vw, 800px”/><figcaption id=Type msconfig > Press Enter

Step 3: Select the Services tab > Select Hide all Microsoft services > Select Disable all.
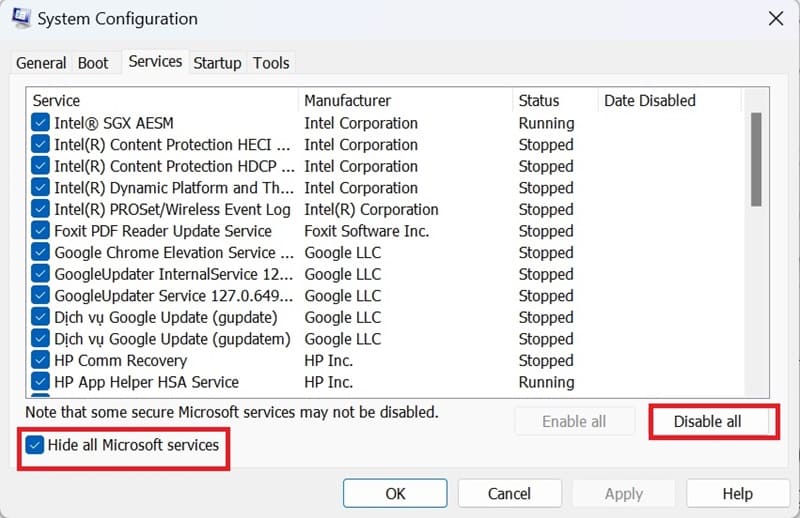
Select the setting to disable or click Disable All

Step 4: Click on the Apply box > Select OK to save the information > Wait a few seconds, the system will have a confirmation message > Select Restart.

Epilogue

Knowing those setting to disable on Windows 11 not only helps you improve your gaming performance but also helps your computer run more efficiently. Follow the steps outlined to ensure that you can enjoy hours of entertainment without being interrupted by technical issues. Good luck!

Tags: avoidDisableSettingstrackedWindows
Previous Post

[Lập Trình Game] Lesson 9: Create a MENU for a Game when programming with Godot

Next Post

How to keep NumLock key always on in Windows 11

AnonyViet

AnonyViet

Related Posts

Instructions on how to enter promotional codes on the App Store most accurately
Tips

Instructions on how to enter promotional codes on the App Store most accurately

October 18, 2026
How to open “This PC” instead of “Quick Access” in File Explorer by default
Tips

How to open “This PC” instead of “Quick Access” in File Explorer by default

October 17, 2026
How to create a virtual Pet, a virtual character running around on the Desktop to relax
Tips

How to create a virtual Pet, a virtual character running around on the Desktop to relax

October 15, 2026
15 cách tăng tốc Windows 10 nhanh như gió
Tips

15 cách tăng tốc Windows 10 nhanh như gió

October 14, 2026
How to create Guest mode Shortcuts for Chrome and Edge
Tips

How to create Guest mode Shortcuts for Chrome and Edge

October 13, 2026
Test what breed of dog you are through 10 multiple choice questions
Tips

Test what breed of dog you are through 10 multiple choice questions

October 13, 2026
Next Post
How to keep NumLock key always on in Windows 11

How to keep NumLock key always on in Windows 11

0 0 votes
Article Rating
Subscribe
Login
Notify of
guest

guest

0 Comments
Oldest
Newest Most Voted

Recent News

Instructions on how to enter promotional codes on the App Store most accurately

Instructions on how to enter promotional codes on the App Store most accurately

October 18, 2026
How to open “This PC” instead of “Quick Access” in File Explorer by default

How to open “This PC” instead of “Quick Access” in File Explorer by default

October 17, 2026
Instructions for receiving 3 months of MultCloud Premium for free with 200GB data

Instructions for receiving 3 months of MultCloud Premium for free with 200GB data

October 17, 2026
Instructions for receiving pension through VNeID without going to the ward

Instructions for receiving pension through VNeID without going to the ward

October 16, 2026
Instructions on how to enter promotional codes on the App Store most accurately

Instructions on how to enter promotional codes on the App Store most accurately

October 18, 2026
How to open “This PC” instead of “Quick Access” in File Explorer by default

How to open “This PC” instead of “Quick Access” in File Explorer by default

October 17, 2026
Instructions for receiving 3 months of MultCloud Premium for free with 200GB data

Instructions for receiving 3 months of MultCloud Premium for free with 200GB data

October 17, 2026
AnonyViet - English Version

AnonyViet

AnonyViet is a website share knowledge that you have never learned in school!

We are ready to welcome your comments, as well as your articles sent to AnonyViet.

Follow Us

Contact:

Email: anonyviet.com[@]gmail.com

Main Website: https://anonyviet.com

Recent News

Instructions on how to enter promotional codes on the App Store most accurately

Instructions on how to enter promotional codes on the App Store most accurately

October 18, 2026
How to open “This PC” instead of “Quick Access” in File Explorer by default

How to open “This PC” instead of “Quick Access” in File Explorer by default

October 17, 2026
  • Home
  • Home 2
  • Home 3
  • Home 4
  • Home 5
  • Home 6
  • Next Dest Page
  • Sample Page

say88 tỷ lệ kèo nhà cái kèo nhà cái 5 febet

No Result
View All Result
  • Home
  • News
  • Software
  • Knowledge
  • MMO
  • Tips
  • Security
  • Network
  • Office

say88 tỷ lệ kèo nhà cái kèo nhà cái 5 febet

wpDiscuz
0
0
Would love your thoughts, please comment.x
()
x
| Reply