As someone who likes to tinker with computers, many people often ask you to install Windows for them. Each person has their own preferences, some people like to use Windows 7, others like to use Windows 10. Your solution is to use WinSetupFromUSB to create a USB to install Windows with many integrated versions. This is convenient so that you can go to any computer and install Windows suitable for the user.
| Join the channel Telegram belong to AnonyViet 👉 Link 👈 |
To create a Windows installation USB, you need a high-capacity USB. AnonyViet recommends at least 8-32Gb if you want to integrate 3 or 4 versions of Windows into 1 USB. Then use the software WinSetupFromUSB to create USB boot.
WinSetupFromUSB is a bootable USB disk creation program that integrates many versions of Windows. You can use that USB to install Windows XP/Vista/7/8/10 or Windows Server without a disc. This means that 1 USB will have all Windows installers integrated into it. With the new version WinSetupFromUSB supports both Legacy and UEFI standards.
How to Create a Windows installation USB using WinSetupFromUSB
First, you need to prepare the Windows ISO file want to integrate download to computer. Afterward download WinSetupFromUSB Go to your computer and launch it. After unpacking, there will be 2 versions, 32bit and 64bit, you need to run the correct version suitable for Windows.
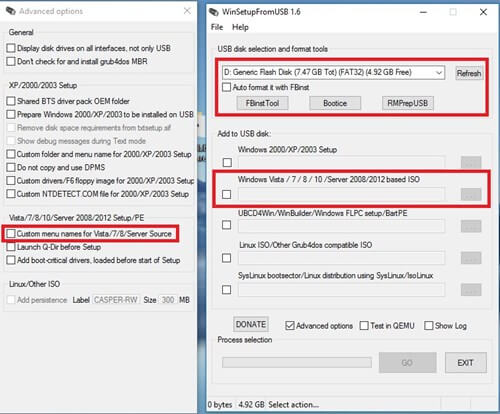
Now plug the USB into the computer and press the button Refresh Let the software recognize the USB. Next click Advanced Options. Check the box “Custom menu names for Vista/7/8/10/Server Source” so you can name the folder containing the Windows ISO file that needs to be integrated, and name the Boot Menu.
Next is to check in “Auto format it with Fbinst“ and choose format FAT32.
Now, you choose the first Windows version you want to integrate into the USB. Check “Windows Vista/7/8/10/Server 2008/2012 based ISO” click on (“…”) and select the ISO file (eg Windows 7)
Normally from Windows 7 and above, the ISO file will be larger than 4GB and cannot be copied to the USB FAT32 format, then you will receive a notification. split files. You just keep pressing OK.
Finally press the button Go to create the Windows-integrated USB Boot setup process. During the operation, you will receive 2 notificationsjust press OK to continue. When WinSetupFromUSB is Formatting the USB, there will be a message asking you to name the folder containing the ISO File and name the Boot Menu. You can set it yourself for easy management.
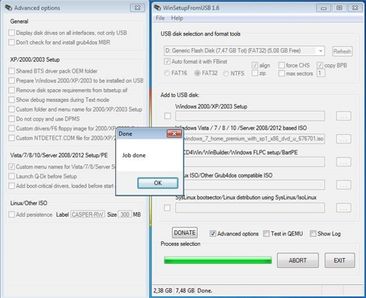
When completed, a notification will appear Job Done! So Completed setup of 1 version Windows to USB.
How to integrate multiple Windows onto USB using WinSetupFromUSB
According to the instructions above, you have integrated the first Windows installer onto the USB. To integrate other Windows (For example, Windows 10), follow the steps above, but be careful ARE NOT check in “Auto format it with Fbinst“.
It’s just a matter of changing places.”Windows Vista/7/8/10/Server 2008/2012 based ISO” click on (“…”) and select another Windows ISO file.
You can also integrate additional Linux installers such as: Ubuntu, Centos, Redhat, Kali Linux… by checking Linux IOS other Grub4Dos complatibe IOS and points to its ISO file.
How to fix stalled USB creation process
For some computers using Windows 10, the software will crash when creating a USB Boot. You can fix it as follows:
Method 1: Restart the computer and run WinSetupFromUSB again
Method 2: Download WinSetupFromUSB a slightly lower version and recreate a USB Boot to install Windows


![[Lập Trình Game] Lesson 7: Move between levels when completing tasks [Lập Trình Game] Lesson 7: Move between levels when completing tasks](https://anonyviet.com/wp-content/uploads/2020/03/image015xx.jpg)


