Những hướng dẫn này được thực hiện từ năm 2015 khi phiên bản Windows 10 đầu tiên ra mắt. Công bằng mà nói, Microsoft đã quyết định đá đít những người dùng thích vọc vạch và cả những người muốn bảo vệ quyền riêng tư trên Windows 10. Nhưng vì thích hệ điều hành này nên mình đã kiên trì và cố gắng hết sức để những hướng dẫn này vẫn có thể thực hiện được trong các bản cập nhật tiếp theo.
| Tham gia kênh Telegram của AnonyViet 👉 Link 👈 |
Việc phát hành bản cập nhật 1903, đã phá vỡ rất nhiều thứ trên máy tính của mình và tôi không thể chịu đựng được nữa. Mình xin lỗi vì đã làm các bạn thất vọng nhưng Windows ngày nay không còn ổn định như Linux. Tôi không thể làm việc hiểu quả nếu Windows tiếp tục bị lỗi sau mỗi bản cập nhật (máy mình bị dính lỗi Wifi rất khó chịu luôn).
Giới thiệu cách bảo vệ quyền riêng tư
Windows 10 có một số lo ngại về quyền riêng tư do nó có rất nhiều tính năng từ xa và online. Đáp lại những lo ngại này, Microsoft đã phát hành một tài liệu giải thích chính xác dữ liệu mà họ thu thập được. Thậm chí, Windows 10 còn có Trình chẩn đoán lỗi. Hầu hết mọi thứ có vẻ khá hợp lý khi các tính năng từ xa được đặt thành cơ bản. Tuy nhiên, đây là cách ngăn Windows 10 gửi dữ liệu của bạn đến Microsoft.
Quan trọng: Quy trình này không thể hoàn thiện mà không cần cài đặt lại Windows. Không làm theo hướng dẫn nếu:
- Bạn không phải là người dùng có kinh nghiệm
- Bạn cần sử dụng tài khoản Microsoft vì bất kỳ lí do gì
- Bạn cần tải xuống mọi thứ từ Windows Store (bao gồm các bản phân phối Linux nếu bạn muốn sử dụng nó)
- Bạn cần thêm/xoá tài khoản người dùng trong PC (tài khoản mới sẽ không hoạt động chính xác.
Những hành động của bạn sẽ là bằng chứng trước toà, tôi sẽ không chịu trách nhiệm cho bất kỳ vụ mất dữ liệu hoặc thiệt hại có thể xảy ra.
Bắt đâu thôi!!!
Không sử dụng các cài đặt mặc định
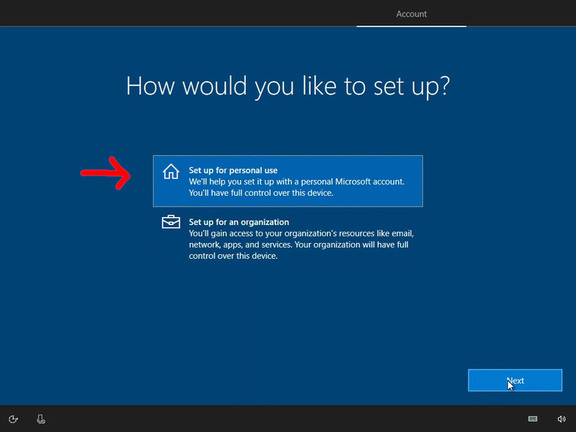
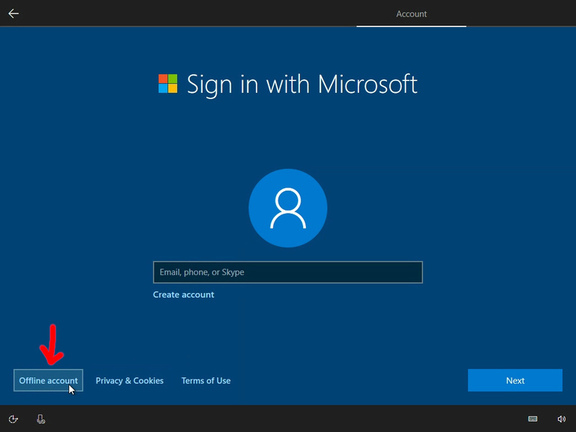
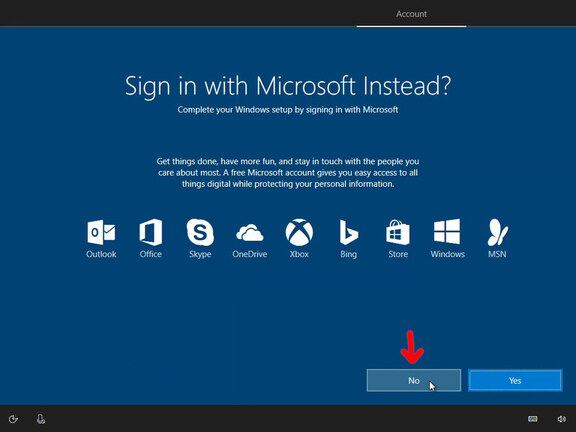
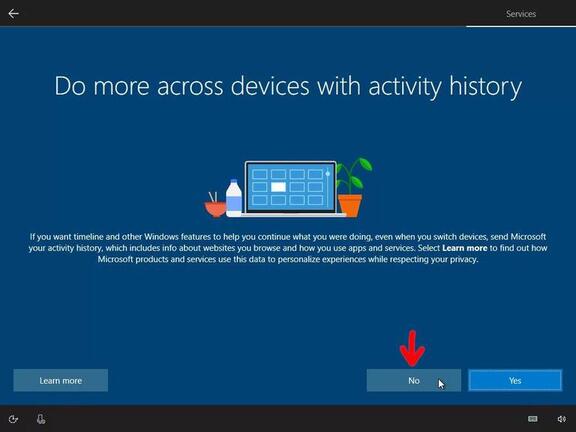
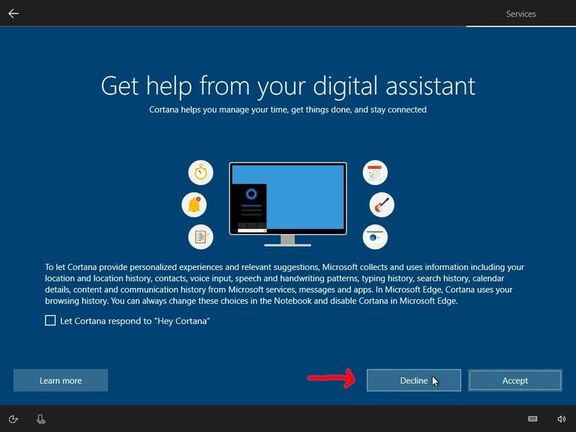
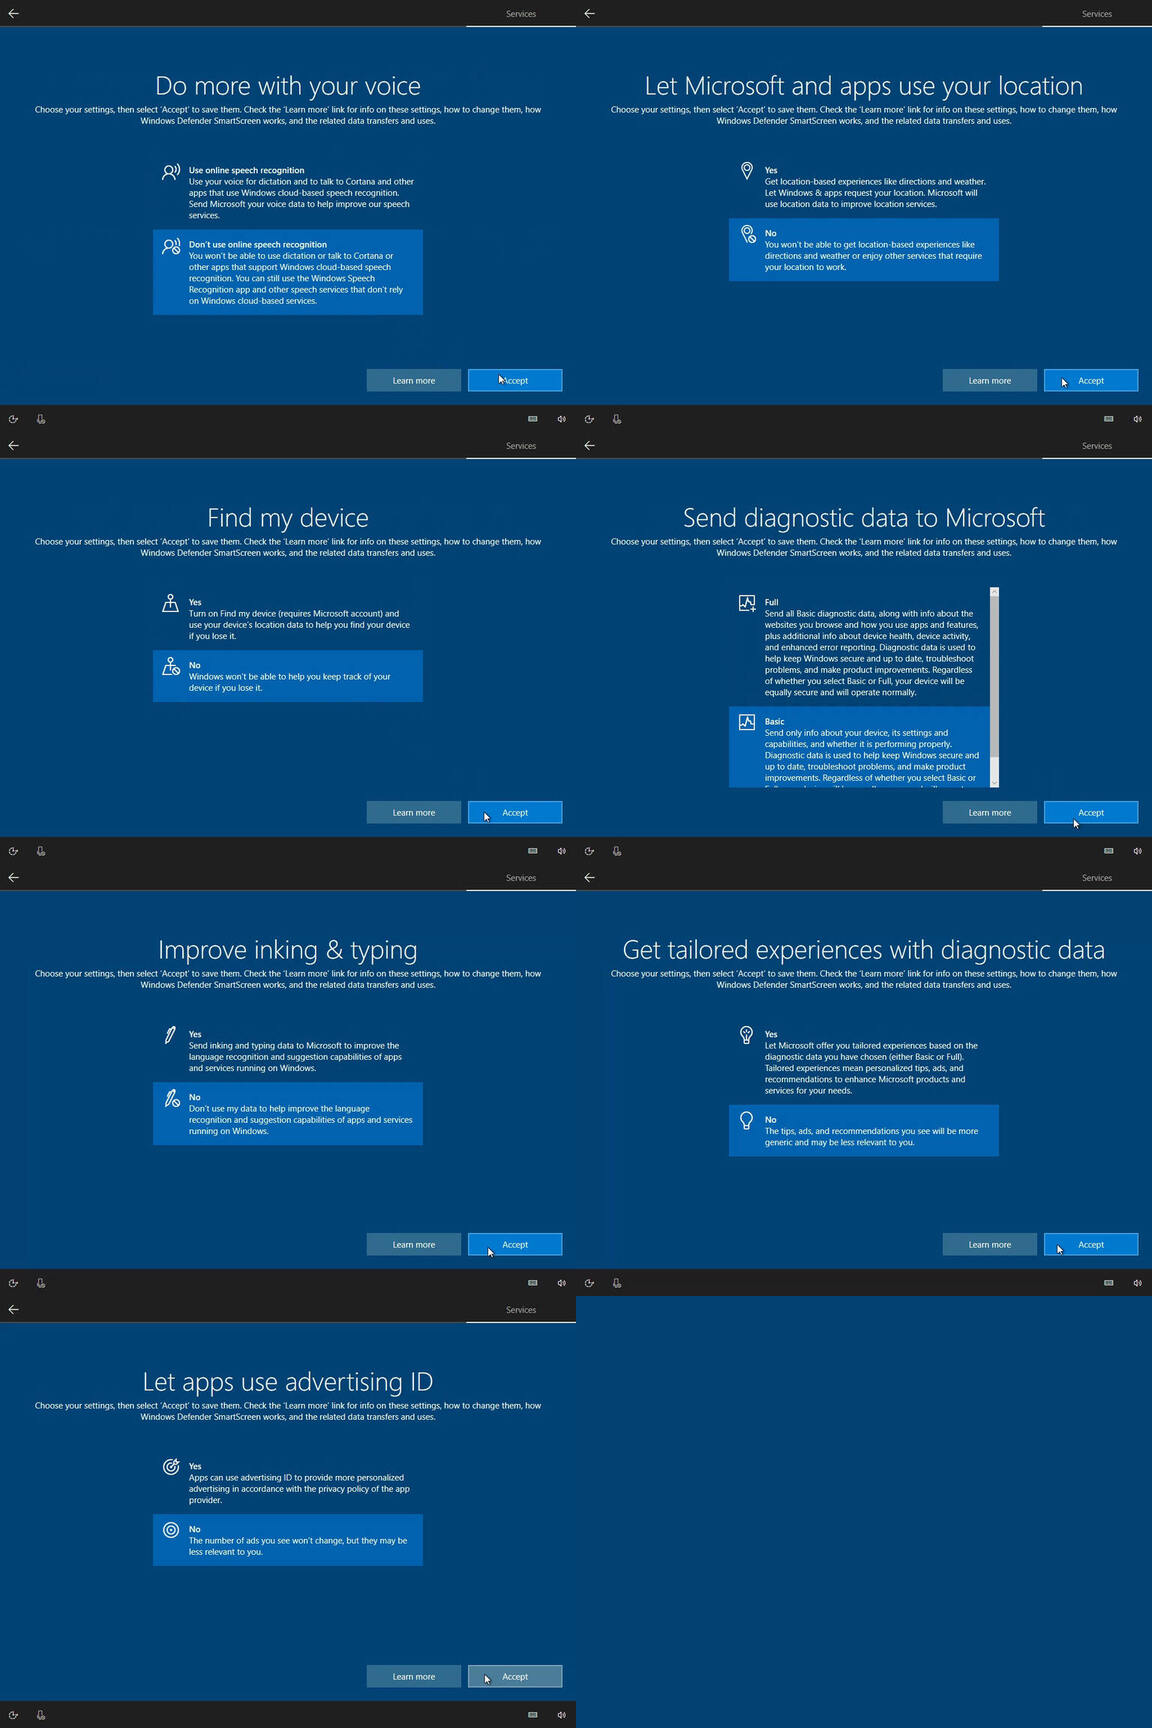
Khi cài đặt xong Windows, hãy tạo một tài khoản cục bộ (Local User), không sử dụng Cortana và tắt mọi thứ trong cài đặt quyền riêng tư. Những chuyện này sẽ giúp bạn bảo mật dữ liệu của mình tốt hơn.
Nếu bạn đã cài đặt Windows với các cài đặt mặc định, hãy đi đến Start > Settings > Privacy để tắt chúng. Bạn cũng nên truy cập vào Account và ngắt kết nối tài khoản Micrsoft của mình vì hướng dẫn này sẽ ngăn tài khoản đó hoạt động bình thường.
Tải xuống tất cả các bản cập nhật
Khi bạn truy cập vào PC, vào Settings > Updates and Sercurity để nó tải xuống các bản cập nhật. Khởi động lại và lặp lại quá trình này cho đến khi không còn thứ gì để cập nhật cả. Điều này rất quan trọng vì Windows Update có thể can thiệp vào các hoạt động của bạn.
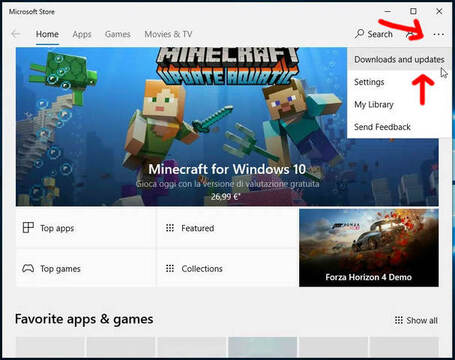
Bây giờ hãy mở Store lên và download các bản cập nhật. Một lần nữa, chuyện này rất quan trọng vì việc cập nhật sẽ can thiệp vào các hoạt động của bạn. Nó có thể mất thời gian một chút đấy.
Bây giờ hệ thống của bạn đã được cập nhật đầy đủ, hãy đảm bảo Windows đã kích hoạt bản quyền (hoặc KMSPico).
Xoá mọi thứ bạn có thể
Mở Start menu và gỡ cài đặt tất cả các ứng dụng. Một số ứng dụng như Microsoft Edge sẽ không có tuỳ chọn gỡ cài đặt. Đừng lo, mình sẽ loại bỏ nó sau. Điều quan trọng bây giờ là gỡ cài đặt tất cả các phần mềm OEM và các trò chơi như Candy Crush và Minecraft (riêng mình thì sẽ giữ lại cái này),
Nếu bạn đã sử dụng các phiên bản Windows 10 trước đó, bạn sẽ nhận thấy rằng lần này chúng ta có thể xoá nhiều thứ hơn, như Paint 3D, mà không cần dùng đến các thủ thuật hay phần mềm thứ 3.
Công cụ bên thứ 3
Đây là những gì anh em cần:
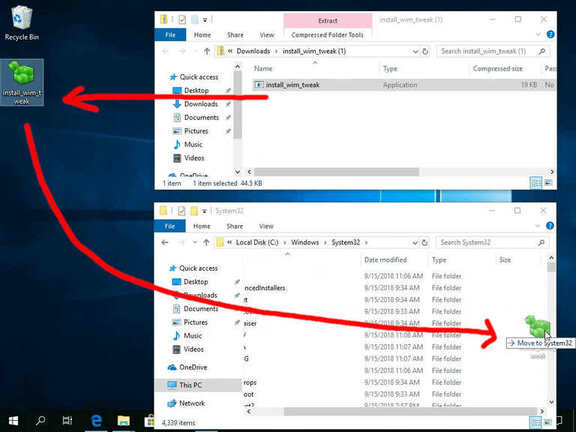
- Install_Wim_Tweak: Tải xuống ở đây và giải nén nó ra. Sau đó copy sang C:\Windows\System32. Đây là công cụ rất tiện dụng cho phép bạn loại bỏ các thành phần độc hại Windows bằng một tệp lệnh duy nhất. Bạn có thể xoá nó khỏi System32 khi bạn hoàn thành xong hướng dẫn.
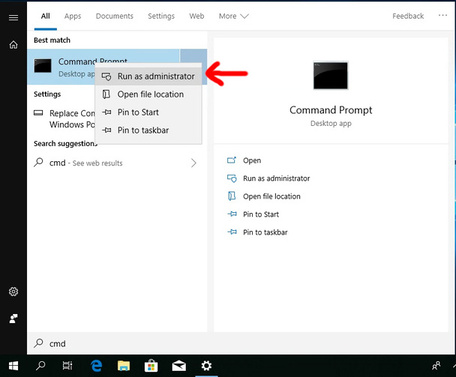
Mình cần sử dụng CMD. Hãy nhấn vào Start, nhập cmd và nhấn chuột phải để chạy nó với quyền Administrator.
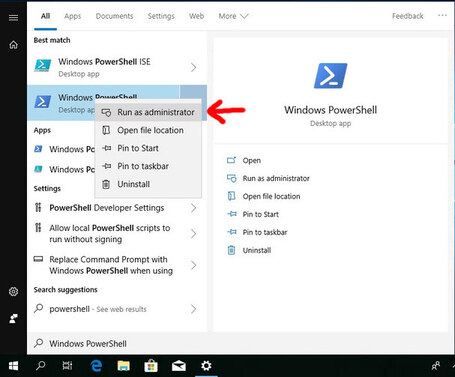
Mình cũng sẽ cần PowerShell, bạn làm giống bước trên nha.
Gỡ bỏ Windows Defender
Trong cmd, nhập:
reg add "HKLM\SOFTWARE\Microsoft\Windows\CurrentVersion\Explorer" /v SmartScreenEnabled /t REG_SZ /d "Off" /f
reg add "HKCU\Software\Microsoft\Windows\CurrentVersion\AppHost" /v "EnableWebContentEvaluation" /t REG_DWORD /d "0" /f
reg add "HKCU\Software\Classes\Local Settings\Software\Microsoft\Windows\CurrentVersion\AppContainer\Storage\microsoft.microsoftedge_8wekyb3d8bbwe\MicrosoftEdge\PhishingFilter" /v "EnabledV9" /t REG_DWORD /d "0" /f
reg add "HKLM\SOFTWARE\Policies\Microsoft\Windows Defender" /v DisableAntiSpyware /t REG_DWORD /d 1 /f
reg add "HKLM\SOFTWARE\Policies\Microsoft\Windows Defender\Spynet" /v SpyNetReporting /t REG_DWORD /d 0 /f
reg add "HKLM\SOFTWARE\Policies\Microsoft\Windows Defender\Spynet" /v SubmitSamplesConsent /t REG_DWORD /d 2 /f
reg add "HKLM\SOFTWARE\Policies\Microsoft\Windows Defender\Spynet" /v DontReportInfectionInformation /t REG_DWORD /d 1 /f
reg delete "HKLM\SYSTEM\CurrentControlSet\Services\Sense" /f
reg add "HKLM\SOFTWARE\Policies\Microsoft\MRT" /v "DontReportInfectionInformation" /t REG_DWORD /d 1 /f
reg add "HKLM\SOFTWARE\Policies\Microsoft\MRT" /v "DontOfferThroughWUAU" /t REG_DWORD /d 1 /f
reg delete "HKLM\SOFTWARE\Microsoft\Windows\CurrentVersion\Run" /v "SecurityHealth" /f
reg delete "HKLM\SOFTWARE\Microsoft\Windows\CurrentVersion\Explorer\StartupApproved\Run" /v "SecurityHealth" /f
reg add "HKLM\SOFTWARE\Microsoft\Windows NT\CurrentVersion\Image File Execution Options\SecHealthUI.exe" /v Debugger /t REG_SZ /d "%windir%\System32\taskkill.exe" /f
install_wim_tweak /o /c Windows-Defender /r
reg add "HKCU\Software\Microsoft\Windows\CurrentVersion\Notifications\Settings\Windows.SystemToast.SecurityAndMaintenance" /v "Enabled" /t REG_DWORD /d 0 /f
reg delete "HKLM\SYSTEM\CurrentControlSet\Services\SecurityHealthService" /f
Việc này sẽ mất khoảng 1-2 phút. Kể từ tháng 6 năm 2018, biểu tượng Windows Security trong Start menu không thể bị xoá. Nếu Windows thông báo về việc hệ thống không được bảo vệ, hãy nhấp chuột phải vào thông báo và ẩn nó đi.
Hoặc sử dụng các phần mềm diệt virus khác tại đây.
Xoá các tính năng
Bây giờ anh em sẽ xoá gần như tất cả các tính năng UWP trong Windows. Ứng dụng UWP duy nhất còn lại sẽ là ứng dụng cài đặt. Nếu bạn cài đặt thủ công các ứng dụng UWP sau này (như các trò chơi UWP bị crack), chúng có thể không hoạt động chính xác. Chưa kể các bản crack còn kèm theo những món quà nữa. Chúng ta đang bảo vệ quyền riêng tư của mình mà, đúng chứ?
Lưu ý: Nếu một số ứng dụng xuất hiện lại sau vài phút, đó là vì bạn đã không đợi các bản cập nhật kết thúc. Bạn có thể chỉ cần loại bỏ chúng một lần nữa bằng cách sử dụng các lệnh tương tự.
Mình sẽ sử dụng cmd và PowerShell để xoá mọi thứ có thể. Các lệnh màu xanh lá cây là cmd; những cái màu xanh là dành cho PowerShell.
Windows Store
Get-AppxPackage -AllUsers *store* | Remove-AppxPackage
Cứ mặc kệ mấy cái lỗi hiện lên, đừng quan tâm nó.
install_wim_tweak /o /c Microsoft-Windows-ContentDeliveryManager /r
install_wim_tweak /o /c Microsoft-Windows-Store /r
reg add "HKLM\Software\Policies\Microsoft\WindowsStore" /v RemoveWindowsStore /t REG_DWORD /d 1 /f
reg add "HKLM\Software\Policies\Microsoft\WindowsStore" /v DisableStoreApps /t REG_DWORD /d 1 /f
reg add "HKCU\Software\Microsoft\Windows\CurrentVersion\AppHost" /v "EnableWebContentEvaluation" /t REG_DWORD /d 0 /f
reg add "HKLM\SOFTWARE\Policies\Microsoft\PushToInstall" /v DisablePushToInstall /t REG_DWORD /d 1 /f
reg add "HKCU\Software\Microsoft\Windows\CurrentVersion\ContentDeliveryManager" /v SilentInstalledAppsEnabled /t REG_DWORD /d 0 /f
sc delete PushToInstall
Music, TV,…
Get-AppxPackage -AllUsers *zune* | Remove-AppxPackage
Get-WindowsPackage -Online | Where PackageName -like *MediaPlayer* | Remove-WindowsPackage -Online -NoRestart
Thay thế bằng: MPC-HC, VLC, MPV
XBOX và Game DVR
Get-AppxPackage -AllUsers *xbox* | Remove-AppxPackage
Kệ tía mấy cái lỗi
sc delete XblAuthManager
sc delete XblGameSave
sc delete XboxNetApiSvc
sc delete XboxGipSvc
reg delete "HKLM\SYSTEM\CurrentControlSet\Services\xbgm" /f
schtasks /Change /TN "Microsoft\XblGameSave\XblGameSaveTask" /disable
schtasks /Change /TN "Microsoft\XblGameSave\XblGameSaveTaskLogon" /disable
reg add "HKLM\SOFTWARE\Policies\Microsoft\Windows\GameDVR" /v AllowGameDVR /t REG_DWORD /d 0 /f
Ngoài ra, vào Start > Settings > Gaming và tắt hết mọi thứ đi.
Sticky Notes
Get-AppxPackage -AllUsers *sticky* | Remove-AppxPackage
Thay thế bằng: Notebot
Map
Get-AppxPackage -AllUsers *maps* | Remove-AppxPackage
sc delete MapsBroker
sc delete lfsvc
schtasks /Change /TN “\Microsoft\Windows\Maps\MapsUpdateTask” /disable
schtasks /Change /TN “\Microsoft\Windows\Maps\MapsToastTask” /disable
Alarms và Clock
Get-AppxPackage -AllUsers *alarms* | Remove-AppxPackage
Get-AppxPackage -AllUsers *people* | Remove-AppxPackage
Mail, Calendar,…
Get-AppxPackage -AllUsers *comm* | Remove-AppxPackage
Get-AppxPackage -AllUsers *mess* | Remove-AppxPackage
Thay thế: Thunderbird
OneNote
Get-AppxPackage -AllUsers *onenote* | Remove-AppxPackage
Photos
Get-AppxPackage -AllUsers *photo* | Remove-AppxPackage
Thay thế: JPEGView, hoặc Windows Photo Viewer
Camera
Get-AppxPackage -AllUsers *camera* | Remove-AppxPackage
Weather, News, …
Get-AppxPackage -AllUsers *bing* | Remove-AppxPackage
Calculator
Get-AppxPackage -AllUsers *calc* | Remove-AppxPackage
Thay thế: SpeedCrunch
Sound Recorder
Get-AppxPackage -AllUsers *soundrec* | Remove-AppxPackage
Thay thế: Audacity
Microsoft Edge
Từ bản cập nhật May 2019, Edge không thể gỡ bỏ hoàn toàn mà không làm hỏng Windows Update. Chúng ta có thể vô hiệu hoá nó, nhưng icon của Edge vẫn nằm ở Start menu.
Chuột phải vào icon Edge trên taskbar và bỏ ghim nó.
taskkill /F /IM browser_broker.exe
taskkill /F /IM RuntimeBroker.exe
taskkill /F /IM MicrosoftEdge.exe
taskkill /F /IM MicrosoftEdgeCP.exe
taskkill /F /IM MicrosoftEdgeSH.exe
mv C:\Windows\SystemApps\Microsoft.MicrosoftEdge_8wekyb3d8bbwe C:\Windows\SystemApps\Microsoft.MicrosoftEdge_8wekyb3d8bbwe_BAK
reg add "HKLM\SOFTWARE\Microsoft\Windows NT\CurrentVersion\Image File Execution Options\MicrosoftEdge.exe" /v Debugger /t REG_SZ /d "%windir%\System32\taskkill.exe" /f
Get-WindowsPackage -Online | Where PackageName -like *InternetExplorer* | Remove-WindowsPackage -Online -NoRestart
Thay thế: Firefox, Chrome, Brave
Contact Support, Get Help
install_wim_tweak /o /c Microsoft-Windows-ContactSupport /r
Get-AppxPackage -AllUsers *GetHelp* | Remove-AppxPackage
Ngoài ra, đi tới Start > Settings > Apps > Manage optional features, và xoá Contact Support (nếu có).
Microsoft Quick Assist
Get-WindowsPackage -Online | Where PackageName -like *QuickAssist* | Remove-WindowsPackage -Online -NoRestart
Connect
install_wim_tweak /o /c Microsoft-PPIProjection-Package /r
Your Phone
Get-AppxPackage -AllUsers *phone* | Remove-AppxPackage
Hello Face
Get-WindowsPackage -Online | Where PackageName -like *Hello-Face* | Remove-WindowsPackage -Online -NoRestart
schtasks /Change /TN “\Microsoft\Windows\HelloFace\FODCleanupTask” /Disable
3D Paint / 3D Print
Hiện tại bạn có thể xoá 3D Paint và 3D Print, nhưng tuỳ chọn này không có sẵn. Để xoá chúng, chạy lệnh trong cmd:
for /f "tokens=1* delims=" %I in (' reg query "HKEY_CLASSES_ROOT\SystemFileAssociations" /s /k /f "3D Edit" ^| find /i "3D Edit" ') do (reg delete "%I" /f )
for /f "tokens=1* delims=" %I in (' reg query "HKEY_CLASSES_ROOT\SystemFileAssociations" /s /k /f "3D Print" ^| find /i "3D Print" ') do (reg delete "%I" /f )
System Restore
Disable-ComputerRestore -Drive "C:\"
vssadmin delete shadows /all /Quiet
reg add "HKLM\SOFTWARE\Policies\Microsoft\Windows NT\SystemRestore" /v "DisableConfig" /t "REG_DWORD" /d "1" /f
reg add "HKLM\SOFTWARE\Policies\Microsoft\Windows NT\SystemRestore" /v "DisableSR " /t "REG_DWORD" /d "1" /f
reg add "HKLM\SOFTWARE\Microsoft\Windows NT\CurrentVersion\SystemRestore" /v "DisableConfig" /t "REG_DWORD" /d "1" /f
reg add "HKLM\SOFTWARE\Microsoft\Windows NT\CurrentVersion\SystemRestore" /v "DisableSR " /t "REG_DWORD" /d "1" /f
schtasks /Change /TN "\Microsoft\Windows\SystemRestore\SR" /disable
Reboot!
Khởi động lại hệ thống và giờ bạn không còn UWP nữa rồi.
Tắt Cortana
Với bản cập nhật Anniversary, Microsoft đã ẩn tuỳ chọn tắt Cortana.
Cảnh báo: Không tìm cách xoá Cortana bằng install_wim_tweak hoặc PowerShell, vì nó sẽ phá vỡ Windows Search và bạn sẽ phải cài đặt lại Windows!
Mở command prompt và nhập lệnh:
reg add "HKLM\SOFTWARE\Policies\Microsoft\Windows\Windows Search" /v AllowCortana /t REG_DWORD /d 0 /f
reg add "HKLM\SYSTEM\CurrentControlSet\Services\SharedAccess\Parameters\FirewallPolicy\FirewallRules" /v "{2765E0F4-2918-4A46-B9C9-43CDD8FCBA2B}" /t REG_SZ /d "BlockCortana|Action=Block|Active=TRUE|Dir=Out|App=C:\windows\systemapps\microsoft.windows.cortana_cw5n1h2txyewy\searchui.exe|Name=Search and Cortana application|AppPkgId=S-1-15-2-1861897761-1695161497-2927542615-642690995-327840285-2659745135-2630312742|" /f
reg add "HKLM\SOFTWARE\Microsoft\Windows\CurrentVersion\Search" /v BingSearchEnabled /t REG_DWORD /d 0 /f
Khởi động lại lần nữa và Cortana đã biến mất. Biểu tượng vẫn còn đó, nhưng Windows sẽ sử dụng tìm kiếm thông thường.
Lưu ý: Windows có thể báo rằng Indexing không chạy, nhưng nó sẽ bắt đầu chạy lại sau vài phút thôi.
Tắt các tính năng không sử dụng
Mở cmd và nhập các lệnh sau
Tắt Windows Error Reporting
reg add "HKLM\SOFTWARE\Policies\Microsoft\Windows\Windows Error Reporting" /v Disabled /t REG_DWORD /d 1 /f
reg add "HKLM\SOFTWARE\Microsoft\Windows\Windows Error Reporting" /v Disabled /t REG_DWORD /d 1 /f
Tắt tự động Updates
Bạn vẫn sẽ nhận được thông báo khi có bản cập nhật và quyết định khi nào sẽ cài đặt chúng
reg add "HKLM\SOFTWARE\Policies\Microsoft\Windows\WindowsUpdate\AU" /v NoAutoUpdate /t REG_DWORD /d 0 /f
reg add "HKLM\SOFTWARE\Policies\Microsoft\Windows\WindowsUpdate\AU" /v AUOptions /t REG_DWORD /d 2 /f
reg add "HKLM\SOFTWARE\Policies\Microsoft\Windows\WindowsUpdate\AU" /v ScheduledInstallDay /t REG_DWORD /d 0 /f
reg add "HKLM\SOFTWARE\Policies\Microsoft\Windows\WindowsUpdate\AU" /v ScheduledInstallTime /t REG_DWORD /d 3 /f
Tắt kiểm tra bản quyền Windows
Theo mặc định, Windows sẽ kiểm tra giấy phép của bạn mỗi khi bạn bật PC, lệnh này sẽ ngăn điều đó
reg add "HKLM\Software\Policies\Microsoft\Windows NT\CurrentVersion\Software Protection Platform" /v NoGenTicket /t REG_DWORD /d 1 /f
Vô hiệu hoá sync
Nó không thực sự ảnh hưởng đến việc bảo vệ dữ liệu, nếu bạn không sử dụng tài khoản Microsoft, nhưng ít nhất nó sẽ vô hiệu hoá cài đặt Sync từ Settings.
reg add "HKLM\Software\Policies\Microsoft\Windows\SettingSync" /v DisableSettingSync /t REG_DWORD /d 2 /f
reg add "HKLM\Software\Policies\Microsoft\Windows\SettingSync" /v DisableSettingSyncUserOverride /t REG_DWORD /d 1 /f
Tắt Windows Tips
reg add "HKLM\Software\Policies\Microsoft\Windows\CloudContent" /v DisableSoftLanding /t REG_DWORD /d 1 /f
reg add "HKLM\Software\Policies\Microsoft\Windows\CloudContent" /v DisableWindowsSpotlightFeatures /t REG_DWORD /d 1 /f
reg add "HKLM\Software\Policies\Microsoft\Windows\CloudContent" /v DisableWindowsConsumerFeatures /t REG_DWORD /d 1 /f
reg add "HKLM\Software\Policies\Microsoft\Windows\DataCollection" /v DoNotShowFeedbackNotifications /t REG_DWORD /d 1 /f
reg add "HKLM\Software\Policies\Microsoft\WindowsInkWorkspace" /v AllowSuggestedAppsInWindowsInkWorkspace /t REG_DWORD /d 0 /f
Loại bỏ tính năng từ xa và các dịch vụ không cần thiết
Trong cmd, gõ các lệnh sau:
sc delete DiagTrack
sc delete dmwappushservice
sc delete WerSvc
sc delete OneSyncSvc
sc delete MessagingService
sc delete wercplsupport
sc delete PcaSvc
sc config wlidsvc start=demand
sc delete wisvc
sc delete RetailDemo
sc delete diagsvc
sc delete shpamsvc
sc delete TermService
sc delete UmRdpService
sc delete SessionEnv
sc delete TroubleshootingSvc
for /f "tokens=1" %I in ('reg query "HKLM\SYSTEM\CurrentControlSet\Services" /k /f "wscsvc" ^| find /i "wscsvc"') do (reg delete %I /f)
for /f "tokens=1" %I in ('reg query "HKLM\SYSTEM\CurrentControlSet\Services" /k /f "OneSyncSvc" ^| find /i "OneSyncSvc"') do (reg delete %I /f)
for /f "tokens=1" %I in ('reg query "HKLM\SYSTEM\CurrentControlSet\Services" /k /f "MessagingService" ^| find /i "MessagingService"') do (reg delete %I /f)
for /f "tokens=1" %I in ('reg query "HKLM\SYSTEM\CurrentControlSet\Services" /k /f "PimIndexMaintenanceSvc" ^| find /i "PimIndexMaintenanceSvc"') do (reg delete %I /f)
for /f "tokens=1" %I in ('reg query "HKLM\SYSTEM\CurrentControlSet\Services" /k /f "UserDataSvc" ^| find /i "UserDataSvc"') do (reg delete %I /f)
for /f "tokens=1" %I in ('reg query "HKLM\SYSTEM\CurrentControlSet\Services" /k /f "UnistoreSvc" ^| find /i "UnistoreSvc"') do (reg delete %I /f)
for /f "tokens=1" %I in ('reg query "HKLM\SYSTEM\CurrentControlSet\Services" /k /f "BcastDVRUserService" ^| find /i "BcastDVRUserService"') do (reg delete %I /f)
for /f "tokens=1" %I in ('reg query "HKLM\SYSTEM\CurrentControlSet\Services" /k /f "Sgrmbroker" ^| find /i "Sgrmbroker"') do (reg delete %I /f)
sc delete diagnosticshub.standardcollector.service
reg add "HKEY_CURRENT_USER\SOFTWARE\Microsoft\Siuf\Rules" /v "NumberOfSIUFInPeriod" /t REG_DWORD /d 0 /f
reg delete "HKEY_CURRENT_USER\SOFTWARE\Microsoft\Siuf\Rules" /v "PeriodInNanoSeconds" /f
reg add "HKLM\SYSTEM\ControlSet001\Control\WMI\AutoLogger\AutoLogger-Diagtrack-Listener" /v Start /t REG_DWORD /d 0 /f
reg add "HKEY_LOCAL_MACHINE\SOFTWARE\Policies\Microsoft\Windows\AppCompat" /v AITEnable /t REG_DWORD /d 0 /f
reg add "HKEY_LOCAL_MACHINE\SOFTWARE\Policies\Microsoft\Windows\AppCompat" /v DisableInventory /t REG_DWORD /d 1 /f
reg add "HKEY_LOCAL_MACHINE\SOFTWARE\Policies\Microsoft\Windows\AppCompat" /v DisablePCA /t REG_DWORD /d 1 /f
reg add "HKEY_LOCAL_MACHINE\SOFTWARE\Policies\Microsoft\Windows\AppCompat" /v DisableUAR /t REG_DWORD /d 1 /f
reg add "HKLM\SOFTWARE\Policies\Microsoft\MicrosoftEdge\PhishingFilter" /v "EnabledV9" /t REG_DWORD /d 0 /f
reg add "HKLM\SOFTWARE\Policies\Microsoft\Windows\System" /v "EnableSmartScreen" /t REG_DWORD /d 0 /f
reg add "HKCU\Software\Microsoft\Internet Explorer\PhishingFilter" /v "EnabledV9" /t REG_DWORD /d 0 /f
reg add "HKCU\Software\Microsoft\Windows\CurrentVersion\Policies\Explorer" /v "NoRecentDocsHistory" /t REG_DWORD /d 1 /f
reg add "HKLM\SOFTWARE\Microsoft\Windows NT\CurrentVersion\Image File Execution Options\CompatTelRunner.exe" /v Debugger /t REG_SZ /d "%windir%\System32\taskkill.exe" /f
reg add "HKLM\SOFTWARE\Microsoft\Windows NT\CurrentVersion\Image File Execution Options\DeviceCensus.exe" /v Debugger /t REG_SZ /d "%windir%\System32\taskkill.exe" /f
Nhấn Win + R, nhập regedit, ấn enter và đi đến đường dẫn HKEY_LOCAL_MACHINE\SYSTEM\CurrentControlSet\Services
Tại đây, xác định vị trí các keys:
- DPS
- WdiServiceHost
- WdiSystemHost
Các keys này đã rối quyền trong Windows. Để xoá keys, chúng ta phải sửa chúng, làm theo video dưới đây:
Nhấp chuột phải vào key và chọn Permissions, sau đó chọn Advanced, nhấn change ở dòng Owner. Nhập tên user hiện tại rồi nhấn “check name”. Sau đó tích vào “Replace owner on subcontainers and objects” và “Replace all child object permission entries with inheritable permission entries from this object”. Còn lại làm y như video. Lặp lại quá trình cho 2 keys còn lại.
Scheduled Tasks
Windows 10 lưu trữ một lượng lớn các lịch trình tác vụ của chúng ta. Chúng có thể gửi lịch trình của ta về Microsoft. Điều này sẽ ảnh hưởng đến quá trình bảo vệ dữ liệu của mình. Để xoá chúng, mở cmd lên và nhập:
schtasks /Change /TN "Microsoft\Windows\AppID\SmartScreenSpecific" /disable
schtasks /Change /TN "Microsoft\Windows\Application Experience\AitAgent" /disable
schtasks /Change /TN "Microsoft\Windows\Application Experience\Microsoft Compatibility Appraiser" /disable
schtasks /Change /TN "Microsoft\Windows\Application Experience\ProgramDataUpdater" /disable
schtasks /Change /TN "Microsoft\Windows\Application Experience\StartupAppTask" /disable
schtasks /Change /TN "Microsoft\Windows\Autochk\Proxy" /disable
schtasks /Change /TN "Microsoft\Windows\CloudExperienceHost\CreateObjectTask" /disable
schtasks /Change /TN "Microsoft\Windows\Customer Experience Improvement Program\BthSQM" /disable
schtasks /Change /TN "Microsoft\Windows\Customer Experience Improvement Program\Consolidator" /disable
schtasks /Change /TN "Microsoft\Windows\Customer Experience Improvement Program\KernelCeipTask" /disable
schtasks /Change /TN "Microsoft\Windows\Customer Experience Improvement Program\Uploader" /disable
schtasks /Change /TN "Microsoft\Windows\Customer Experience Improvement Program\UsbCeip" /disable
schtasks /Change /TN "Microsoft\Windows\DiskDiagnostic\Microsoft-Windows-DiskDiagnosticDataCollector" /disable
schtasks /Change /TN "Microsoft\Windows\DiskFootprint\Diagnostics" /disable
schtasks /Change /TN "Microsoft\Windows\FileHistory\File History (maintenance mode)" /disable
schtasks /Change /TN "Microsoft\Windows\Maintenance\WinSAT" /disable
schtasks /Change /TN "Microsoft\Windows\PI\Sqm-Tasks" /disable
schtasks /Change /TN "Microsoft\Windows\Power Efficiency Diagnostics\AnalyzeSystem" /disable
schtasks /Change /TN "Microsoft\Windows\Shell\FamilySafetyMonitor" /disable
schtasks /Change /TN "Microsoft\Windows\Shell\FamilySafetyRefresh" /disable
schtasks /Change /TN "Microsoft\Windows\Shell\FamilySafetyUpload" /disable
schtasks /Change /TN "Microsoft\Windows\Windows Error Reporting\QueueReporting" /disable
schtasks /Change /TN "Microsoft\Windows\WindowsUpdate\Automatic App Update" /disable
schtasks /Change /TN "Microsoft\Windows\License Manager\TempSignedLicenseExchange" /disable
schtasks /Change /TN "Microsoft\Windows\Clip\License Validation" /disable
schtasks /Change /TN "\Microsoft\Windows\ApplicationData\DsSvcCleanup" /disable
schtasks /Change /TN "\Microsoft\Windows\Power Efficiency Diagnostics\AnalyzeSystem" /disable
schtasks /Change /TN "\Microsoft\Windows\PushToInstall\LoginCheck" /disable
schtasks /Change /TN "\Microsoft\Windows\PushToInstall\Registration" /disable
schtasks /Change /TN "\Microsoft\Windows\Shell\FamilySafetyMonitor" /disable
schtasks /Change /TN "\Microsoft\Windows\Shell\FamilySafetyMonitorToastTask" /disable
schtasks /Change /TN "\Microsoft\Windows\Shell\FamilySafetyRefreshTask" /disable
schtasks /Change /TN "\Microsoft\Windows\Subscription\EnableLicenseAcquisition" /disable
schtasks /Change /TN "\Microsoft\Windows\Subscription\LicenseAcquisition" /disable
schtasks /Change /TN "\Microsoft\Windows\Diagnosis\RecommendedTroubleshootingScanner" /disable
schtasks /Change /TN "\Microsoft\Windows\Diagnosis\Scheduled" /disable
schtasks /Change /TN "\Microsoft\Windows\NetTrace\GatherNetworkInfo" /disable
del /F /Q "C:\Windows\System32\Tasks\Microsoft\Windows\SettingSync\*"
Tắt các gợi ý
Chúng ta phải tắt Windows Spotlight, và các “Gợi ý”.
Vào Start > Settings > Personalizaton > Lock screen:
- Đặt hình nền từ Picture
- Tắt “Get fun facts, tips, tricks and more on your lock screen”
Vào Personalization > Start:
- Tắt “Show suggestions ccasionally in Start”
Quay trở lại Settings và đi đến System > Notifications and actions
- Tắt “Get tips, tricks, và suggestions as you use Windows”
- Tắt “Show me the Windows welcome…”
Quay lại Settings > System > Multitasking
- Tắt “Showw suggestions occasionally in your timeline”
Quay lại thêm lần nữa Settings > Privacy, tắt mọi thứ trong:
- General
- Activity history
- Speech
- Inking
- App dianostics, tắt “Let apps access diagnostic information”
Tiếp tục quay lại Settings > Search
- Tắt mọi thứ dưới Permissions & History
Bạn vẫn có thể nhận được các thông báo gợi ý. Chỉ cần chuột phải và tắt nó thôi.
Sử dụng FireWall để bảo mật dữ liệu hơn
Đối với một số ứng dụng (như ứng dụng cài đặt), cách duy nhất để ngăn chúng báo cáo dữ liệu là chặn chúng bằng tường lửa . Đây là lý do tại sao bạn nên sử dụng tường lửa để chặn tất cả lưu lượng truy cập ngoại trừ những gì bạn cho phép.
Cá nhân mình cho phép Windows Update, Network discovery and sharing, DHCP, DNS, trình duyệt web. Điều này sẽ hạn chế các ứng dụng khác truy cập DNS, chúng sẽ không thể gửi hoặc nhận bất cứ thứ gì. Bảo vệ quyền riêng tư của bạn tốt hơn bao giờ hết.
SimpleWall là tường lửa các bạn nên sử dụng. Nếu bạn đã sử dụng TinyWall, hãy gỡ nó đi, vì nó đã không còn hoạt động ở bản 1903 rồi.
SimpleWall có thể chặn/bỏ chặn các tệp thực thi riêng lẻ, ứng dụng UWP và dịch vụ, cũng như lọc theo địa chỉ, cổng và giao thức.
Không giống như TinyWall, nó không có chế độ tự động học, nhưng nó có một thông báo rất hữu ích hiện lên khi một ứng dụng bị chặn. Vì vậy bạn có thể quyết định xem có chặn nó hay không. Điều này rất hữu ích khi cài dặt phần mềm mới.
Cấu hình đề xuất cho SimpleWall:
- Trong Settings > Mode, sử dụng Whitelist. Điều này sẽ chặn tất cả lưu lượng truy cập mà bạn không cho phép
- Trong Settings > Settings > General, bật “Load on system Startup”, “Start minimized”,và “Skip User Account Control prompt”
- Trong Settings > Settings > Rules, chọn “Enable boot-time filters”
- Trong Settings > Settings > Rules > System Rules, cho phép smb (trong và ngoài nước), nếu bạn có kế hoạch sử dụng file sharing, và cả Windows Update
- Trong File > Import, bạn có thể tải xuống thiết lập. Nó sẽ chặn một số tính năng của Windows và cho phép tất cả các ứng dụng truy cập mạng cục bộ nhưng không phải Internet.
- Bật “Enable filtering”, sau đó chọn Whitelist
SimpleWall là một công cụ rất mạnh. Hạn chế duy nhất của phần mềm này là chặn Windows Update ngay cả khi bạn cho phép nó. Nhưng nhà phát triển sẽ sửa nó ngay thôi.
Chúc mừng, bạn đã bảo vệ quyền riêng tư của mình xong rồi đó!
Hướng dẫn này hoạt động trên Windows 10 các phiên bản. Khi một bản cập nhật lớn được cài đặt, gần như tất cả các thay đổi sẽ quay về mặc định. Bạn sẽ phải lặp lại quy trình này. Các bản cập nhật lớn xuất hiện khoảng 2 lần một năm.
Cộng tác viên: Kiệt Phạm

