• Home
  • News
  • Software
  • Knowledge
  • MMO
  • Tips
  • Security
  • Network
  • Office
AnonyViet - English Version
  • Home
  • News
  • Software
  • Knowledge
  • MMO
  • Tips
  • Security
  • Network
  • Office
No Result
View All Result
  • Home
  • News
  • Software
  • Knowledge
  • MMO
  • Tips
  • Security
  • Network
  • Office
No Result
View All Result
AnonyViet - English Version
No Result
View All Result

Instructions to delete Icon learn more about this picture on Windows 11

AnonyViet by AnonyViet
June 10, 2025
in Tips
0

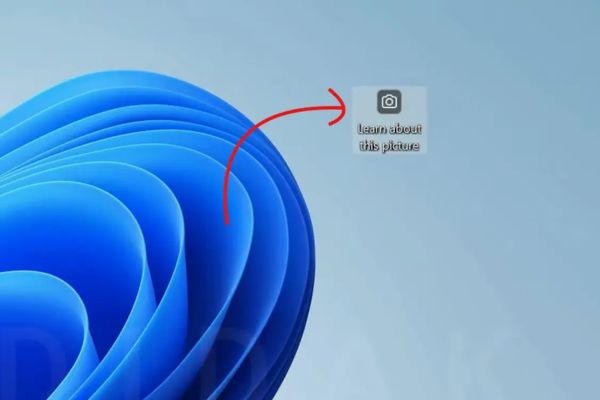
Windows 11 brings a modern, beautiful interface and many unique features, including Spotlight – a automatic tool to change the wallpaper with beautiful photos from around the world. However, not everyone is satisfied with the symbol “Learn more about this picture” appears on the background screen. So how to Delete Icon Learn more about this picture Effective way? Let’s explore the detailed solutions below!

Join the channel Telegram belong to Anonyviet 👉 Link 👈

Why does the “Learn more about this picture” icon cause annoyance?

Spotlight feature above Windows 11 Not only provides wallpapers but also allows users to click on the “Learn More About this Picture” icon to find out information about images. This idea is interesting but not heartbreaking everyone. According to the reflection from the Latest Windows Latest, the user community complains that this symbol disturbs the desktop interface, especially when they just want to enjoy the wallpaper without more information.
Why does the
Why does the “Learn more about this picture” icon cause annoyance?

Even a post on Microsoft Feedback Hub related to this issue has attracted more than 400,000 views. This shows that the need to delete the Learn More About this Picture is not only a personal opinion but also became a common desire of a large number of users. Unfortunate, Microsoft There is no integrated option to turn off directly in the settings, forcing users to find manual solutions.

How to delete the reasoning icon more about this picture

If you are not too “salty” with Spotlight, the easiest way to remove this symbol is to completely turn off the feature and switch to the static wallpaper from the personal collection.

To do it, you just need to enter Settings> Personalization> Backgroundselect “Picture” or “Slideshow” instead of “Windows Spotlight”. However, the disadvantage of this method is that you will lose the convenience of the wallpaper automatically changes every day.

For those who still want to keep Spotlight but cannot bear the unpleasant symbol, do not worry! Here are two effective ways to delete the reasoning icon more about this picture without giving up your favorite feature.

Method 1: Use Registry Editor to delete the icon

This is a technical solution but extremely effective to delete the reasoning icon more about this picture. However, you need to manipulate carefully to avoid affecting the system. Please follow these steps:

Step 1: Press the key combination Windows + Rtyping “RegeditAnd click Enter.

HKEY_CURRENT_USER\Software\Microsoft\Windows\CurrentVersion\Explorer\HideDesktopIcons\NewStartPanel

Step 2: Create a new key: Right -click on the empty area, choose New> Dword (32-bit) Value.

Step 3: Name: Enter {2CC5CA98-6485-489A-920E-B3E88A6CCCT3}} and click Enter.
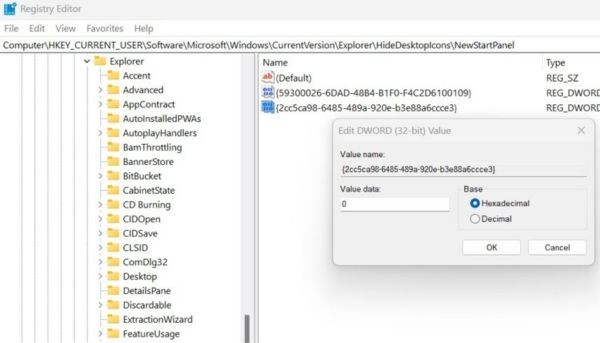
Method 1: Use Registry Editor to delete the icon

Step 4: Edit value: double click on the newly created lock, keep the hexadecimal mode, change Value data into 1then click OK.

Step 5: Restart the device: Exit the Registry Editor and restart the PC to apply changes.

Once completed, the “Learn more about this picture” icon will completely disappear from the background screen. If you want to recover, you just need to return to the upper lock and change Value Data to 0.

Method 2: Use Explorer Patcher to turn off the icon

If you are not used to editing Registry, third -party applications like Explorer Patcher is a more friendly choice to delete it. This is an open source tool, easy to use and safe. The steps are as follows:

Step 1: Visit the github page of Explorer Patcher HERE To download the latest version.

Step 2: Run the settings file and wait for the process to complete. After installation, the application will automatically launch.

Step 3: Switch to tab Spotlight In the left menu. Click Hide the “Learn more about this picture” icon.
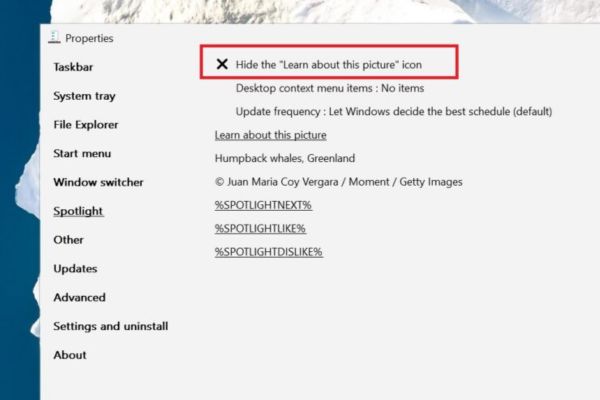
Method 2: Use Explorer Patcher to turn off the icon

Immediately, the icon will disappear without restarting the device. If you want to recover, you just need to uncheck this option in the application.

Conclusion

With hundreds of thousands of feedback from users, Microsoft may soon add the official option to Delete Icon Learn more about this picture In the upcoming Windows 11 updates. This not only improves the user experience but also shows the listening from the technology giant. In the meantime, you absolutely can apply the above methods to enjoy the clean, tidy background screen as you like!

Tags: deleteIconInstructionsLearnPictureWindows
Previous Post

Motorcycle cold penalties: Common behaviors and tests to avoid being sanctioned

Next Post

iOS 26: Summary of new features

AnonyViet

AnonyViet

Related Posts

How to open “This PC” instead of “Quick Access” in File Explorer by default
Tips

How to open “This PC” instead of “Quick Access” in File Explorer by default

October 17, 2026
How to create a virtual Pet, a virtual character running around on the Desktop to relax
Tips

How to create a virtual Pet, a virtual character running around on the Desktop to relax

October 15, 2026
15 cách tăng tốc Windows 10 nhanh như gió
Tips

15 cách tăng tốc Windows 10 nhanh như gió

October 14, 2026
How to create Guest mode Shortcuts for Chrome and Edge
Tips

How to create Guest mode Shortcuts for Chrome and Edge

October 13, 2026
Test what breed of dog you are through 10 multiple choice questions
Tips

Test what breed of dog you are through 10 multiple choice questions

October 13, 2026
Fliqlo – Create digital clock screens on Windows and phones
Tips

Fliqlo – Create digital clock screens on Windows and phones

October 12, 2026
Next Post
iOS 26: Summary of new features

iOS 26: Summary of new features

0 0 votes
Article Rating
Subscribe
Login
Notify of
guest

guest

0 Comments
Oldest
Newest Most Voted

Recent News

How to open “This PC” instead of “Quick Access” in File Explorer by default

How to open “This PC” instead of “Quick Access” in File Explorer by default

October 17, 2026
Instructions for receiving 3 months of MultCloud Premium for free with 200GB data

Instructions for receiving 3 months of MultCloud Premium for free with 200GB data

October 17, 2026
Instructions for receiving pension through VNeID without going to the ward

Instructions for receiving pension through VNeID without going to the ward

October 16, 2026
MBTI, Big Five, DISC or Holland: which personality test should you choose?

MBTI, Big Five, DISC or Holland: which personality test should you choose?

October 15, 2026
How to open “This PC” instead of “Quick Access” in File Explorer by default

How to open “This PC” instead of “Quick Access” in File Explorer by default

October 17, 2026
Instructions for receiving 3 months of MultCloud Premium for free with 200GB data

Instructions for receiving 3 months of MultCloud Premium for free with 200GB data

October 17, 2026
Instructions for receiving pension through VNeID without going to the ward

Instructions for receiving pension through VNeID without going to the ward

October 16, 2026
AnonyViet - English Version

AnonyViet

AnonyViet is a website share knowledge that you have never learned in school!

We are ready to welcome your comments, as well as your articles sent to AnonyViet.

Follow Us

Contact:

Email: anonyviet.com[@]gmail.com

Main Website: https://anonyviet.com

Recent News

How to open “This PC” instead of “Quick Access” in File Explorer by default

How to open “This PC” instead of “Quick Access” in File Explorer by default

October 17, 2026
Instructions for receiving 3 months of MultCloud Premium for free with 200GB data

Instructions for receiving 3 months of MultCloud Premium for free with 200GB data

October 17, 2026
  • Home
  • Home 2
  • Home 3
  • Home 4
  • Home 5
  • Home 6
  • Next Dest Page
  • Sample Page

say88 tỷ lệ kèo nhà cái kèo nhà cái 5 febet

No Result
View All Result
  • Home
  • News
  • Software
  • Knowledge
  • MMO
  • Tips
  • Security
  • Network
  • Office

say88 tỷ lệ kèo nhà cái kèo nhà cái 5 febet

wpDiscuz
0
0
Would love your thoughts, please comment.x
()
x
| Reply