
Like other languages, Python can load, store, and resolve packages. Creating a virtual Python environment will allow you to work on a separate copy (environment) of Python for each specific project without interfering or affecting the operation of other projects.
| Join the channel Telegram belong to AnonyViet 👉 Link 👈 |

These Python environments can easily be hosted on VPS or dedicated servers to support users. It will be beneficial for different team members to work on the same project.
Why is the Python virtual environment needed on Windows?
Virtual environments are tools that provide you with many different Python version settings for each project. All Python projects will use the same directory to store and retrieve site-packages. That’s why I need a virtual environment because Python cannot distinguish between different versions in the same site-packages directory. To work around this problem, you can create different virtual Python environments for each project. There is no limit to the number of virtual environments you can create in the same system.
You can use a module called virtual environment or venv to create a unique environment for each project. You can also customize the necessary environment settings for your project. Venv does not modify the default system settings of Python or its modules. Venv will create a directory containing the executables needed to use the Python packages required by the project.
Condition
If you want to use venv functionality on Windows 10. You need to enable it Windows Subsystem for Linux (WSL) to allow you to run a Linux distribution in Windows 10.
Because most of the Python information is for Linux environments. Most developers use Linux installation tools. So with WSL, Python will be more compatible with the environment and developers.
How to enable WSL on Windows 10
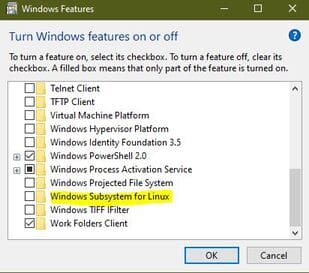
Step 1: Click on Start Menu and search for “Turn Windows features on or off”.
Step 2: Click on the first result.
Step 3: Scroll down and select the “Windows Subsystem for Linux” option.
Step 4: Restart the system to apply the changes.
Install Linux Distro
You can learn the versions Linux is available and install them. But in this article, I will use the Ubuntu 18.04 LTS distribution because it is regularly updated, has a large support community, and has complete documentation for newbies.
Step 1: Setting Ubuntu 18.04 LTS from Microsoft Store.
Step 2: After downloading, you need to open Ubuntu from Store or Start menu.
Step 3: The first time you open Ubuntu, it will ask you to create a username and password.
Step 4: Update the system using the command below:
sudo apt update && sudo apt upgradeIf the above command does not work, you must update and upgrade the operating system manually.
Now you need to use PowerShell to install the distribution and navigate to the folder containing the newly downloaded Linux distribution (app_name.appx) and run the command below.
Add-AppxPackage .\app_name.appxAdd distro path to Windows environment
You need to use PowerShell to install additional paths.
$userenv = [System.Environment]::GetEnvironmentVariable("Path", "User")For example:
[System.Environment]::SetEnvironmentVariable("PATH", $userenv + ";C:\Users\Admin\Ubuntu", "User")Open a new distro session
After declaring the newly installed distribution, you must launch a new session. You can launch it from the Ubuntu shortcut available on the Start Menu. It will then be stored locally on your system and ready to use. For Windows server users, launch the Linux distribution’s executable file stored in the distribution’s installation directory.
Set up the environment
You need to set up a Python virtual environment on Windows 10 by performing the steps below:
- You must have a compatible version of Python installed.
- Then install Pip.
- Install virtual environment.
- Finally, install VirtualEnvWrapper-win.
Install Python
You should install the latest and updated version of Python to set up the environment. So, I will install Python version 3.8.0. You can also use it Python 3.9 okay.
Install PIP
Usually, PIP comes pre-installed in Python3. If you cannot find PIP, you can install it manually using the command below.
curl https://bootstrap.pypa.io/get-pip.py -o get-pip.pyAfter installing the get-pip.py file, you can save it to your desktop. Then, navigate to the desktop and use the admin account to run the file.
python3 get-pip.pycd DesktopPython get-pip.py
Install and create virtual environments
The venv module comes with standard libraries if you are using Python 3 or you can also install it manually using the command below.
$ pip install virtualenvOnce installed, you can test virtualenv using the command below.
$ virtualenv --versionNow we will create a virtual environment (my_project) for the project using the command below. A directory (my_project) will be created with all the required executables to use the installed packages.
$ virtualenv my_project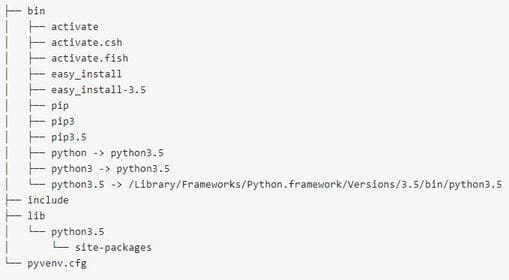
The folder will have the file structure as above.
To use the Python 3 compiler, you can run the command below.
virtualenv -p /usr/bin/python3 my_projectThen access the newly created project directory using the command below.
cd my_projectYou have to activate the virtual environment (my_project) using the above file structure activation script using the command below.
$ source my_project/bin/activate(my_project) $
If it appears my_project or shows your project name, the virtual environment is active.
Install VirtualEnvWrapper-win
Virtual environments can solve the package management problem to some extent but will come with some hassles in managing the environment, which you can solve by using the virtualenvwrapper tool.
- It helps you organize and manage virtual environments in one location.
- It allows you to create, delete, and clone environments.
- You can also switch between different environments.
You can install the wrapper using the commands below.
Using pip:
pip install virtualenvwrapper-winUsing git:
git clone git://github.com/davidmarble/virtualenvwrapper-win.gitYou can check the location of the wrapper script with the command below.
$ which virtualenvwrapper.shOnce it is installed and verified, you can navigate to that directory and run the command below.
python setup.py install After this command, the Python virtual environment is available.
Deactivate the virtual environment
If you do not want to continue with the virtual environment, you can deactivate it using the command below.
(my_project) $ deactivateConclude
This article has shown how you can install a Linux distribution on Windows 10. Even if you are using Windows 10, you should install a Linux distribution to set up a Python virtual environment and take advantage of the functions it has.
It provides you with a better environment and security to install packages and modules. You will know how to install Python, pip and start and activate the virtual environment along with the file structure.
Frequently asked questions
Do I need to install Windows Subsystem for Linux (WSL) to create a Python virtual environment on Windows 10?
The article covers using WSL for easy compatibility with Linux tools and tutorials. However, you can still create a Python virtual environment on Windows 10 without WSL, but installing and using some tools may be more complicated.
How to activate virtual environment after creation?
After creating the virtual environment using the command virtualenv my_projectyou need to navigate into that folder (cd my_project) and run the command source my_project/bin/activate (or my_project\Scripts\activate on Windows without using WSL). When the environment is enabled, you’ll see the environment name (for example: (my_project)) appears before the command prompt.
How many virtual environments can I create on my system?
You can create an unlimited number of virtual environments on the same system. Each virtual environment will be independent of the others, making it easier to manage projects and package versions.