
RAM manufacturers often intentionally limit processing speed. With a few minutes in the BIOS and a little testing, you can overclock your RAM to run faster than the manufacturer’s specifications.
| Join the channel Telegram belong to AnonyViet 👉 Link 👈 |

Things you need to know before overclocking RAM
Overclocking RAM is quite more complicated in comparison CPU overclocking or GPU, simply crank up the clock and hope your heatsink can handle the system’s temperature. With RAM, there are many things that need to be tweaked, but it’s also much safer because RAM doesn’t generate too much heat.
Every program you use stores operational data in RAM before loading it into the CPU cache. In games, RAM latency improvements can significantly reduce frame load times. This can improve fps and most importantly reduce stuttering in CPU-intensive areas where new data needs to be loaded from RAM into cache or VRAM.
RAM speed is usually measured in megahertz (Mhz). The speed of DDR4 RAM is usually 2133 Mhz or 2400 Mhz, although the actual speed is actually half because it is Double Data Rate (DDR). On top of that, RAM has a lot of latency control and different read and write speeds. They are measured periodically and are often grouped under the abbreviation “CAS Latency (CL)”. For example, a mid-range DDR4 RAM kit might be 3200 Mhz CL16. Improving speed or timing will improve latency.
RAM communicates with the rest of the computer’s components using a system called Serial Presence Detect. Through this, it provides the BIOS with the main frequencies and times at which it can operate, known as the JEDEC specification. This is the stock speed and it is included in every DDR4 stick ever produced.

However, Intel has found a way to cheat the system. By providing another configuration on JEDEC, called XMP (Extreme Memory Profile), they can run RAM at higher than standard speeds. If you buy RAM clocked above 2400 Mhz, you may get an XMP profile that you can enable at any time.
Manufacturers do not allow products to work 100%. They have to do this to push the prices of components higher, so it often happens that RAM comes with XMP configuration due to product segmentation. RAM also operates within a certain voltage, typically 1,350 volts for DDR4, but you can adjust the voltage a bit yourself.
But the main problem is that SPD is not activated all the time. According to Kingston representatives, they “only adjust the ‘Master’ (CL, RCD, RP, RAS) timings” and since the SPD system used to store XMP profiles has a limited number of entries, the rest is up to the motherboard to decide. In my case, the “auto” setting on the main ASUS set some strange values some of the time. RAM refuses to run with XMP configuration until I fix it myself.
How to determine RAM response time
While overclocking RAM is quite safe, it’s also a bit more complicated than just increasing the values when overclocking the CPU. If you are running AMD Ryzen then overclocking ram is simpler because there is a tool called “Ryzen DRAM Calculator” will make this whole process easier. The computer will eliminate some of the headaches and you won’t have to leave the RAM at the “AUTO” setting on the motherboard.
As for Intel, the tool can still identify key timings, and the built-in memory checker will work the same way. You will also download this software even if you are not using AMD.
Open the software and enter the Ryzen CPU code you are using (select Ryzen 2 Gen if you are using Intel) and the type of memory you have. If you don’t know, you can search google to check the components of RAM.
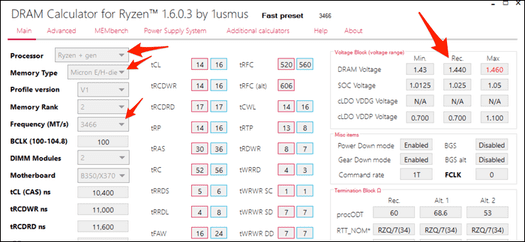
Press the button “R – XMP” purple at the bottom to load Profile XMP. Enter your Ryzen CPU code and memory type, then press “Calculate SAFE” to calculate the time of active RAM. You can press the “ buttonCompare Timings” to compare with my XMP settings.

The SAFE setting will almost always work, I had no problems at many fixed voltage levels. The FAST feature may work, but may not be stable.
You need to take a screenshot (there’s a button at the bottom left) and view it while in the BIOS.
How to overclock RAM in BIOS
You should have taken a screenshot of your computer with the parameters available because the next steps will be performed in the BIOS.
Turn off your PC and boot into BIOS or UEFI. Continuously press the Del or F2 button (depending on Main type), access the BIOS similar to this screen:
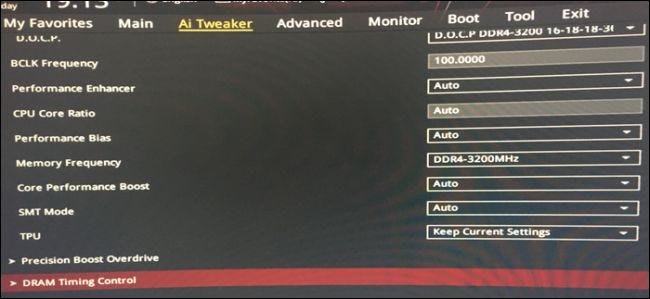
Find the tab Memory or RAM and load your XMP Profile to get started. Make sure the clock speed is what you want. You can increase the clock speed while keeping the response time the same (especially on Intel CPUs).
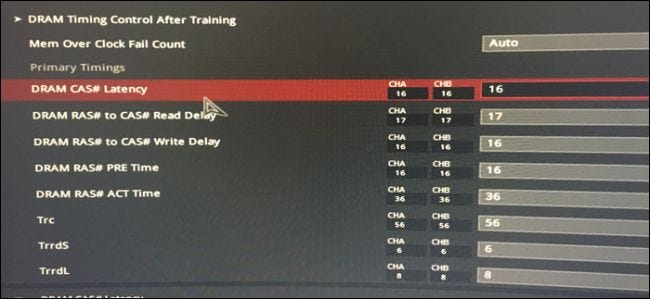
Now, open the screenshot on your phone and start entering the corresponding number. In my case, the numbers matched, but you should still check again.
ASUS BIOS displays the full names of many master clocks, here is a list of master clocks and their related terminology:
- tCL – Main CAS Latency
- tRCDRD – Read latency from RAS to CAS
- tRCDWR – RAS to CAS write latency.
- tRP – RAS precharge time (PRE)
- tRAS – Active RAS time (ACT)
The remaining parts must match the screenshot exactly.
Once you are done entering the time, look for the voltage control section. You’ll enter the recommended DRAM voltage (the computer displays potentially unsafe voltages in red. Any voltage below 1,450v is probably safe). If you’re using Ryzen, you’ll enter the recommended SOC voltage, which powers the memory controller on the CPU.
Save settings and exit BIOS. Your computer will restart and if it gets into Windows, you can move on to the next step.
What to do if it fails to start
If the system fails to boot, your motherboard may not be able to do a self-test (POST), you may have to wait about 30 seconds for the BIOS to boot into safe mode and restore the most recent settings. You can try increasing the memory voltage by 25 millivolts (0.025v) before reaching the maximum recommended voltage. You can also try increasing the SOC voltage a bit on Ryzen PCs, as first and second generation Ryzens are very difficult to overclock RAM. Intel doesn’t have the same SOC as Ryzen and probably won’t have this problem.
If your computer fails to boot into safe mode, don’t worry. Your BIOS may not have that feature and you will need to clear the CMOS manually. CMOS is a battery on the mainboard that you can remove and reinsert. After reinserting the CMOS, the PC will restore its normal state.
Ensures stable overclocking
After returning to Windows, you need to make sure the overclocking process is stable. Switch to the “MEMbench” tab to check. Set the mode to “Custom” and task scope to 400%. Click “Max RAM” at the bottom to allocate all your remaining RAM. The software will check and find errors in RAM 4 times.
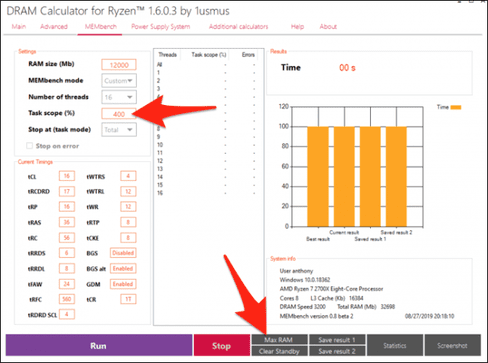
Click “Run” to start running the RAM test. In my case, testing 32GB of RAM at task scope 400% took less than ten minutes.
If there are no errors, you can overclock the RAM again or check the “FAST” setting. This is the entire overclocking process. If possible, check your RAM overnight, set the task scope to about 100,000% and leave the computer overnight. If there are no errors, then you have successfully overclocked your RAM.
Benchmark RAM
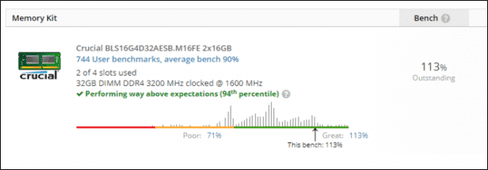
If you want to see how much RAM power has increased, you can download it UserBenchmark to benchmark your entire PC, including your RAM. My RAM has increased performance by 23% after overclocking.
Frequently asked questions
How much can I overclock my RAM?
Depends on your RAM type and motherboard. Most RAM can be overclocked beyond the manufacturer’s specifications, but this should be done carefully and step by step to avoid damage. You should consult your RAM and motherboard manufacturer’s documentation for more information.
Is overclocking RAM safe?
In general, overclocking RAM is quite safe because it generates less heat than overclocking the CPU or GPU. However, it needs to be done properly and monitor the temperature to avoid causing damage to components.
What tools do I need to overclock RAM?
You need to access your computer’s BIOS/UEFI and can use support software such as Ryzen DRAM Calculator (for AMD Ryzen) to calculate safe settings. Understanding the response time (latency) parameters of RAM is also very important.