• Home
  • News
  • Software
  • Knowledge
  • MMO
  • Tips
  • Security
  • Network
  • Office
AnonyViet - English Version
  • Home
  • News
  • Software
  • Knowledge
  • MMO
  • Tips
  • Security
  • Network
  • Office
No Result
View All Result
  • Home
  • News
  • Software
  • Knowledge
  • MMO
  • Tips
  • Security
  • Network
  • Office
No Result
View All Result
AnonyViet - English Version
No Result
View All Result

How to compress and decompress files using Powershell on Windows 10/11

AnonyViet by AnonyViet
September 10, 2024
in Tips
0

Way Compress and decompress files using Powershell on Windows 10/11 is an essential skill that every computer user should know. Powershell, a powerful command-line tool from Microsoft, not only helps you save storage space and simplify data management. In this article, AnonyViet will guide you how to use this tool to compress and decompress files effectively.

Join the channel Telegram belong to AnonyViet 👉 Link 👈

What is Powershell?

To explain simply, Powershell is a command line utility developed by Microsoft, created to replace CMD, helping users manipulate computers through commands. If you know how to use it, Powershell can help you save time in your work significantly.

While you can use File Explorer to quickly create a zip file or extract the contents of a compressed file, you can also use PowerShell to perform the same tasks more efficiently with the command line. Plus, you can even choose a compression ratio to compress the file faster.

You can compress and decompress files using Powershell

See also: Instructions for creating Zip Bomb – Super compressed file that crashes the computer when opened

Instructions for compressing files using PowerShell

To zip files with PowerShell on Windows 10 (or 11), follow these steps:

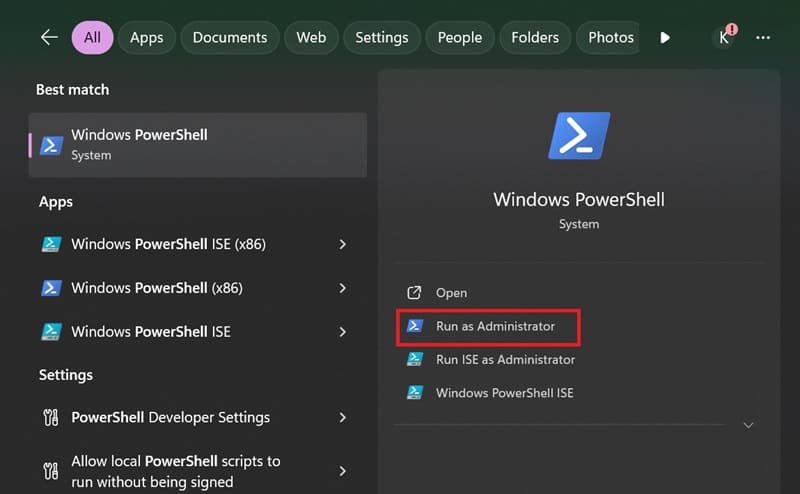
Step 1: Open Start on Windows.

Step 2: Search for PowerShell, right-click the first result and select 'Run as administrator'.

Select 'Run as administrator'

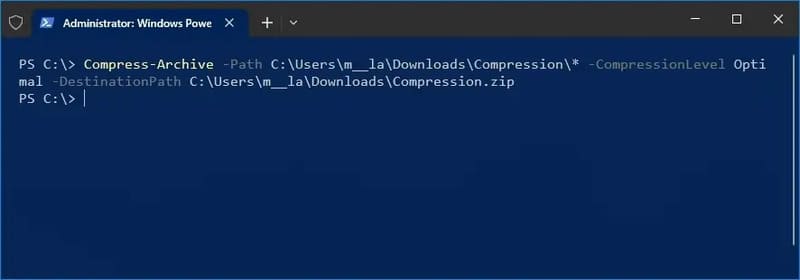
Step 3: Type the following command to compress and zip a folder and press Enter:

Compress-Archive -Path C:\SOURCE\PATH\TO\YOUR\FILES\* -CompressionLevel Optimal -DestinationPath C:\DESTINATION\PATH\ZIPPEDFILE.zip

Enter the following command to compress the file

Note:

  • Change C:\SOURCE\PATH\TO\YOUR\FILES\* to the folder path containing the files you want to compress.
  • Change C:\DESTINATION\PATH\ZIPPEDFILE.zip into the path and name of the compressed file you want to create.
    The * character acts as a wildcard, allowing all files inside the root directory to be compressed.

Instructions for adding files to a zip file using Powershell

Open Powershell, paste the following command in:

Compress-Archive -Path C:\SOURCE\PATH\TO\YOUR\FILES -Update -DestinationPath C:\DESTINATION\PATH\ZIPPEDFILE.zip
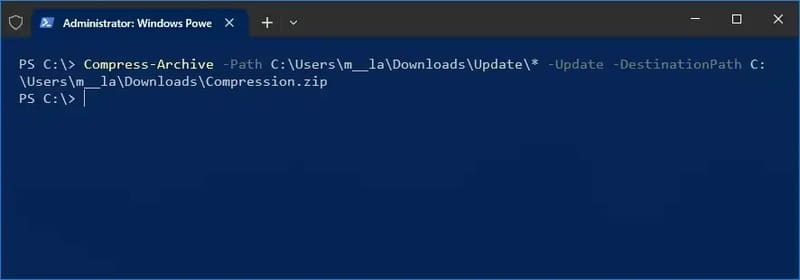
Instructions for adding files to a zip file using Powershell

Change:

  • C:\DESTINATION\PATH\ZIPPEDFILE.zip is the path to the existing compressed file.
  • C:\SOURCE\PATH\TO\YOUR\FILES into the path to the files you want to add.

Instructions for changing the compression level for files

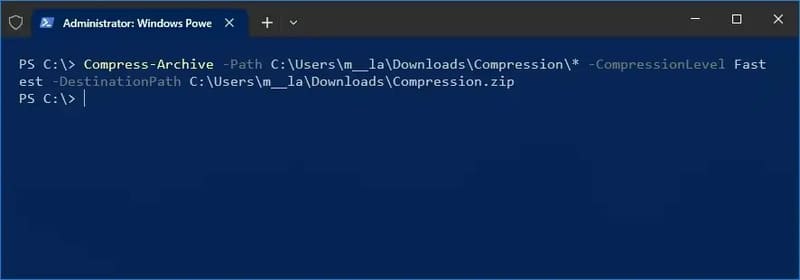
Access Powershell and use the command line as follows:

Compress-Archive -Path C:\PATH TO FILE YOU WANT TO COMPRESS\* -CompressionLevel Fastest -DestinationPath C:\WHERE TO SAVE FILE.zip

Instructions for changing the compression level for files

In there:

Select the desired compression level in the section -CompressionLevelsuch as:

  • Fastest: Fastest compression, compressed file size may be larger.
  • NoCompression: Uncompressed, compressed file size is equivalent to the total size of the original files.
  • Optimal (Default): Compress with best compression ratio.

Instructions for unzipping files using Powershell

Type the following command to unzip a zip file and press Enter:

Expand-Archive -Path C:\PATH TO COMPRESSED FILE.zip -DestinationPath C:\WHERE TO SAVE FILE

Instructions for unzipping files using Powershell

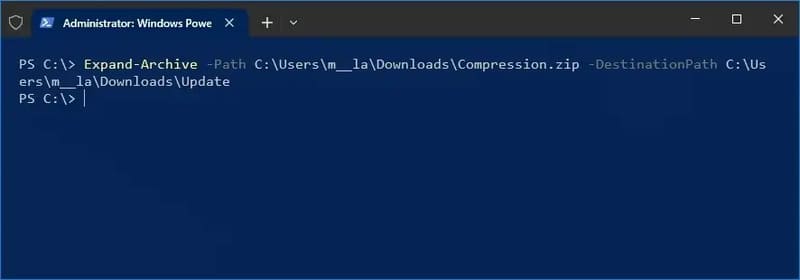
Once the steps are completed, PowerShell will extract all files and folders from the specified zip file.

See also: How Install and activate Office 2024 LTSC free forever

Conclusion

By using these commands you can easily Compress and decompress files using Powershell on Windows 10 and 11, saving storage space and making it more convenient to manage and share data.

Tags: CompressdecompressfilesPowerShellWindows
Previous Post

How to set Password expiration date in Windows for more security

Next Post

Download job application using PowerPoint Resume/CV Template

AnonyViet

AnonyViet

Related Posts

How to create beautiful studio-like preschool graduation photos for your child
Tips

How to create beautiful studio-like preschool graduation photos for your child

May 21, 2026
Instructions on how to change iPhone fonts beautifully with Lara
Tips

Instructions on how to change iPhone fonts beautifully with Lara

May 20, 2026
Create images of guardian mascots using AI according to year of birth
Tips

Create images of guardian mascots using AI according to year of birth

May 20, 2026
Try the Shopee Profit Calculator now, avoid the risk of selling at a loss
Tips

Try the Shopee Profit Calculator now, avoid the risk of selling at a loss

May 19, 2026
Prompt converts photos into extremely impressive children’s drawings
Tips

Prompt converts photos into extremely impressive children’s drawings

May 17, 2026
Instructions for receiving 1 month of ChatGPT Plus for free
Tips

Instructions for receiving 1 month of ChatGPT Plus for free

May 12, 2026
Next Post
Download job application using PowerPoint Resume/CV Template

Download job application using PowerPoint Resume/CV Template

0 0 votes
Article Rating
Subscribe
Login
Notify of
guest

guest

0 Comments
Oldest
Newest Most Voted
Inline Feedbacks
View all comments

Recent News

Snapvie: Tool to download 8K YouTube videos, no installation required

Snapvie: Tool to download 8K YouTube videos, no installation required

May 24, 2026
How to create your own Video AI App to use Omni, Nano Banana without API Key

How to create your own Video AI App to use Omni, Nano Banana without API Key

May 23, 2026
If I forget something on the Metro train, what should I do to get it back?

If I forget something on the Metro train, what should I do to get it back?

May 23, 2026
How to create amazing flash effects for photos on Instagram

How to create amazing flash effects for photos on Instagram

May 21, 2026
Snapvie: Tool to download 8K YouTube videos, no installation required

Snapvie: Tool to download 8K YouTube videos, no installation required

May 24, 2026
How to create your own Video AI App to use Omni, Nano Banana without API Key

How to create your own Video AI App to use Omni, Nano Banana without API Key

May 23, 2026
If I forget something on the Metro train, what should I do to get it back?

If I forget something on the Metro train, what should I do to get it back?

May 23, 2026
AnonyViet - English Version

AnonyViet

AnonyViet is a website share knowledge that you have never learned in school!

We are ready to welcome your comments, as well as your articles sent to AnonyViet.

Follow Us

Contact:

Email: anonyviet.com[@]gmail.com

Main Website: https://anonyviet.com

Recent News

Snapvie: Tool to download 8K YouTube videos, no installation required

Snapvie: Tool to download 8K YouTube videos, no installation required

May 24, 2026
How to create your own Video AI App to use Omni, Nano Banana without API Key

How to create your own Video AI App to use Omni, Nano Banana without API Key

May 23, 2026
No Result
View All Result
  • Home
  • News
  • Software
  • Knowledge
  • MMO
  • Tips
  • Security
  • Network
  • Office

wpDiscuz
0
0
Would love your thoughts, please comment.x
()
x
| Reply