
Zalo is a popular messaging and voice calling application, often storing a lot of data such as videos, photos, and sounds, taking up significant space on the hard drive. Storing too much of this data, especially on drive C (system drive), can significantly slow down computer speed. This article AnonyViet will guide you how to move Zalo data to another hard drive safely and effectively using the tool ZaloMovehelps free up C drive space and improve computer performance.
| Join the channel Telegram belong to AnonyViet 👉 Link 👈 |
Why do you need to transfer Zalo data to another drive?
Before we begin, let's clearly understand why Zalo data migration is necessary:
Free up C drive space
When C drive space is occupied too much by Zalo data, the system will become slow and not operate smoothly. Moving data to another drive helps free up space on drive C, thereby improving computer performance.
Avoid computer overload
If you are someone who often sends and receives heavy files such as videos or images via Zalo, this amount of data will increase and cause overload on drive C. This can lead to computer crashes or errors. when storing.
Easily manage data
Moving data to another drive not only helps reduce the load on drive C but also helps you easily manage and reorganize your files. Drive D or E usually has larger capacity, suitable for long-term storage of important files without worrying about the drive filling up.
See more: Instructions for buying Water Bus tickets on Zalo
How to transfer Zalo data to another drive using the ZaloMove tool
ZaloMove is a free and easy-to-use tool that helps you quickly move Zalo data folders from drive C to other drives safely and effectively. Below are detailed instructions on how to use this tool.
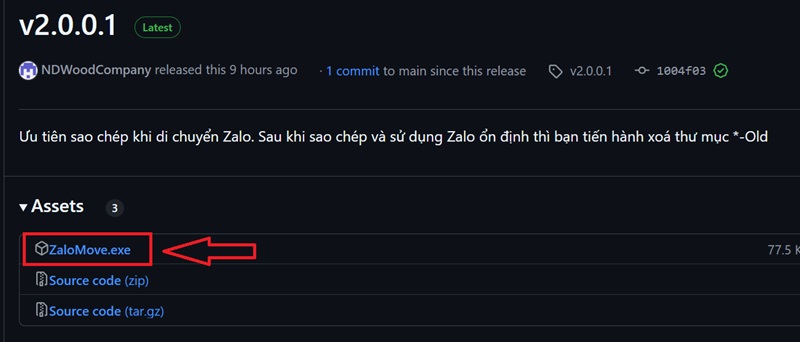
Step 1: First, you need to download the ZaloMove tool from the GitHub page HERE
Step 2: Right click on the ZaloMove icon and select Run as administrator to ensure the data migration process goes smoothly.
Step 3: Click the folder icon to choose where you want to store Zalo data. By default, the tool will suggest saving data in drive D, but you can choose any other drive that suits you.
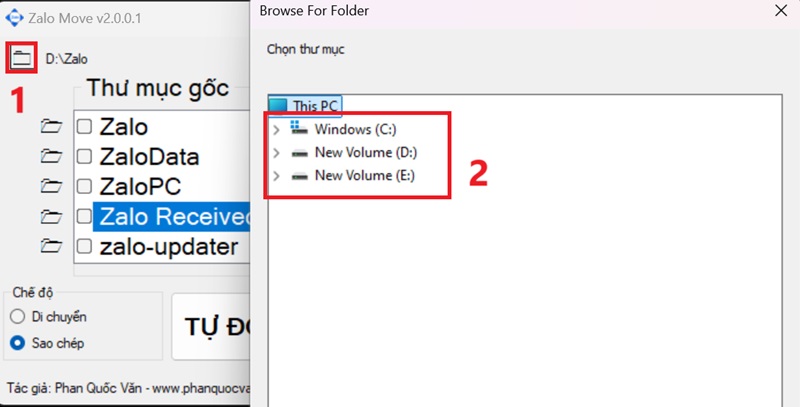
Step 4: Select the folder containing the Zalo data that needs to be moved. By default, the tool will move all 5 main folders.
Step 5: ZaloMove tool provides two data migration modes: Copy and Move.
- Copy: This option creates a copy of Zalo data at a new location. At the same time, ZaloMove will rename the root folder to *-Old for backup. This is safe mode and I recommend it because you have a copy of the original data in case the migration fails.
- Move: Data will be completely cut from drive C to the new location, erasing the original data at the old location.
Note: If you're a new user or unfamiliar with the data migration process, select it Copy mode to ensure safety. After you have tested and found Zalo working properly in the new location, you can go back and delete the old *-Old folders to save space.

Once you have selected the necessary settings, click the button AUTOMATIC to start the data migration process. This process may take some time, depending on the amount of data to be moved.
Important notes when using ZaloMove
- Do not open Zalo during travel: To avoid errors or data not synchronizing properly, you should not open the Zalo application while the ZaloMove tool is running.
- Recheck data after migration: After completing the migration process, open Zalo and recheck all data such as messages, photos, videos to ensure that everything has been successfully migrated and works normally.

See more: Instructions for clearing cache on Zalo to optimize capacity
Conclusion
Move Zalo data to another hard drive with the tool ZaloMove is a simple but effective solution to free up C drive space and improve computer performance. With detailed instructions and important notes, you can perform this process safely and easily. Wish you success!


 128GB: when is enough, when should you upgrade to a higher level?")


