Together we will learn what resolution is and how to keep the image quality. You will understand why your photos when posted on Facebook or other social networks are not as smooth and sharp as people.
| Join the channel Telegram belong to AnonyViet 👉 Link 👈 |
This article is the knowledge I share with you. If you have any ideas or additional knowledge. Please leave a comment for other friends to refer to, avoid saying things that cause discord.
What is the image resolution?
As far as I know, the secondary image resolution is made up of a unit called Pixels. Pixels color cells are very, very small in size and in the number of hundreds, tens of thousands of pixels will create an image. Number pixels The more in an image, the clearer the image and vice versa.
But the photos you like do not always meet the resolution needs. Some sites like Facebook will have a minimum resolution requirement for photos. What happens if your photos do not meet the requirements?
How to change image resolution?
Would you try to change the resolution of that photo? However, changing the image resolution manually can cause the image to be blurred, broken, and no longer clear. pixels has been “stretched”.
Because basically we have no deep knowledge about images. So arbitrarily changing the resolution manually will not be suitable and cause bad effects on the image. I will help you to solve this problem.
To solve that, today I will show you how to increase the image resolution and still keep the quality. Of course, we will ask for the help of software developed by experts.
That software is called: Photozoom. A famous software in the world of art and photography. Below, I will leave the download link of the Pro 7 version for you.
Remember to skip the ad to support me!
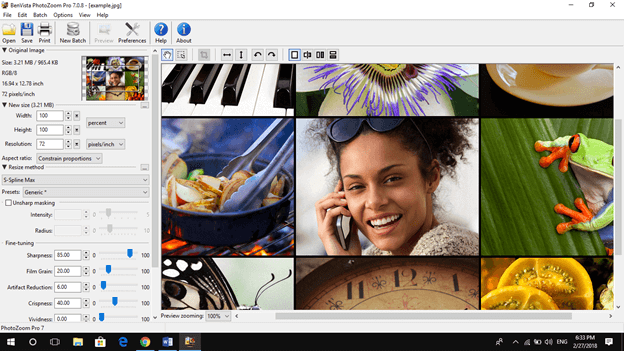
After downloading and installing normally like other software. This is the software interface when used.

Instructions for using the software to increase the image resolution
In order to start improving your image quality, you need to have an image. Of course! Choose a photo for yourself and add it to the software by pressing Openselect the photo you want to increase the resolution then continue pressing Open:

Increase resolution
Then the job of increasing the image resolution will be very simple. You just need to enter the resolution that you want into the frame new size. Pay attention to the Resolution a bit!
Here Width means image width, Cao is the image height and Resolution is the image resolution.
One note that after entering Width or Cao, the software will automatically change the remaining dimensions of the image to best fit your photo. The software will keep your original image ratio, only increase the resolution.
For example, here I will change the image resolution from 100 to 1080:

After changing the resolution, the software will scan the image and edit it. Depending on the image resolution that you increase more or less, scanning and editing photos will be fast or slow.
Note
Edge New Size You can see how much the image will weigh after you change the resolution. One drawback of the software is that when increasing the resolution, the image will be very heavy.
Once done, save the photo by clicking Save. You will see a window pop up, please choose the path, name and image extension in turn. Then press Save is okay ( The image suffix is usually .png and .ping ).

Another window appears, here you can choose the image compression level to make the image lighter. You can choose the level from 0 to 9. The higher the level, the longer the saving process will take. Then you press Ok:

Finally, wait for the saving process to complete.

Good luck
Lmint.


