
Create USB boot installed macOS 26 tahoe is the most optimal solution for those who want to experience the new Apple operating system in an active and professional way. Instead of having to reload the heavy installer for each machine, a USB Boot allows you to install clean, fast and efficient. This article will guide you in detail to make it successful, even if you are a beginner.
| Join the channel Telegram belong to Anonyviet 👉 Link 👈 |
Why create USB Boot MacOS 26 tahoe installation?
Before going into technical steps, let’s find out why this method is preferred by technology followers and IT experts more than directly upgrading through System Settings.
Maximum time saving
You only need to download the installer once. The USB will then become a mobile installer, ready to upgrade for any compatible Mac without an internet connection to reload.

Implement “Clean Install” (Clean Settings)
This is the greatest benefit. Creation USB boot Install MacOS 26 Tahoe allows you to completely delete the drive before installing. This helps your new system operate smoothly, stable, no more spam files or errors from the old version.
Safe and flexible
You can use USB to install MacOS Tahoe on a separate partition, experience in parallel with the current operating system without fear of affecting the job. It is also the perfect “savior” when the Mac has a problem and needs to reinstall from the beginning.
If you manage multiple Macs, having a standard installer in your hand will help the upgrade process simultaneously become effective and consistent.
Prepare before creating USB Boot installed macOS 26 tahoe
To make the process smoothly, make sure you have the following “ingredients”:
- A USB: Minimum capacity requirements 32GB. For the best speed, prioritize using USB 3.0 (or higher).
- Internet connection: Needed to download the MacOS 26 Tahoe installer from Apple.
- A compatible Mac: Your Mac needs to be eligible to run MacOS Tahoe (Mac lines using Apple Silicon and Mac Intel 2019 and above).
Important warning: All data on USB will be deleted during this process. Backup all important files from USB to another safe place before you start.
Instructions on USB Boot Macos 26 Tahoe Boot
We will perform this process through 4 main steps very clearly. Please follow carefully!
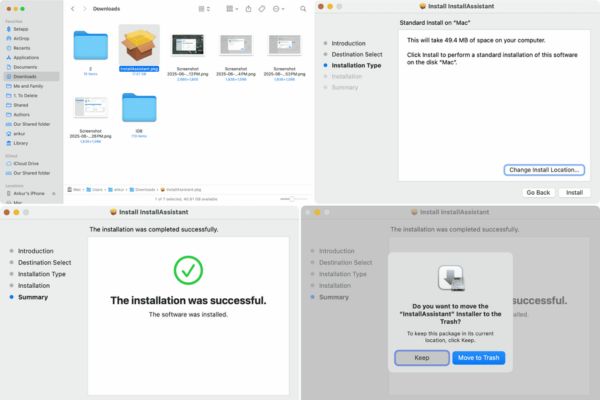
Step 1: Download the installer MacOS Tahoe Beta
Use Safari browser, access the download link to MacOS Tahoe Beta that Apple provides to developers or Public Beta users HERE.
After downloading the file (about 16GB), open it. A installer will appear. You just need to press Install and follow the instructions to apply “Install MacOS Beta.App“Installed into the Applications folder on your Mac.
Step 2: Prepare the installation file in the Applications folder
To make the following command simpler, we will perform a small operation:
- Open Finder> Applications.
- Find an application called “Install MacOS Beta.App“.
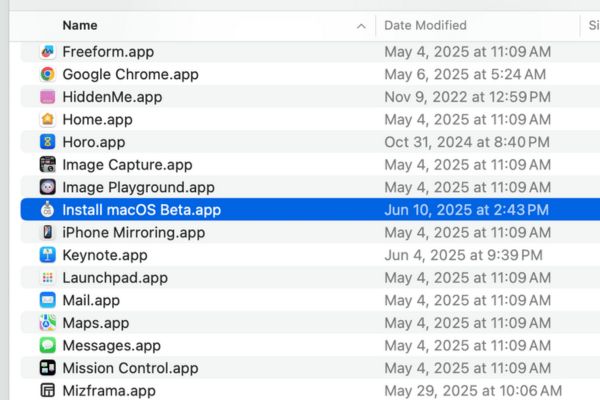
- Right -click on it and select Rename (rename). Change its name to “Tahoe“
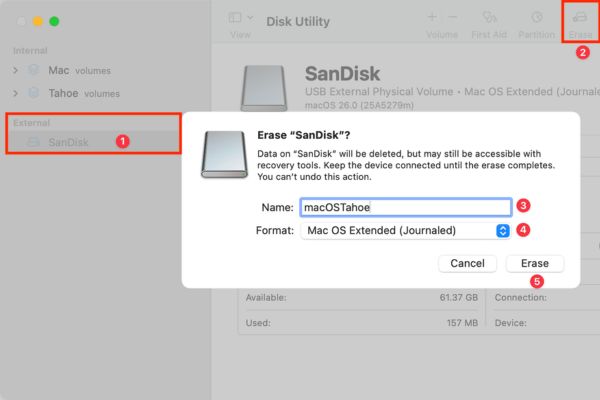
Step 3: USB format
Plug your USB into Mac> Open Disk Utility (Find in the Applications/Utilities).
From the list on the left, choose the right USB one> click the button Erase On the toolbar.
In the window appears, set the following exactly:
- Name: macostahoe (instant, spaced).
- Format: Mac OS Extended (Journaled).
- Scheme: Select Guid Partition Map.
Press Erase And wait for a moment to complete the process.
Step 4: Use the Terminal command to complete
- Open application Terminal (also in the Applications/Utilities).
- Copy the correct command line below and paste it into the Terminal window and Enter:
Sudo /Applications/tahoe.app/contents/resources/creatateinstallMedia –Volume/volumes/macostahoe
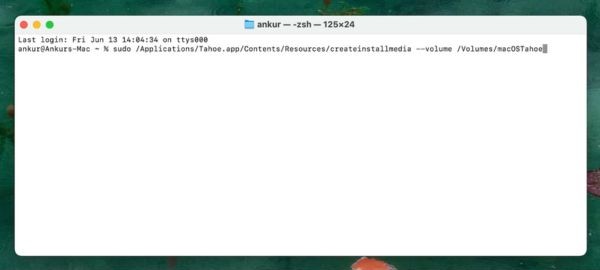
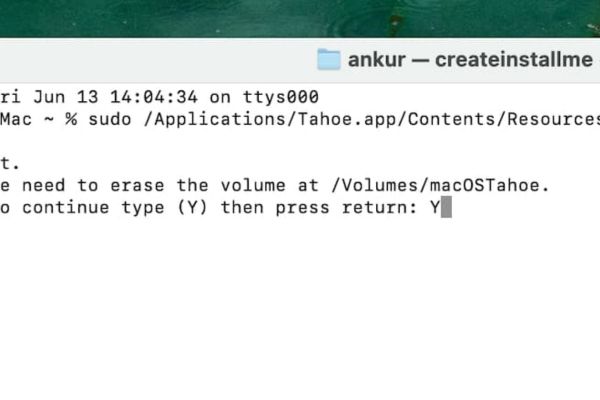
- Terminal will ask the password of the machine’s administrator. Enter your password and press Enter.
- The system will ask to confirm the USB deletion. Key Y and click Enter.
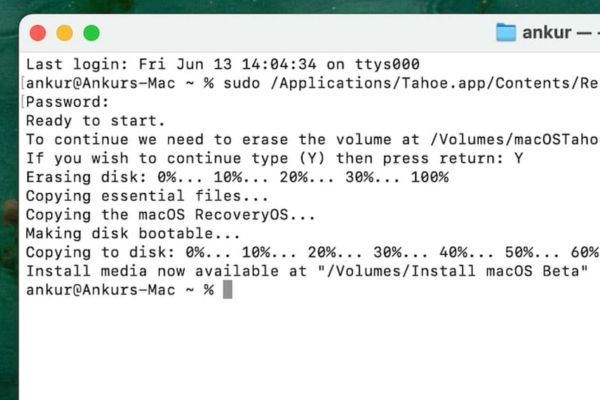
Now, the USB Boot MacOS 26 Tahoe is officially started. Terminal will automatically delete, copy files and create boots for USB. This process may take 15-30 minutes. Do not close Terminal or withdraw USB, wait patiently until you see a successful notice: Install Media Now Available at “/Volumes/Install MacOS Beta”.
How to use USB to install MacOS 26 tahoe on Mac
After creating a successful USB, the installation is very simple:
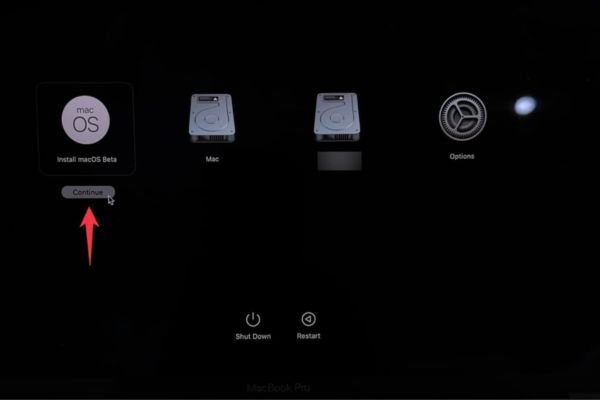
Turn off the Mac you want to install and wait about 30 seconds> plug the USB Boot into the device> Turn on the device and start into the Startup Manager:
- Mac Apple Silicon (m1/m2/m3 …): Press and hold the power button until the start -up screen appears.
- Mac Intel: Turn on the device and immediately press the Option key (⌥).
Choose a drive called “Install MacOS Beta“From the list and follow the instructions on the screen to start the journey to experience MacOS 26 Tahoe.
Conclusion
Create USB boot installed macOS 26 tahoe Not only does it save you time but also brings a more stable and smoother system. With the powerful USB in hand, you are now completely proactive in upgrading, reinstalling or testing new macOS on any compatible Mac.


 128GB: when is enough, when should you upgrade to a higher level?")


