Nowadays, building a Lab Network at home to run NAS, storage server, self-hosting service… has become much more popular. A common problem is: how to access network services at home from outside the Internet when most home connections are used? Dynamic IPevery time the modem restarts, the IP changes.
| Join the channel Telegram belong to AnonyViet 👉 Link 👈 |
Instead of having to remember a hard-to-remember and ever-changing IP range, the most convenient way is to use domain name (For example: lab.anonyviet.com) and configure so that the DNS record is always automatically updated according to the modem’s current public IP. This article guides you through configuration Cloudflare + a small bash script to do Dynamic DNS, helping your domain name always point to the correct IP at home.
1. Operating model
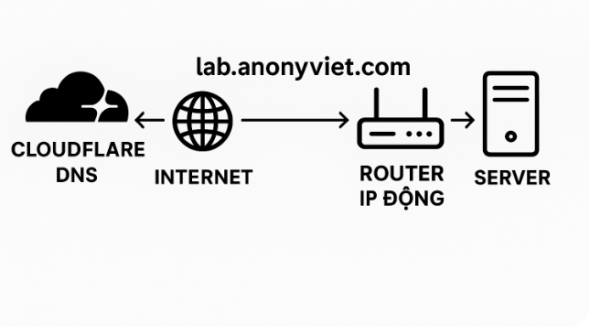
The idea is as follows:
- You have a domain name managed by Cloudflare.
- On an always-on machine on your local network (Linux, virtual machine, Raspberry Pi…), you run a script periodically.
- This script:
- Get the current public IP (modem’s WAN IP).
- Compare with the IP configured in the A record on Cloudflare.
- If changed, the script calls the Cloudflare API to update the IP of your DNS record.
Thanks to that, even if the WAN IP changes, it only takes a few minutes for the domain name to automatically point to the new IP, you just need to access the domain as usual.
2. Prepare in advance on Cloudflare
Before touching the script, you need to prepare a few things on Cloudflare.
2.1. Domain name and DNS configuration
Step 1: Buy and point the domain name to Cloudflare (change the nameserver at the place of purchase to Cloudflare’s nameserver).
Step 2: In Cloudflare, go to section DNS and create an A record for Lab.
Example you want to use: lab.anonyviet.com
Create record:
Type: A
-
-
- Name:
lab - IPv4 addresses: can be temporarily filled in
123.123.123.123(Then the script will automatically update the real IP). - Proxy status: depending on needs, can be turned on (Proxied) or turned off (DNS only).
- Name:
-

2.2. Get Zone ID and generate API Token
You need 2 things to automatically configure Cloudflare
- Zone ID
- API Tokens
How to get Zone ID cloudflare
Zone ID of domain (go to domain in Cloudflare, tab Overviewat the bottom of the page you will see Zone ID).
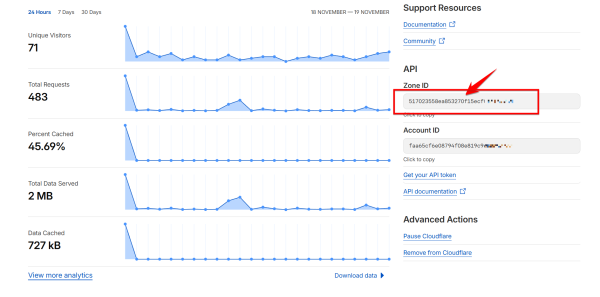
Save the Zone ID number sequence
How to get Cloudflare Toklen API
Here’s how to create an API Token with DNS management rights: Go to the page https://dash.cloudflare.com/profile/api-tokens
Select Create Tokens.
Select template Edit Zone DNS -> Use template
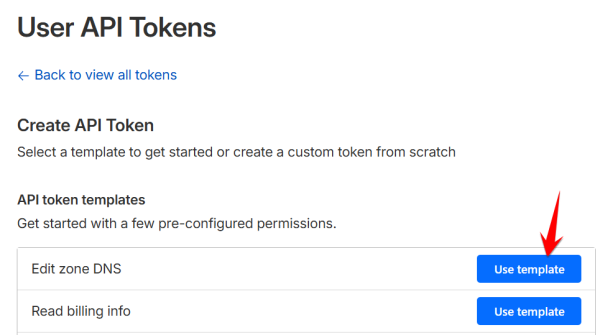
In Zone Resources, select specific zone, in the box next to select the correct domain you want to update dynamic IP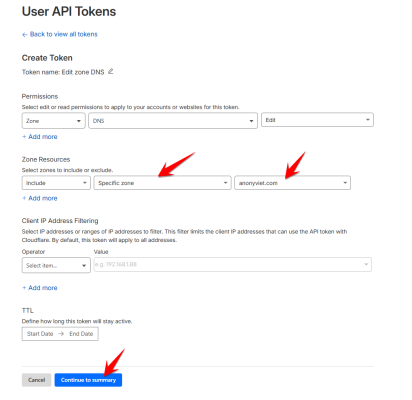
Once created, copy it API Tokens and save it in a safe place.
3. Prepare the machine to run the script (Linux / Raspberry Pi)
You need an always-on machine on your local network, for example:
- Raspberry Pi.
- The server runs Ubuntu, Debian, or any Linux distro.
- There is SSH access for configuration.
Install additional necessary tools:
sudo apt update
sudo apt install -y curl jq
curl used to call API, jq used to process JSON returned from Cloudflare.
4. Write a script to update IP via Cloudflare
Create folder and script file:
cd ~
mkdir -p cloudflare
cd cloudflare
nano cloudflare.sh
Paste the following content (customize the variables at the top of the file accordingly):
#!/usr/bin/env bash

# ================== CẤU HÌNH ==================
CF_API_TOKEN="YOUR_API_TOKEN_HERE"
CF_ZONE_ID="YOUR_ZONE_ID_HERE"
CF_RECORD_NAME="lab.anonyviet.com"   # Tên đầy đủ của record (FQDN)

IP_FILE="$HOME/cloudflare/current_ip.txt"
LOG_FILE="$HOME/cloudflare/cloudflare.log"

# ================== HÀM HỖ TRỢ ==================

log() {
  echo "$(date '+%Y-%m-%d %H:%M:%S') - $1" >> "$LOG_FILE"
}

mkdir -p "$(dirname "$IP_FILE")"

# ================== LẤY IP PUBLIC ==================

CURRENT_IP=$(curl -s https://ipv4.icanhazip.com | tr -d '\n')

if [[ -z "$CURRENT_IP" ]]; then
  log "Không lấy được IP public, dừng."
  exit 1
fi

OLD_IP=""
if [[ -f "$IP_FILE" ]]; then
  OLD_IP=$(cat "$IP_FILE")
fi

if [[ "$CURRENT_IP" == "$OLD_IP" ]]; then
  log "IP không thay đổi ($CURRENT_IP), bỏ qua cập nhật."
  exit 0
fi

log "IP thay đổi: $OLD_IP -> $CURRENT_IP, bắt đầu cập nhật Cloudflare."

# ================== LẤY RECORD ID ==================

RESPONSE=$(curl -s -X GET \
  "https://api.cloudflare.com/client/v4/zones/$CF_ZONE_ID/dns_records?type=A&name=$CF_RECORD_NAME" \
  -H "Authorization: Bearer $CF_API_TOKEN" \
  -H "Content-Type: application/json")

RECORD_ID=$(echo "$RESPONSE" | jq -r '.result[0].id')

if [[ -z "$RECORD_ID" || "$RECORD_ID" == "null" ]]; then
  log "Không tìm thấy DNS record cho $CF_RECORD_NAME"
  exit 1
fi

# ================== GỬI YÊU CẦU CẬP NHẬT ==================

UPDATE_PAYLOAD=$(jq -n \
  --arg type "A" \
  --arg name "$CF_RECORD_NAME" \
  --arg content "$CURRENT_IP" \
  --argjson ttl 120 \
  --argjson proxied true \
  '{type: $type, name: $name, content: $content, ttl: $ttl, proxied: $proxied}')

UPDATE_RESP=$(curl -s -X PUT \
  "https://api.cloudflare.com/client/v4/zones/$CF_ZONE_ID/dns_records/$RECORD_ID" \
  -H "Authorization: Bearer $CF_API_TOKEN" \
  -H "Content-Type: application/json" \
  --data "$UPDATE_PAYLOAD")

SUCCESS=$(echo "$UPDATE_RESP" | jq -r '.success')

if [[ "$SUCCESS" == "true" ]]; then
  echo "$CURRENT_IP" > "$IP_FILE"
  log "Cập nhật thành công bản ghi $CF_RECORD_NAME -> $CURRENT_IP"
  exit 0
else
  log "Cập nhật thất bại. Phản hồi: $UPDATE_RESP"
  exit 1
fi
Save the file, then grant execution permission:
chmod +x ~/cloudflare/cloudflare.sh
Note:
- Replace
YOUR_API_TOKEN_HEREwith your real API Token. - Replace
YOUR_ZONE_ID_HEREwith real Zone ID. - Replace
lab.anonyviet.comwith the domain/subdomain you want to use for homelab.
5. Test the script for the first time
Test run manually:
./cloudflare.sh
If everything is ok:
- File
current_ip.txtwill be created and contain the current public IP. - File
cloudflare.logwill record the update log. - In Cloudflare → DNS, A record
lab.anonyviet.comwill be updated with the correct public IP.
If you don’t see updates:
- Check the correct Zone ID, API Token, and record name.
- Use the following command to view log:
tail -n 50 ~/cloudflare/cloudflare.log
6. Set up cron for automatic updates
When the script is working well, you should run it automatically every few minutes cron.
Open crontab:
crontab -e
Add line:
*/5 * * * * /bin/bash /home/USERNAME/cloudflare/cloudflare.sh >/dev/null 2>&1
In there:
- Replace
USERNAMEwith real username on the system. - Calendar
*/5 * * * *meaning run every 5 minutes. You can adjust it to 10, 15 minutes depending on your needs.
Press the keys repeatedly to save:
Ctrl X
Y
Enter
From now on, cron will automatically run the script. Every time the WAN IP changes, Cloudflare will be updated a few minutes later.
7. NAT Port service to the Internet
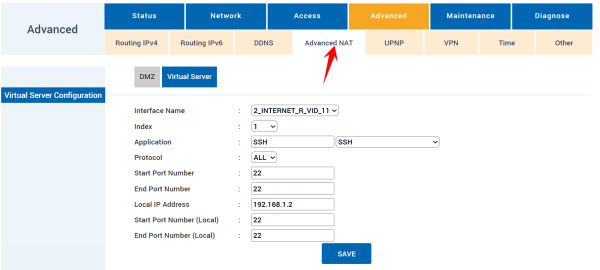
Now go to the Internet Router to Nat Port the service out to the Internet, then access the service according to the domain name configured above.
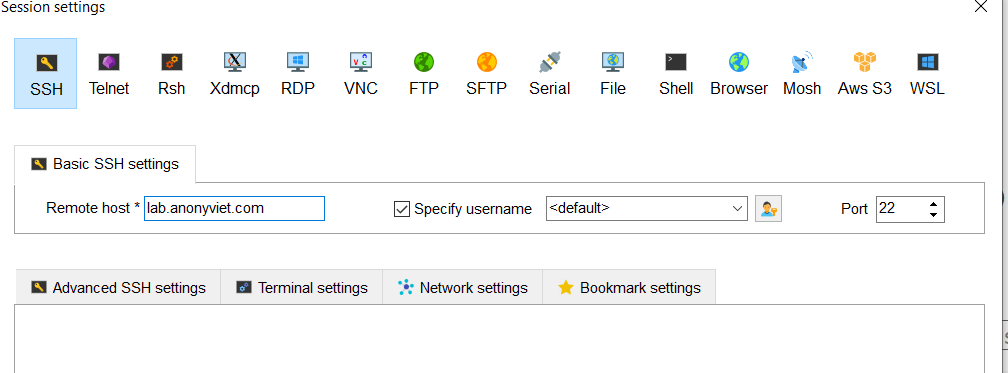
For example, if you want to SSH to the Server at home, then NAT Port 22. Then declare access when outside the internet as: hostname: lab.anonyviet.comPort 22.
The picture below is the NAT Port on Modem VNPT GW040-NS
Use MobaxTerm to remotely SSH to the Lab at home
8. A few notes when using for homelab
- The script should be placed on the computer always on in the internal network (Raspberry Pi, mini PC, NAS…).
- You should check the log periodically to make sure the update is not corrupted due to expired tokens, wrong permissions, etc
- If you use additional reverse proxy (Nginx Proxy Manager, Traefik…) or SSL, make sure the domain name points to the correct IP before configuring HTTPS.
You can edit the domain name, link, screenshots… in the article to suit your homelab and system.

