Activate Dolby Vision HDR Windows 11 is the first step for you to turn your computer screen into a mini cinema. This technology delivers brilliant, deep and incredibly realistic images. Let’s discover how to do it in just a few minutes.
| Join the channel Telegram belong to AnonyViet 👉 Link 👈 |
What is Dolby Vision HDR?
Most of us are familiar with SDR (Standard Dynamic Range) screens. SDR has a certain limit to the colors and brightness it can display.
HDR (High Dynamic Range) was born to break that limit. It allows displaying a wider range of colors, deeper blacks and much brighter whites. As a result, the image becomes more detailed, realistic and has more depth.
However, Dolby Vision goes a step further than the regular HDR10 standard. The core difference lies in “dynamic metadata”.
- HDR10: Uses static metadata, meaning it applies a common color and brightness setting to the entire movie or show.
- Dolby Vision: Using dynamic metadata, allows fine-tuning of images frame-by-frame or scene-by-scene. This means that in a scene, dark areas will be truly dark and bright areas will be bright without losing detail from each other. This is the secret to creating the ultimate cinematic experience.
When you enable Dolby Vision HDR Windows 11you’re unlocking the ability to display content exactly as the filmmaker intended.

Necessary conditions to enjoy Dolby Vision on Windows 11
To be able to experience this technology, your system needs to meet a few basic requirements.
- Monitors that support Dolby Vision: Check the specifications from your monitor or laptop manufacturer to make sure it has the Dolby Vision logo or certification, as not all HDR monitors support it.
- Compatible graphics cards (GPUs): Most modern graphics cards from NVIDIA (RTX series) and AMD (RX 6000 series and above) both support Dolby Vision signal output.
- Updated Windows 11 operating system: Make sure you’re running the latest version of Windows 11, especially the 24H2 update, to get the best support and most intuitive installation interface.
- Dolby Vision content: You need a source that supports this technology, such as movies and shows on Netflix (with Premium package), Disney+, or games that support Dolby Vision.

Instructions for activating Dolby Vision HDR Windows 11
Step 1: Open the application Settings using key combinations Windows + I. Alternatively, you can also click the Start menu and select the Settings gear icon.
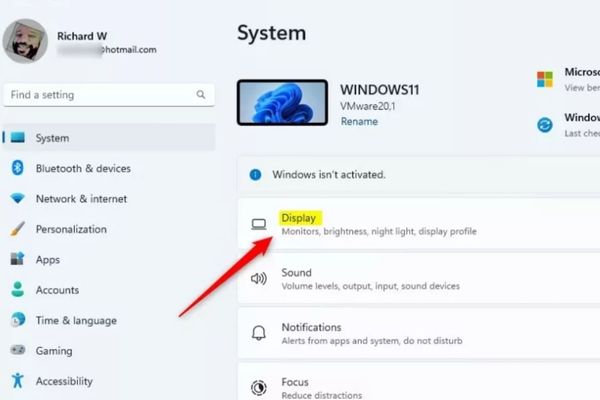
Step 2: In the newly opened Settings window, look at the menu column on the left and select System. Next, in the right pane, find and click the cell Display.

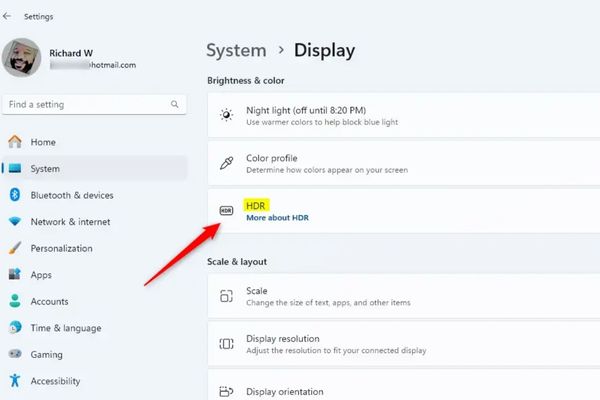
Step 3: On the Display settings page, you will see display-related options. Find and click on the section called HDR.

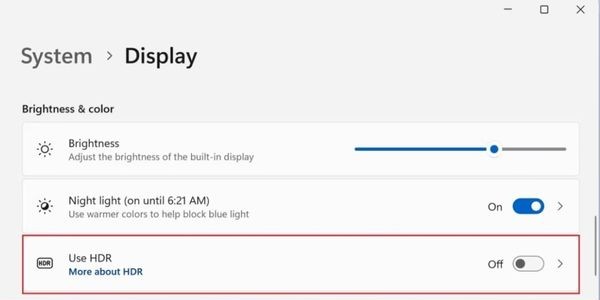
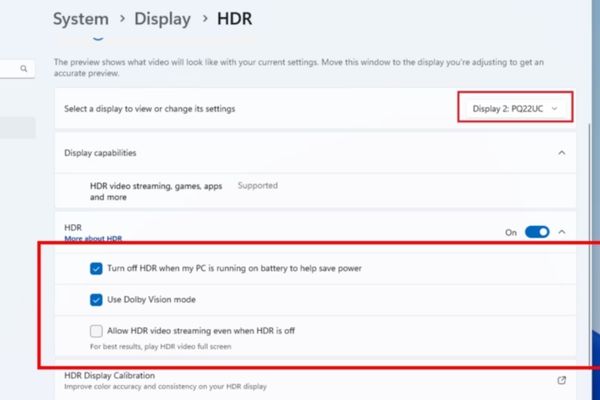
Step 4: Find options Use HDR and flip the switch On. If you have multiple displays, make sure you’ve selected the correct display that supports Dolby Vision from the drop-down menu.

If your system (display, GPU, operating system) meets the requirements, Windows 11 will automatically use the Dolby Vision profile. You will immediately notice a change in color and brightness on the screen.

How to turn off Dolby Vision HDR when not needed
While it’s great for entertainment, you may want to turn off HDR when working on documents or general office tasks to save battery life (for laptops) or to keep colors displayed properly.
How to do it is very simple: Just repeat the above steps and in Step 4, flip the switch Use HDR about location Off. The screen will return to normal SDR mode.
Conclude
Job Enable Dolby Vision HDR Windows 11 is no longer a complicated process for tech people. With innovations from Microsoft, every user can now easily harness the maximum visual power from their hardware. Your movie watching and gaming experience will be raised to a new level with vivid colors, impressive contrast and amazing detail.


