• Home
  • News
  • Software
  • Knowledge
  • MMO
  • Tips
  • Security
  • Network
  • Office
AnonyViet - English Version
  • Home
  • News
  • Software
  • Knowledge
  • MMO
  • Tips
  • Security
  • Network
  • Office
No Result
View All Result
  • Home
  • News
  • Software
  • Knowledge
  • MMO
  • Tips
  • Security
  • Network
  • Office
No Result
View All Result
AnonyViet - English Version
No Result
View All Result
Home Tips

Instructions to increase RAM for computers with USB

AnonyViet by AnonyViet
February 18, 2023
in Tips
0
0
SHARES
Share on FacebookShare on Twitter

Do you know? You can use USB to increase Ram capacity in Windows 7, 8, 10 without using any Support Software. Please read the article below to know more about these methods

Join the channel Telegram belong to AnonyViet ? Link ?

AnonyViet I’ve known this trick for a long time, but maybe some of you haven’t heard of it. I confirm that I can do it, not Download Ram, or download RAM like on troll Web sites. As you know a basic function of RAM memory. For gaming purposes, one needs a lot of RAM. What if you don’t have enough money to buy new RAM and also sometimes don’t have an extra slot on your motherboard to set up new RAM. How would you upgrade the RAM? Well, the answer is simple. Today, we are going to share some tips that will help you to Increase RAM for computer with USB in Windows.

:mrgreen: ? ? :mrgreen: ? ? :mrgreen: ? ? :mrgreen: ? ?

How To Increase RAM Using USB / Pendrive In Windows 8 & 10

#1 Method: Using Virtual Ram Concept For Windows

Step 1. First attach the USB to the computer. Then open computer and right click My Computer =>Afterward, Properties.
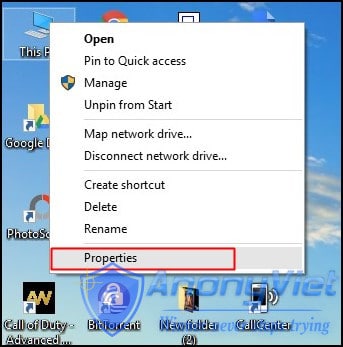
Virtual Ram Concept For Windows

Step 2. Now the Properties window will appear, then click on Advanced system settings from the left side.
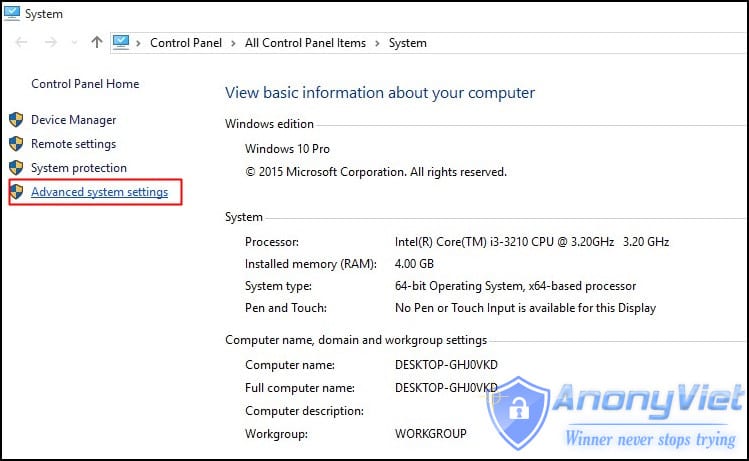
Virtual Ram Concept For Windows

Step 3. Then in Advanced Tab click Settings button appears in Performance tab.
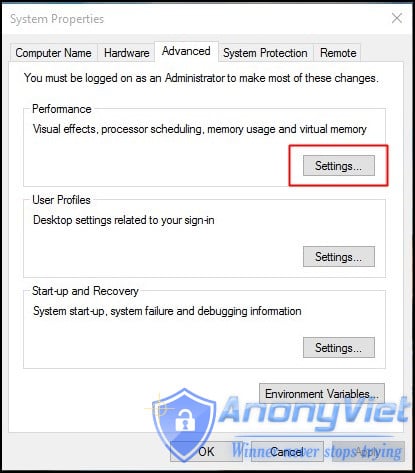
Virtual Ram Concept For Windows

Step 4. New window will appear again then click Advanced Tabs.
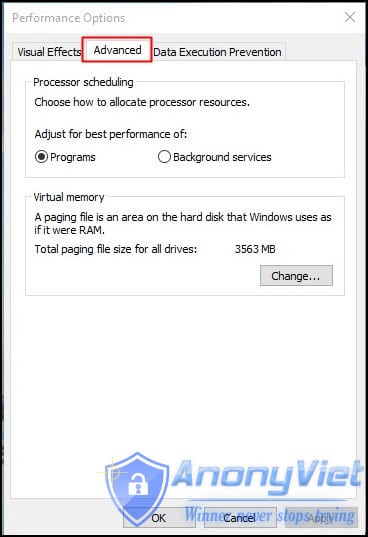
Virtual Ram Concept For Windows

Step 5. In the Advanced Tab there is an option of Virtual Memory, Then click Change
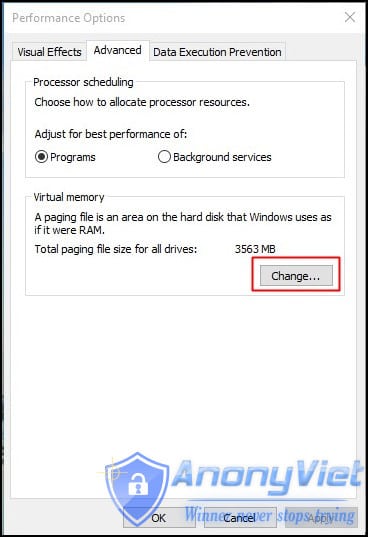
Virtual Ram Concept For Windows

Step 6. Now uncheck the box (Uncheck)Automatically manage paging file size for all drives. In the box below, select USB your plugged into the computer, remember the capacity of the USB. In the cell Custom Size: enter the amount of USB you want to share for Ram
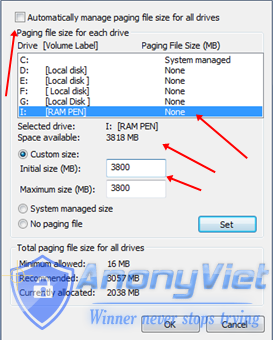
Virtual Ram Concept For Windows
Virtual Ram for Windows

Note: If your USB is of Size 4Gb, then you should subtract 10 Mb. As shown in the picture, I am using 4Gb USB and the available space is 3700 Mb, so I only enter the Custom Size as 3690, to ensure safety for use.

Restart your computer or laptop and now your USB is working like Virtual Ram. If you face problem in above method then also can follow below method which is easy to implement and work on Window 7, 8

#2 Method: Use ReadyBoost in Windows 7, 8, 10

Step 1. First of all attach your USB to the computer => Now please right click go to your USB drive and open Properties
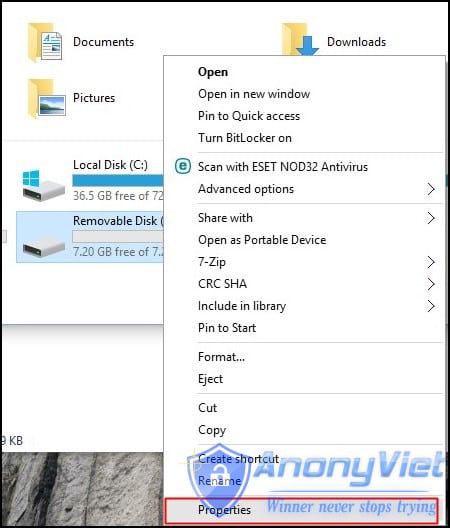
Using ReadyBoost in Windows 7, 8, 10

Step 2. Now you need to browse to ReadyBoost Tabs.
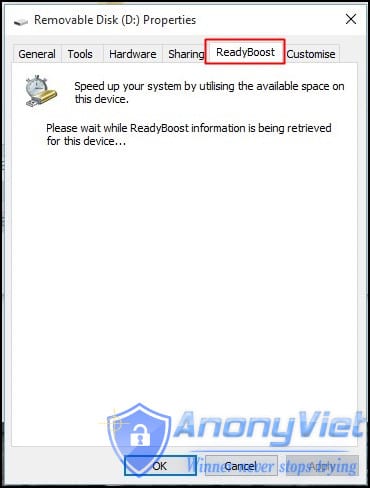
Using ReadyBoost in Windows 7, 8, 10

Step 3. Then switch to Use disk device and reduce your current memory space. If your current device location is 4100MB, then reduce it to about 200-300MB.
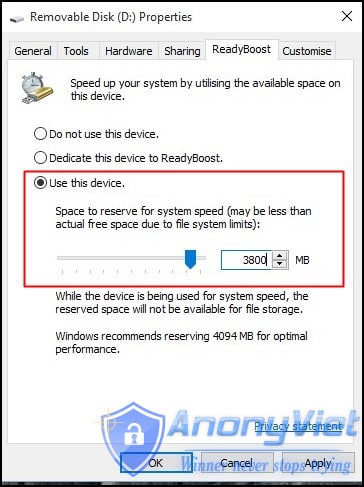
Using ReadyBoost in Windows 7, 8, 10

Step 4. Then click the button and all Done Apply.
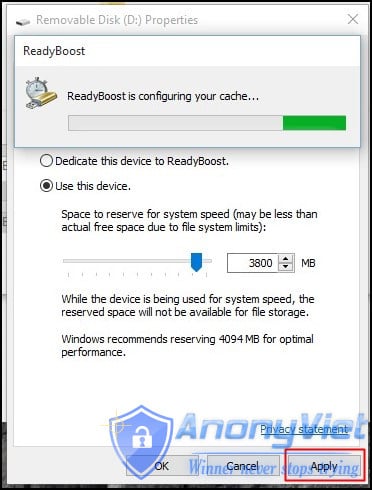
Using ReadyBoost in Windows 7, 8, 10

Step 5. In case if you want to change your drive back to normal then switch it back to Do not use a device in the tab ReadyBoost.
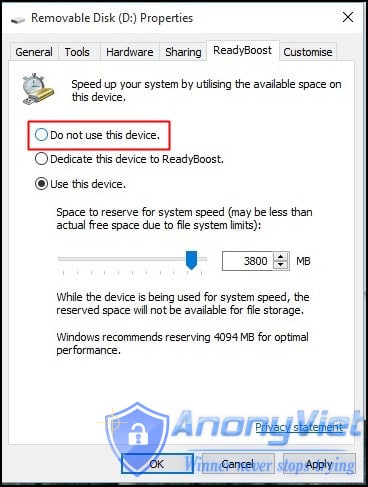
Using ReadyBoost in Windows 7, 8, 10

#3 Method: Use external software

Disk RAM

Disk RAM
Disk RAM

RAM Disk is a high performance RAM disk application that allows you to have a drive on your computer completely stored in its memory. As memory is much faster than the physical hard drive, storing data temporarily on a fast in-memory disk achieves a higher performance. Whatever your job is, read on to find out what a RAM disk can offer you.

You can see how many MB of memory is free on your computer’s USB or hard drive and can set them up as RAM Disk.

eBoostr
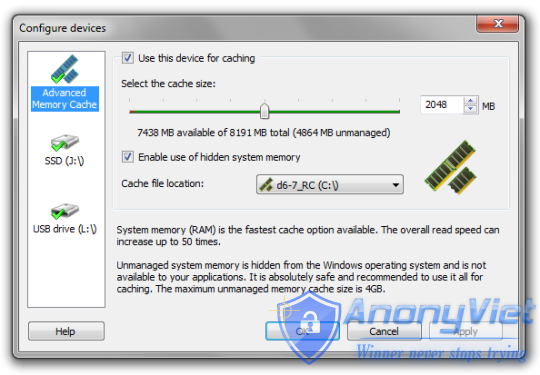
eBoostr
eBoostr

eBoostr is designed to make your computer faster. It features an easy to use interface and an automatic configuration wizard that will get you “super speed” in no time at all. It also has a selection of ReadyBoost where you can use your USB drive to speed up the computer.

Important recommendations:

first. Always Safely Eject USB Drive (Safely remove USB) when not in use

2. In the virtual memory method if you want to convert your USB back to normal. You follow the steps above and Remove the custom memory value, select the default settings by checking Automatic Size Management Paging.

3. In Method ReadyBoost if not half used, delete all files do ReadyBoost created in your USB.

The article achieved: 5/5 – (100 votes)

Previous Post

Delete all Facebook friends in 2s

Next Post

Service “Free AntiDDoS” for Websites

AnonyViet

AnonyViet

Related Posts

[Facebook] Latest TUT Rip
Tips

[Facebook] Latest TUT Rip

March 26, 2023
[Facebook] Summary of Facebook report spells
Tips

[Facebook] Summary of Facebook report spells

March 25, 2023
How to use the Fn key on a laptop keyboard
Tips

How to use the Fn key on a laptop keyboard

March 24, 2023
Unleash your creativity and expand your image with the DALL-E 2
Tips

Unleash your creativity and expand your image with the DALL-E 2

March 24, 2023
How to create USB Boot, USB install Windows with Rufus
Tips

How to create USB Boot, USB install Windows with Rufus

March 23, 2023
5 steps to fix 100% Full Disk error on Windows 8/8.1/10
Tips

5 steps to fix 100% Full Disk error on Windows 8/8.1/10

March 22, 2023
Next Post
Service “Free AntiDDoS” for Websites

Service "Free AntiDDoS" for Websites

Leave a Reply Cancel reply

Your email address will not be published. Required fields are marked *

Recent News

[Facebook] Latest TUT Rip

[Facebook] Latest TUT Rip

March 26, 2023
How to unlock the hidden FM Radio feature on your phone

How to unlock the hidden FM Radio feature on your phone

March 26, 2023
[Facebook] Summary of Facebook report spells

[Facebook] Summary of Facebook report spells

March 25, 2023
Tổng hợp các nhóm Hacker APT trên thế giới

Tổng hợp các nhóm Hacker APT trên thế giới

March 25, 2023
[Facebook] Latest TUT Rip

[Facebook] Latest TUT Rip

March 26, 2023
How to unlock the hidden FM Radio feature on your phone

How to unlock the hidden FM Radio feature on your phone

March 26, 2023
[Facebook] Summary of Facebook report spells

[Facebook] Summary of Facebook report spells

March 25, 2023
AnonyViet – English Version

AnonyViet

AnonyViet is a website share knowledge that you have never learned in school!

We are ready to welcome your comments, as well as your articles sent to AnonyViet.

Follow Us

Contact:

Email: anonyviet.com[@]gmail.com

Main Website: https://anonyviet.com

Recent News

[Facebook] Latest TUT Rip

[Facebook] Latest TUT Rip

March 26, 2023
How to unlock the hidden FM Radio feature on your phone

How to unlock the hidden FM Radio feature on your phone

March 26, 2023
No Result
View All Result
  • Home
  • News
  • Software
  • Knowledge
  • MMO
  • Tips
  • Security
  • Network
  • Office

© 2023 JNews - Premium WordPress news & magazine theme by Jegtheme.