AIRAVAT là ứng dụng RAT trên Android đa chức năng với giao diện web GUI mà không cần bạn phải NAT Port.
| Tham gia kênh Telegram của AnonyViet 👉 Link 👈 |
Cảnh báo: Bài viết này nhằm mục đích giáo dục và không khuyến khích bất kỳ hành vi xấu nào. Bạn phải chịu trách nhiệm cho tất cả những hành động của mình.
Các tính năng có trên AIRAVAT
- Đọc tất cả các tệp của bộ nhớ trong
- Tải bất kỳ file nào từ thiết bị của nạn nhân xuống máy của bạn
- Nhận tất cả thông tin hệ thống của thiết bị nạn nhân
- Truy xuất danh sách các ứng dụng đã cài đặt
- Truy xuất tin nhắn SMS
- Truy xuất nhật ký cuộc gọi
- Truy xuất danh bạ
- Gửi tin nhắn
- Nhận tất cả các thông báo
- Keylogger
- Quyền quản trị viên
- Hiển thị cáctTrang lừa đảo để lấy cắp thông tin xác thực thông qua thông báo.
- Đánh cắp thông tin đăng nhập thông qua các trang lừa đảo được tạo sẵn
- Mở bất kỳ trang web đáng ngờ nào thông qua thông báo để lấy cắp thông tin đăng nhập.
- Ghi âm
- Phát nhạc trong thiết bị của nạn nhân
- Thiết bị rung
- Chuyển văn bản thành giọng nói
- Thay đổi hình nền
- Chạy lệnh shell
- Giả mạo Instagram
- Chạy trong nền
- Tự động mở khi thiết bị khởi động
- Tự động bắt đầu khi có bất kỳ thông báo nào
- Không cần chuyển tiếp cổng
Yêu cầu
Trước khi thực hiện thì bạn cần đảm bảo đáp ứng đủ các yêu cầu sau:
- Tài khoản Firebase.
- Tài khoản 000webhost.
- Tải ứng dụng APK Editor Pro+ trên Android tại đây.
- Tải phần mềm giả lập Android như Nox.
Lưu ý là các bạn nên sử dụng email phụ khi đăng ký tài khoản Firebase và 000webhost nhé. Phòng trường hợp Firebase và 000webhost chặn acc bạn.
Cách sử dụng AIRAVAT tạo Android RAT
Thiết lập Firebase
Bước 1: Đầu tiên các bạn cần đăng nhập vào firebase rồi nhấn “Create a project”.

Bước 2: Đặt tên cho dự án, chọn 2 ô bên dưới và nhấn “Continue”.
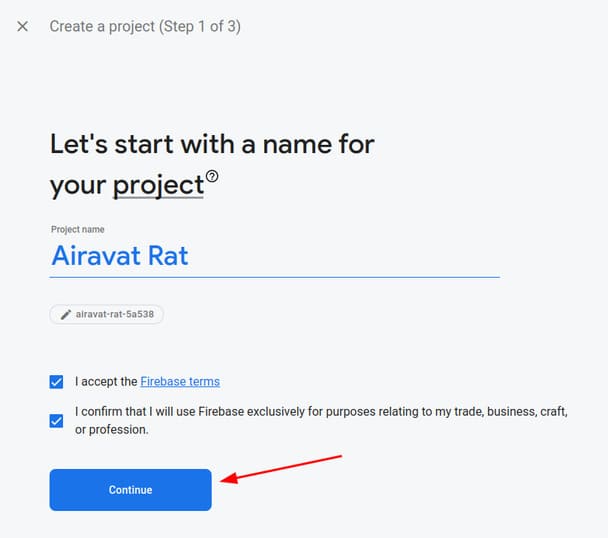
Bước 3: Nhấn tiếp “Continue”.
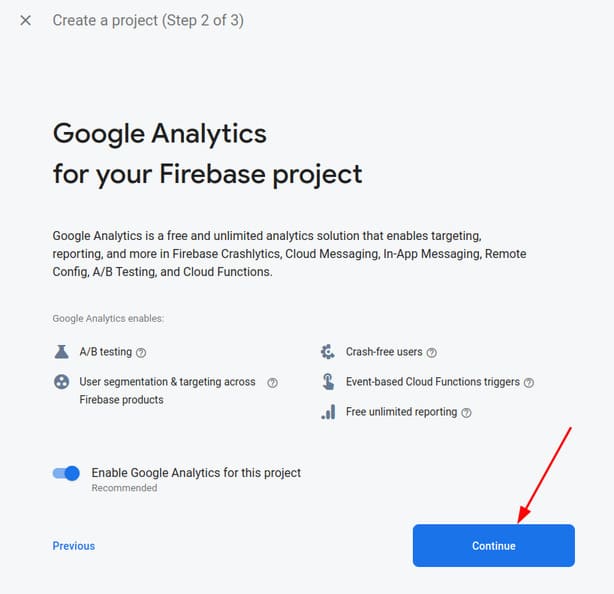
Bước 4: Nhấn “Create a new account”.

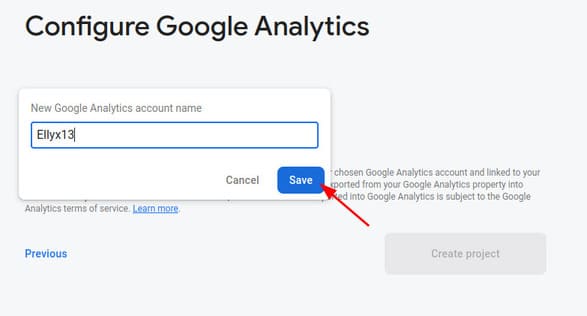
Bước 5: Đặt tên cho tài khoản Google Analytics rồi nhấn “Save”.
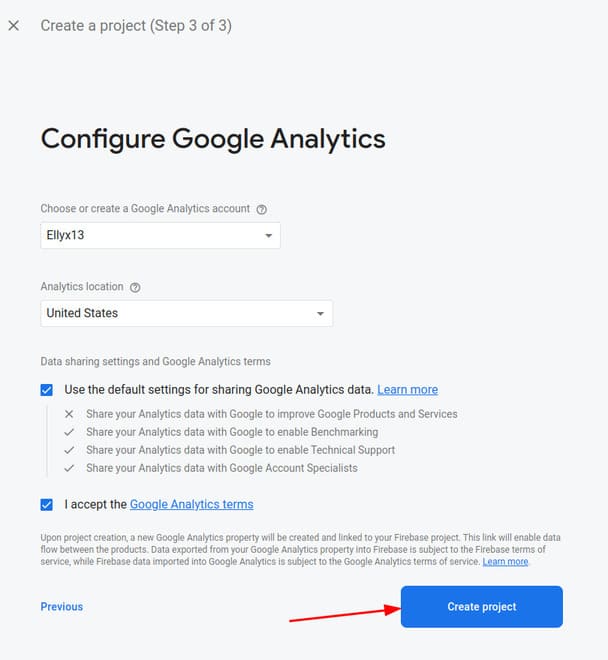
Bước 6: Chọn như hình dưới rồi nhấn “Create project”.
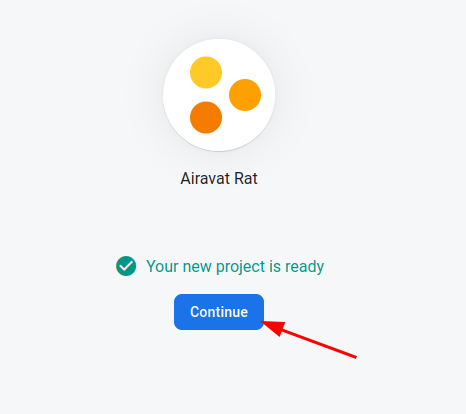
Bước 7: Nhấn “Continue”.
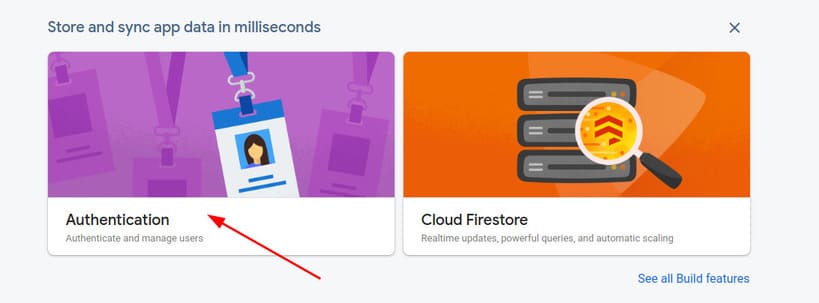
Bước 8: Ở trang chủ, các bạn nhấn vào “Authentication”.
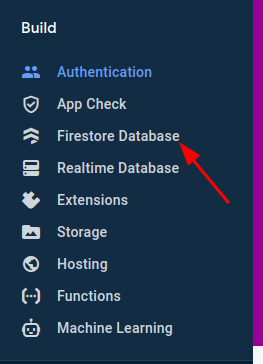
Bước 9: Ở menu bên trái chọn “Firestore Database”.
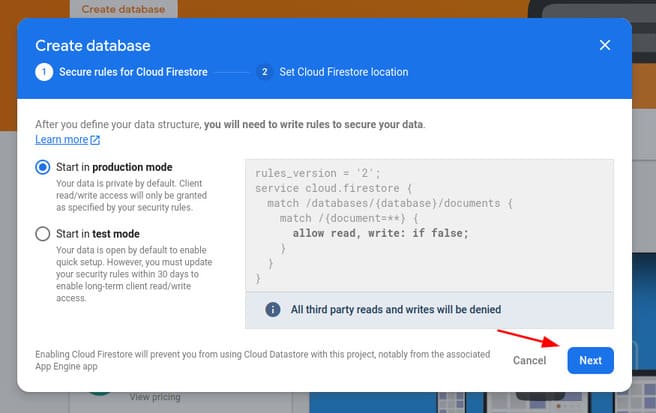
Bước 10: Nhấn “Create database”.

Bước 11: Nhấn Next.
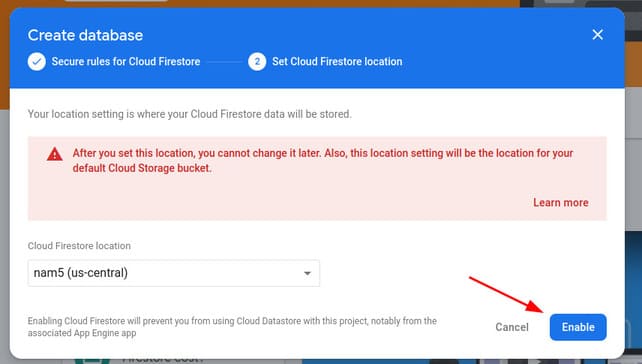
Bước 12: Chọn Enable.
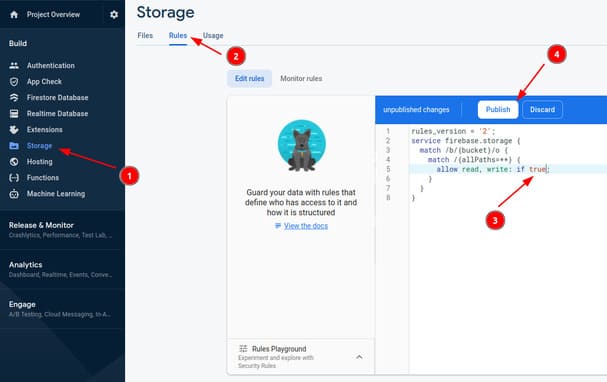
Bước 13: Các bạn làm theo thứ tự như trong ảnh, chọn Storage > Rules, thay false thành true và nhấn Publish.
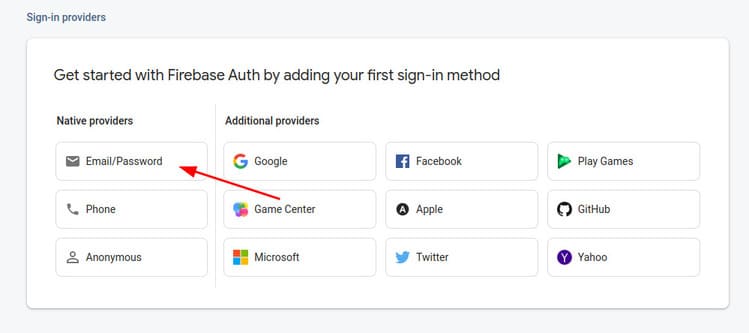
Bước 14: Trong menu bên trái, chọn Authentication và nhấn “Get started”.

Bước 15: Chọn Email/Password.
Bước 16: Chọn Enable và nhấn Save.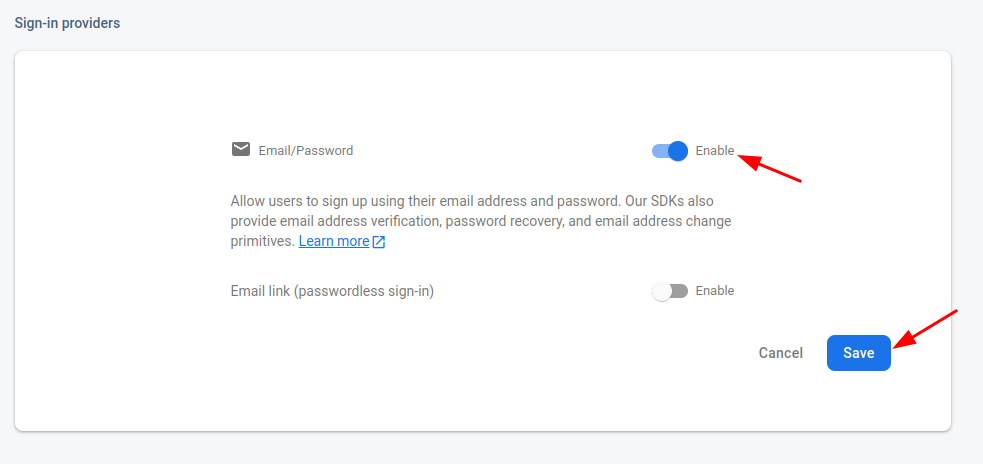
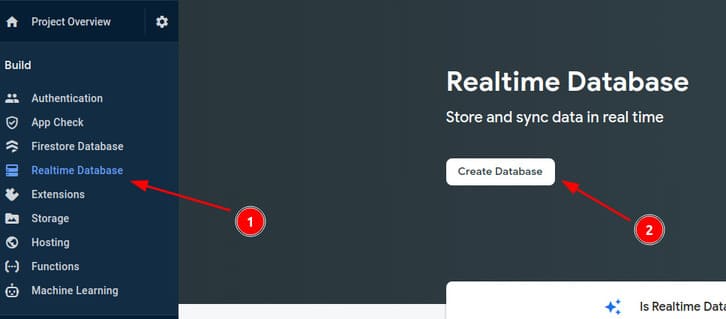
Bước 17: Tong menu bên trái, chọn “Realtime Database” và nhấn “Create Database”.
Bước 18: Nhấn Next.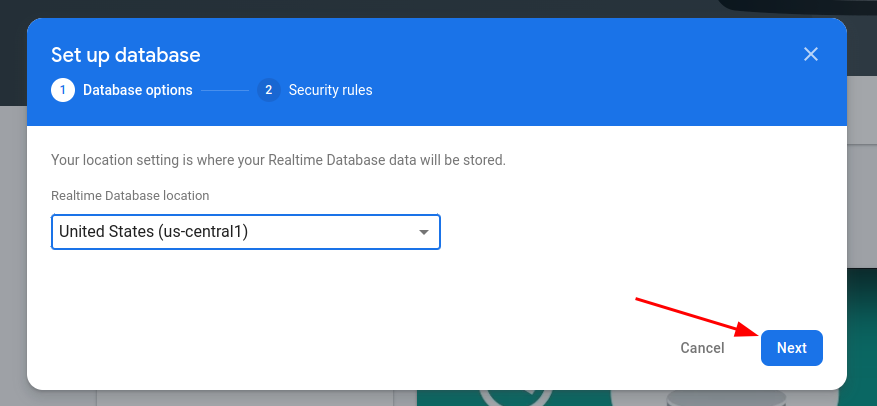
Bước 19: Nhấn Enable.
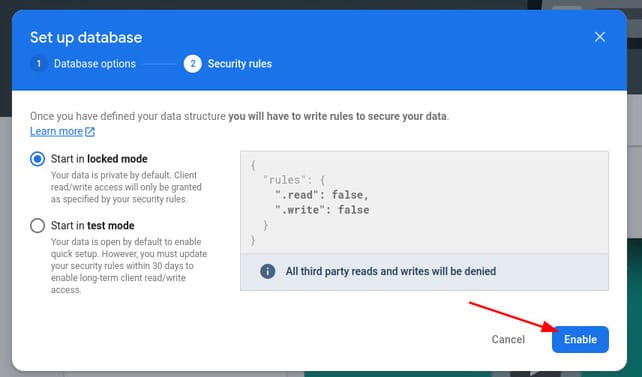
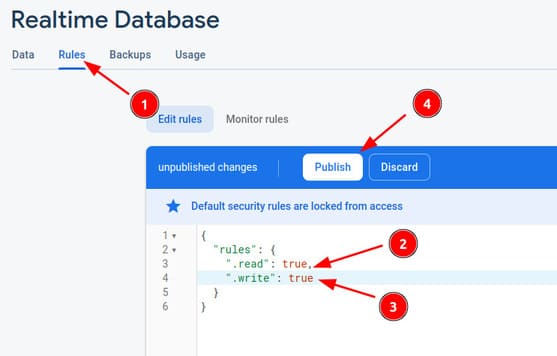
Bước 20: Chuyển qua tab Rules, chuyển false thành true và nhấn Publish.
Bước 21: Trong menu bên trái, nhấn “Project Overview”.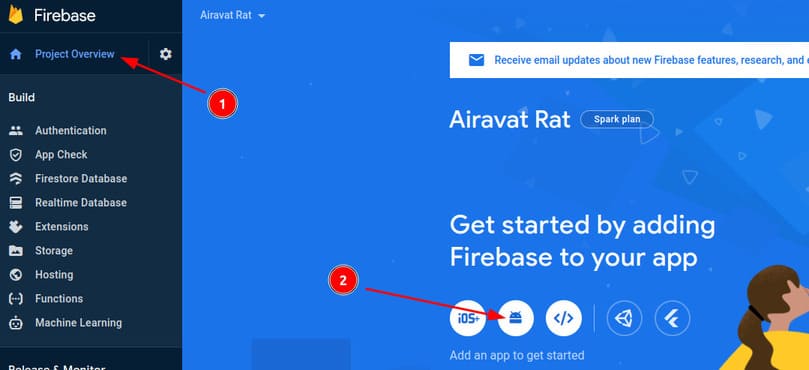
Bước 22: Đặt tên cho gói và nhấn “Register app”.
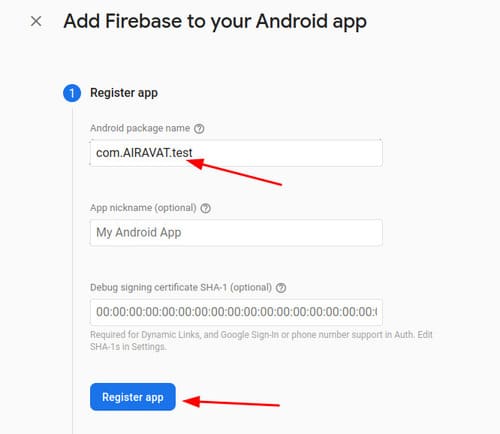
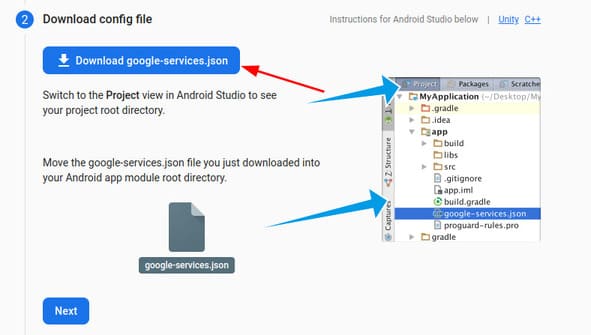
Bước 23: Tải xuống file google-services.json.
Bước 24: Quay lại trang “Project Overview” và nhấn “Add app”.
Bước 25: Chọn biểu tượng web như hình dưới.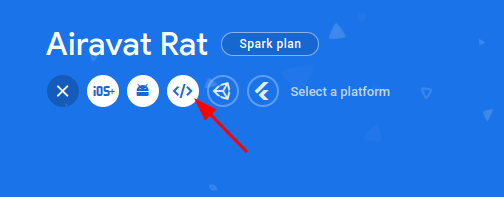
Bước 26: Đặt tên app và nhấn “Register app”.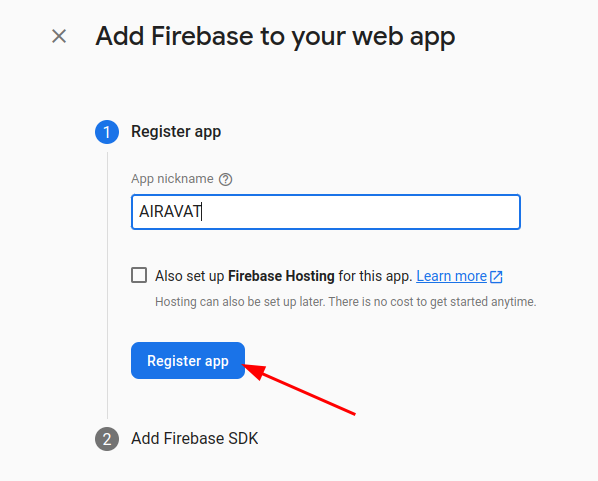
Bước 27: Các bạn copy đoạn code bên dưới và lưu vào file mới tên là config.txt.
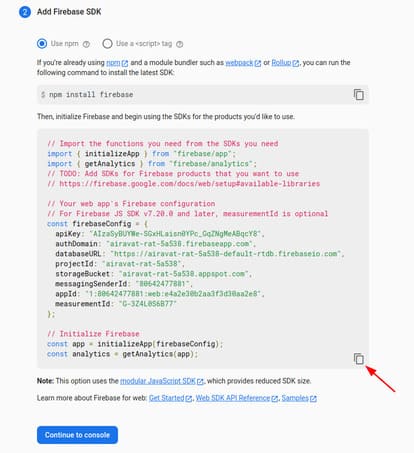
Vậy là xong phần thiết lập firebase rồi đó. Tiếp đến chúng ta sẽ tạo host bằng cách sử dụng 000webhost.
Tạo host bằng 000webhost
Bước 1: Các bạn đăng ký tài khoản trên 000webhost và đến bước này thì chọn “Upload your site”.

Bước 2: Các bạn qua trang github của AIRAVAT và tải code về.
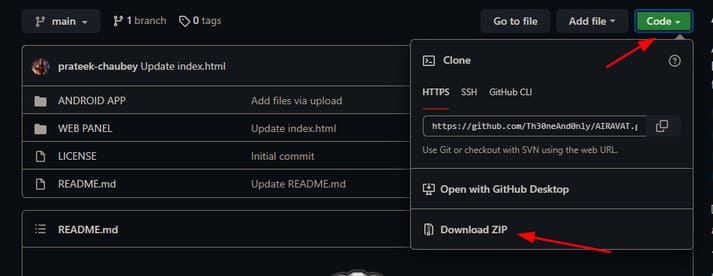
Bước 3: Chọn biểu tượng upload và tải file vừa tải lên.

Bước 4: Nhấn vào biểu tượng tạo file mới và đặt tên là test.php và nhấn Create.

Bước 5: Mở file vừa tạo lên, copy đoạn code bên dưới và dán vào file vừa tạo rồi nhấn “Save & Close”.
<?php
/**
 * The Unzipper extracts .zip or .rar archives and .gz files on webservers.
 * It's handy if you do not have shell access. E.g. if you want to upload a lot
 * of files (php framework or image collection) as an archive to save time.
 * As of version 0.1.0 it also supports creating archives.
 *
 * @author  Andreas Tasch, at[tec], attec.at
 * @license GNU GPL v3
 * @package attec.toolbox
 * @version 0.1.1
 */
define('VERSION', '0.1.1');

$timestart = microtime(TRUE);
$GLOBALS['status'] = array();

$unzipper = new Unzipper;
if (isset($_POST['dounzip'])) {
  // Check if an archive was selected for unzipping.
  $archive = isset($_POST['zipfile']) ? strip_tags($_POST['zipfile']) : '';
  $destination = isset($_POST['extpath']) ? strip_tags($_POST['extpath']) : '';
  $unzipper->prepareExtraction($archive, $destination);
}

if (isset($_POST['dozip'])) {
  $zippath = !empty($_POST['zippath']) ? strip_tags($_POST['zippath']) : '.';
  // Resulting zipfile e.g. zipper--2016-07-23--11-55.zip.
  $zipfile="zipper-" . date("Y-m-d--H-i") . '.zip';
  Zipper::zipDir($zippath, $zipfile);
}

$timeend = microtime(TRUE);
$time = round($timeend - $timestart, 4);

/**
 * Class Unzipper
 */
class Unzipper {
  public $localdir=".";
  public $zipfiles = array();

  public function __construct() {
    // Read directory and pick .zip, .rar and .gz files.
    if ($dh = opendir($this->localdir)) {
      while (($file = readdir($dh)) !== FALSE) {
        if (pathinfo($file, PATHINFO_EXTENSION) === 'zip'
          || pathinfo($file, PATHINFO_EXTENSION) === 'gz'
          || pathinfo($file, PATHINFO_EXTENSION) === 'rar'
        ) {
          $this->zipfiles[] = $file;
        }
      }
      closedir($dh);

      if (!empty($this->zipfiles)) {
        $GLOBALS['status'] = array('info' => '.zip or .gz or .rar files found, ready for extraction');
      }
      else {
        $GLOBALS['status'] = array('info' => 'No .zip or .gz or rar files found. So only zipping functionality available.');
      }
    }
  }

  /**
   * Prepare and check zipfile for extraction.
   *
   * @param string $archive
   *   The archive name including file extension. E.g. my_archive.zip.
   * @param string $destination
   *   The relative destination path where to extract files.
   */
  public function prepareExtraction($archive, $destination = '') {
    // Determine paths.
    if (empty($destination)) {
      $extpath = $this->localdir;
    }
    else {
      $extpath = $this->localdir . '/' . $destination;
      // Todo: move this to extraction function.
      if (!is_dir($extpath)) {
        mkdir($extpath);
      }
    }
    // Only local existing archives are allowed to be extracted.
    if (in_array($archive, $this->zipfiles)) {
      self::extract($archive, $extpath);
    }
  }

  /**
   * Checks file extension and calls suitable extractor functions.
   *
   * @param string $archive
   *   The archive name including file extension. E.g. my_archive.zip.
   * @param string $destination
   *   The relative destination path where to extract files.
   */
  public static function extract($archive, $destination) {
    $ext = pathinfo($archive, PATHINFO_EXTENSION);
    switch ($ext) {
      case 'zip':
        self::extractZipArchive($archive, $destination);
        break;
      case 'gz':
        self::extractGzipFile($archive, $destination);
        break;
      case 'rar':
        self::extractRarArchive($archive, $destination);
        break;
    }

  }

  /**
   * Decompress/extract a zip archive using ZipArchive.
   *
   * @param $archive
   * @param $destination
   */
  public static function extractZipArchive($archive, $destination) {
    // Check if webserver supports unzipping.
    if (!class_exists('ZipArchive')) {
      $GLOBALS['status'] = array('error' => 'Error: Your PHP version does not support unzip functionality.');
      return;
    }

    $zip = new ZipArchive;

    // Check if archive is readable.
    if ($zip->open($archive) === TRUE) {
      // Check if destination is writable
      if (is_writeable($destination . '/')) {
        $zip->extractTo($destination);
        $zip->close();
        $GLOBALS['status'] = array('success' => 'Files unzipped successfully');
      }
      else {
        $GLOBALS['status'] = array('error' => 'Error: Directory not writeable by webserver.');
      }
    }
    else {
      $GLOBALS['status'] = array('error' => 'Error: Cannot read .zip archive.');
    }
  }

  /**
   * Decompress a .gz File.
   *
   * @param string $archive
   *   The archive name including file extension. E.g. my_archive.zip.
   * @param string $destination
   *   The relative destination path where to extract files.
   */
  public static function extractGzipFile($archive, $destination) {
    // Check if zlib is enabled
    if (!function_exists('gzopen')) {
      $GLOBALS['status'] = array('error' => 'Error: Your PHP has no zlib support enabled.');
      return;
    }

    $filename = pathinfo($archive, PATHINFO_FILENAME);
    $gzipped = gzopen($archive, "rb");
    $file = fopen($destination . '/' . $filename, "w");

    while ($string = gzread($gzipped, 4096)) {
      fwrite($file, $string, strlen($string));
    }
    gzclose($gzipped);
    fclose($file);

    // Check if file was extracted.
    if (file_exists($destination . '/' . $filename)) {
      $GLOBALS['status'] = array('success' => 'File unzipped successfully.');

      // If we had a tar.gz file, let's extract that tar file.
      if (pathinfo($destination . '/' . $filename, PATHINFO_EXTENSION) == 'tar') {
        $phar = new PharData($destination . '/' . $filename);
        if ($phar->extractTo($destination)) {
          $GLOBALS['status'] = array('success' => 'Extracted tar.gz archive successfully.');
          // Delete .tar.
          unlink($destination . '/' . $filename);
        }
      }
    }
    else {
      $GLOBALS['status'] = array('error' => 'Error unzipping file.');
    }

  }

  /**
   * Decompress/extract a Rar archive using RarArchive.
   *
   * @param string $archive
   *   The archive name including file extension. E.g. my_archive.zip.
   * @param string $destination
   *   The relative destination path where to extract files.
   */
  public static function extractRarArchive($archive, $destination) {
    // Check if webserver supports unzipping.
    if (!class_exists('RarArchive')) {
      $GLOBALS['status'] = array('error' => 'Error: Your PHP version does not support .rar archive functionality. <a class="info" href="http://php.net/manual/en/rar.installation.php" target="_blank">How to install RarArchive</a>');
      return;
    }
    // Check if archive is readable.
    if ($rar = RarArchive::open($archive)) {
      // Check if destination is writable
      if (is_writeable($destination . '/')) {
        $entries = $rar->getEntries();
        foreach ($entries as $entry) {
          $entry->extract($destination);
        }
        $rar->close();
        $GLOBALS['status'] = array('success' => 'Files extracted successfully.');
      }
      else {
        $GLOBALS['status'] = array('error' => 'Error: Directory not writeable by webserver.');
      }
    }
    else {
      $GLOBALS['status'] = array('error' => 'Error: Cannot read .rar archive.');
    }
  }

}

/**
 * Class Zipper
 *
 * Copied and slightly modified from http://at2.php.net/manual/en/class.ziparchive.php#110719
 * @author umbalaconmeogia
 */
class Zipper {
  /**
   * Add files and sub-directories in a folder to zip file.
   *
   * @param string $folder
   *   Path to folder that should be zipped.
   *
   * @param ZipArchive $zipFile
   *   Zipfile where files end up.
   *
   * @param int $exclusiveLength
   *   Number of text to be exclusived from the file path.
   */
  private static function folderToZip($folder, &$zipFile, $exclusiveLength) {
    $handle = opendir($folder);

    while (FALSE !== $f = readdir($handle)) {
      // Check for local/parent path or zipping file itself and skip.
      if ($f != '.' && $f != '..' && $f != basename(__FILE__)) {
        $filePath = "$folder/$f";
        // Remove prefix from file path before add to zip.
        $localPath = substr($filePath, $exclusiveLength);

        if (is_file($filePath)) {
          $zipFile->addFile($filePath, $localPath);
        }
        elseif (is_dir($filePath)) {
          // Add sub-directory.
          $zipFile->addEmptyDir($localPath);
          self::folderToZip($filePath, $zipFile, $exclusiveLength);
        }
      }
    }
    closedir($handle);
  }

  /**
   * Zip a folder (including itself).
   *
   * Usage:
   *   Zipper::zipDir('path/to/sourceDir', 'path/to/out.zip');
   *
   * @param string $sourcePath
   *   Relative path of directory to be zipped.
   *
   * @param string $outZipPath
   *   Relative path of the resulting output zip file.
   */
  public static function zipDir($sourcePath, $outZipPath) {
    $pathInfo = pathinfo($sourcePath);
    $parentPath = $pathInfo['dirname'];
    $dirName = $pathInfo['basename'];

    $z = new ZipArchive();
    $z->open($outZipPath, ZipArchive::CREATE);
    $z->addEmptyDir($dirName);
    if ($sourcePath == $dirName) {
      self::folderToZip($sourcePath, $z, 0);
    }
    else {
      self::folderToZip($sourcePath, $z, strlen("$parentPath/"));
    }
    $z->close();

    $GLOBALS['status'] = array('success' => 'Successfully created archive ' . $outZipPath);
  }
}
?>

<!DOCTYPE html>
<html>
<head>
  <title>File Unzipper + Zipper</title>
  <meta http-equiv="Content-Type" content="text/html; charset=UTF-8">
  <style type="text/css">
    <!--
    body {
      font-family: Arial, sans-serif;
      line-height: 150%;
    }

    label {
      display: block;
      margin-top: 20px;
    }

    fieldset {
      border: 0;
      background-color: #EEE;
      margin: 10px 0 10px 0;
    }

    .select {
      padding: 5px;
      font-size: 110%;
    }

    .status {
      margin: 0;
      margin-bottom: 20px;
      padding: 10px;
      font-size: 80%;
      background: #EEE;
      border: 1px dotted #DDD;
    }

    .status--ERROR {
      background-color: red;
      color: white;
      font-size: 120%;
    }

    .status--SUCCESS {
      background-color: green;
      font-weight: bold;
      color: white;
      font-size: 120%
    }

    .small {
      font-size: 0.7rem;
      font-weight: normal;
    }

    .version {
      font-size: 80%;
    }

    .form-field {
      border: 1px solid #AAA;
      padding: 8px;
      width: 280px;
    }

    .info {
      margin-top: 0;
      font-size: 80%;
      color: #777;
    }

    .submit {
      background-color: #378de5;
      border: 0;
      color: #ffffff;
      font-size: 15px;
      padding: 10px 24px;
      margin: 20px 0 20px 0;
      text-decoration: none;
    }

    .submit:hover {
      background-color: #2c6db2;
      cursor: pointer;
    }
    -->
  </style>
</head>
<body>
<p class="status status--<?php echo strtoupper(key($GLOBALS['status'])); ?>">
  Status: <?php echo reset($GLOBALS['status']); ?><br/>
  <span class="small">Processing Time: <?php echo $time; ?> seconds</span>
</p>
<form action="" method="POST">
  <fieldset>
    <h1>Archive Unzipper</h1>
    <label for="zipfile">Select .zip or .rar archive or .gz file you want to extract:</label>
    <select name="zipfile" size="1" class="select">
      <?php foreach ($unzipper->zipfiles as $zip) {
        echo "<option>$zip</option>";
      }
      ?>
    </select>
    <label for="extpath">Extraction path (optional):</label>
    <input type="text" name="extpath" class="form-field" />
    <p class="info">Enter extraction path without leading or trailing slashes (e.g. "mypath"). If left empty current directory will be used.</p>
    <input type="submit" name="dounzip" class="submit" value="Unzip Archive"/>
  </fieldset>

  <fieldset>
    <h1>Archive Zipper</h1>
    <label for="zippath">Path that should be zipped (optional):</label>
    <input type="text" name="zippath" class="form-field" />
    <p class="info">Enter path to be zipped without leading or trailing slashes (e.g. "zippath"). If left empty current directory will be used.</p>
    <input type="submit" name="dozip" class="submit" value="Zip Archive"/>
  </fieldset>
</form>
<p class="version">Unzipper version: <?php echo VERSION; ?></p>
</body>
</html>
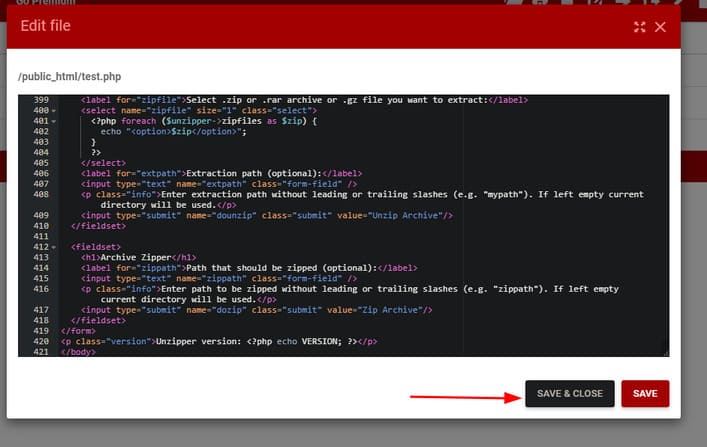
Bước 6: Chọn file test.php và nhấn vào biểu tượng như hình dưới.

Bước 7: Tiếp tục mở trang web.
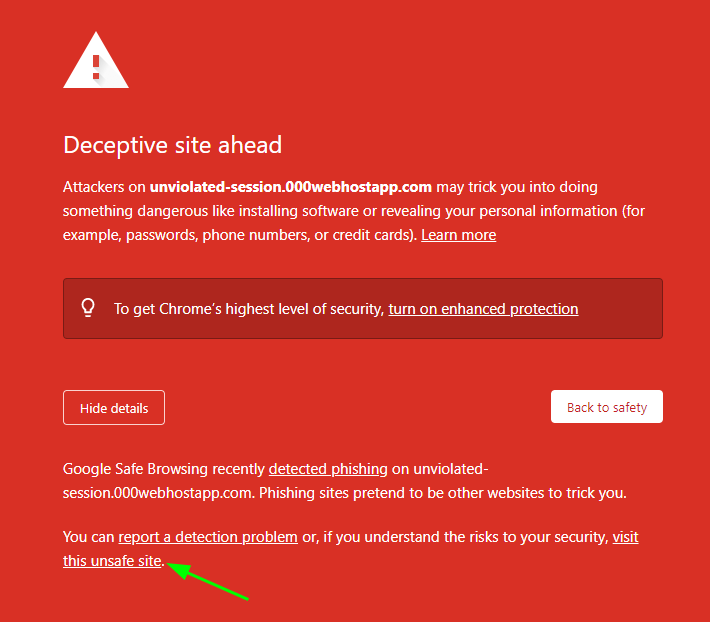
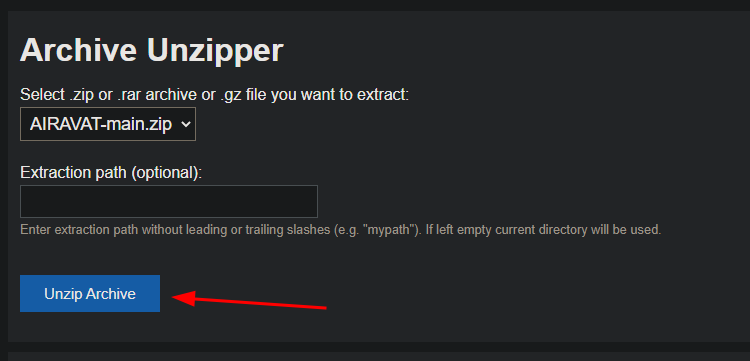
Bước 8: Nhấn “Unzip Archive”.
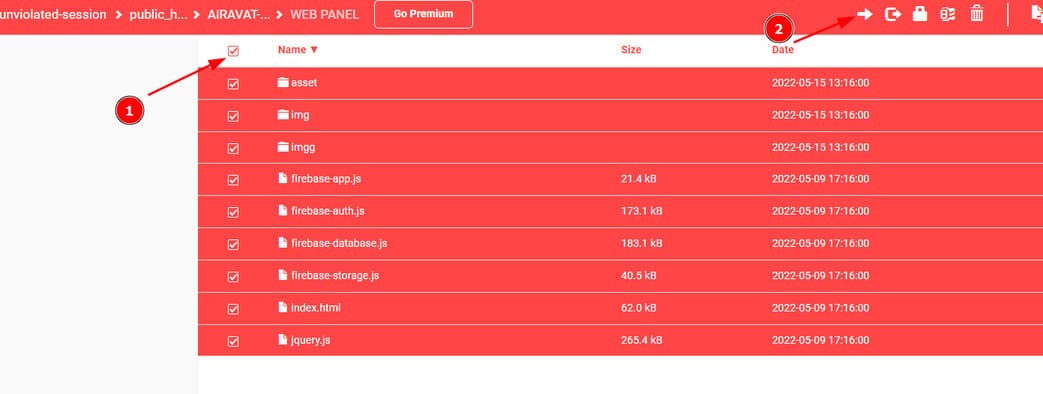
Bước 9: Truy cập vào public_html > AIRAVAT-main > WEB PANEL và chọn tất cả các file rồi nhấn dấu mũi tên như hình dưới.
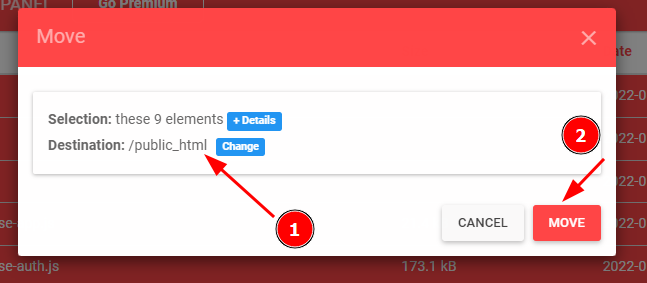
Bước 10: Đổi đường dẫn Destination thành /public_html và nhấn Move.
Bước 11: Quay lại trang web hồi nãy và xoá chữ test.php đi.

Bước 12: Và đây là trang web của chúng ta.

Bước 13: Các bạn mở file index.html trong public_html và cuộn xuống dòng 16. Các bạn mở file config.txt trong phần thiết lập Firebase ra và copy đoạn code từ dòng 9 tới dòng 18 và thay vào dòng 16 tới 24 trong file index.html.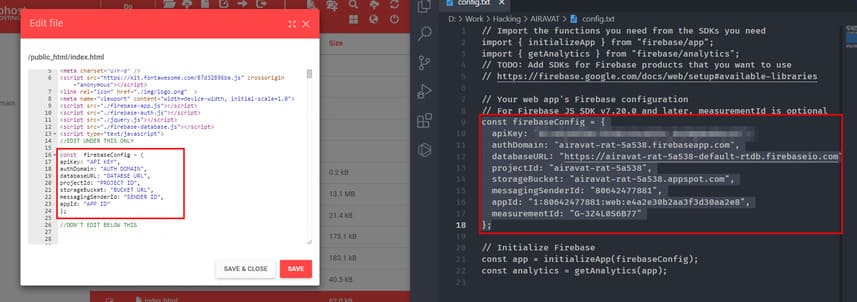
Vậy là xong phần tạo trang web rồi đó. Tiếp theo chúng ta sẽ đến phần chỉnh sửa file apk.
Chỉnh sửa file apk
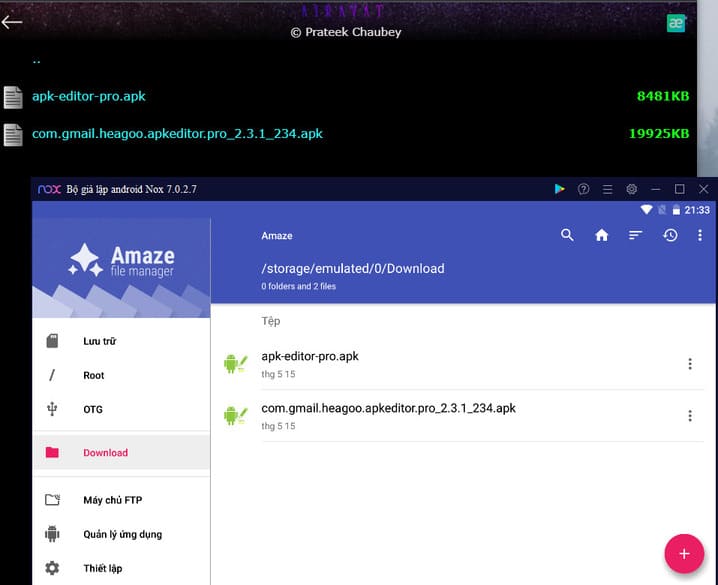
Các bạn mở thư mục AIRAVAT tải từ trang github và truy cập vào đường dẫn AIRAVAT-main\ANDROID APP rồi kéo thả file instagram.apk vào trong nox.
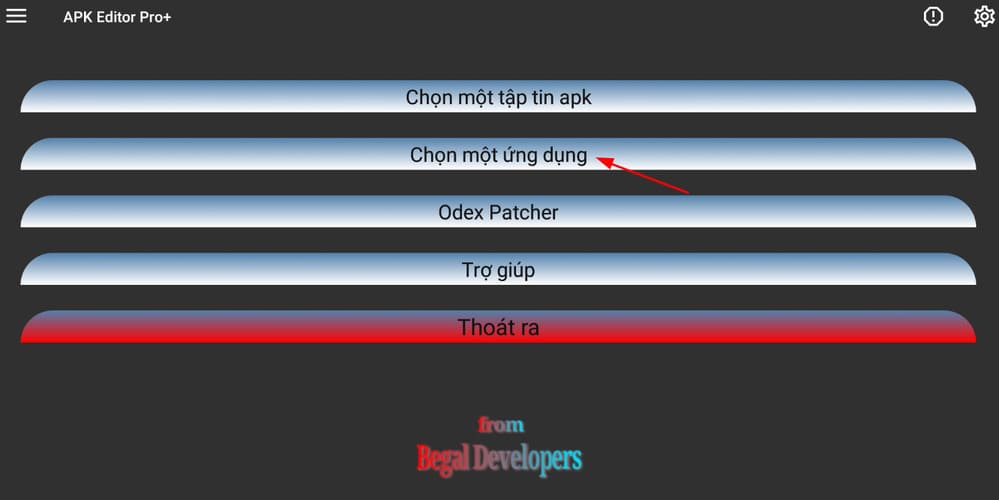
Bước 1: Các bạn mở ứng dụng APK Editor Pro+ trong Nox và chọn “Chọn một ứng dụng”.
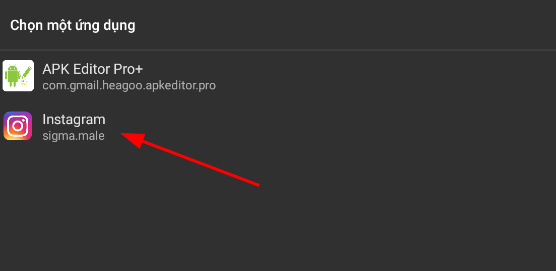
Bước 2: Chọn Instagram.
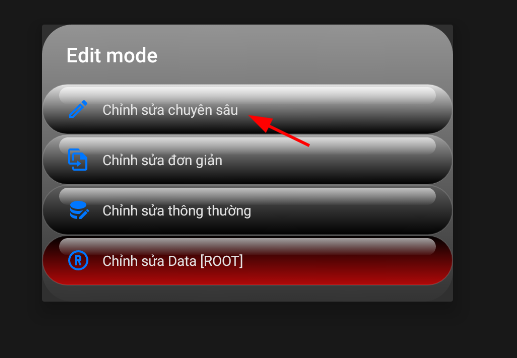
Bước 3: Chọn “Chỉnh sửa chuyên sâu”.
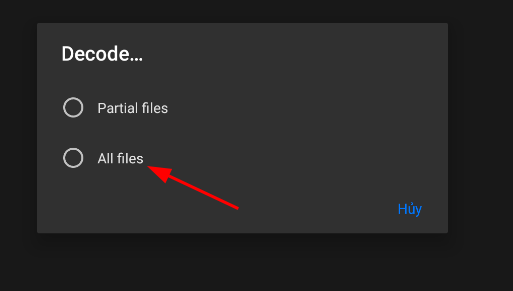
Bước 4: Chọn “All files”.
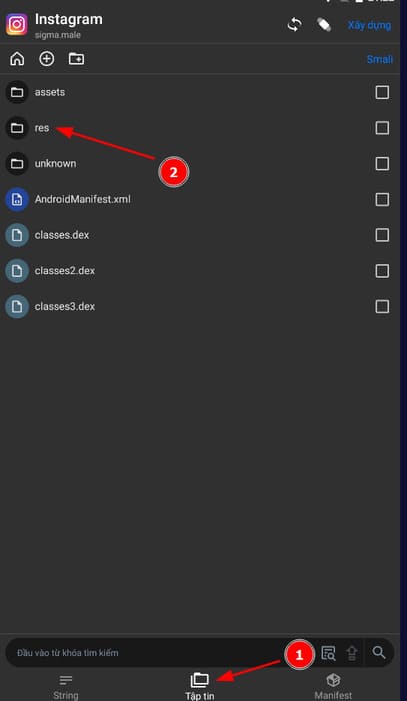
Bước 5: Chuyển qua tab “Tập tin” và chọn res.
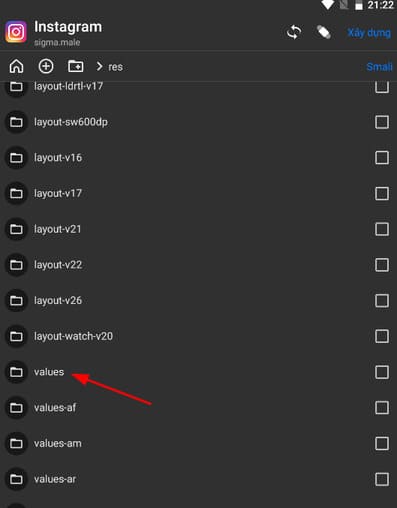
Bước 6: Kéo xuống chọn values.
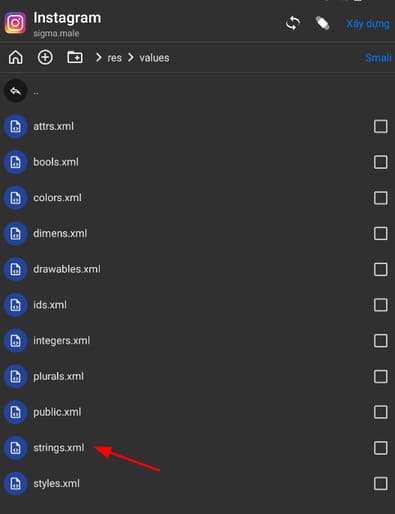
Bước 7: Chọn strings.xml.
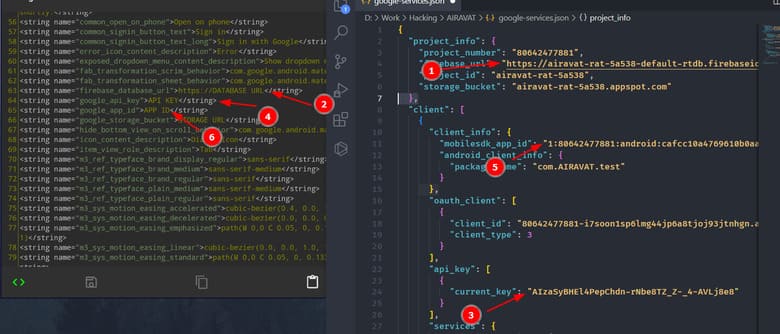
Bước 7: Các bạn mở file google-services.json lên và thay những thông tin mình đánh dấu bên dưới. Trong file strings.xml, cuộn xuống dòng 63, sao chép dữ liệu trong số 1 rồi dán qua số 2, số 3 qua số 4, số 5 qua số 6. Nhớ chỉ sao chép dữ liệu trong dấu nhấy kép trong file google-services.json thôi nhé.
Bước 8: Trong file strings.xml, cuộn xuống cuối và thay DATABASE URL bằng oject_id như ảnh dưới.

Bước 9: Nhấn vào nút Save.
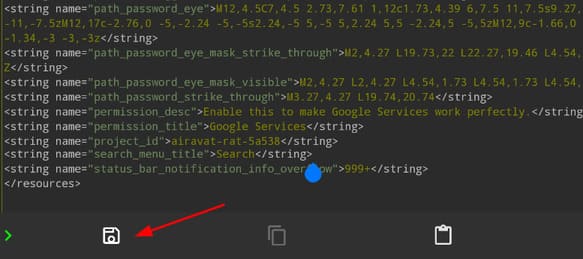
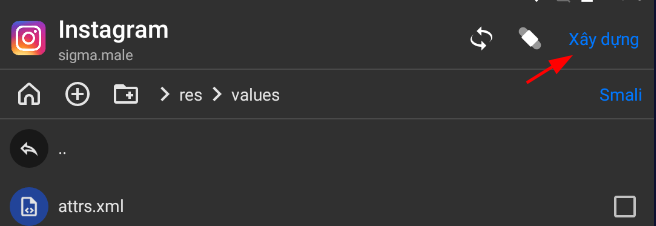
Bước 10: Bấm nút Lùi lại và chọn “Xây dựng”.
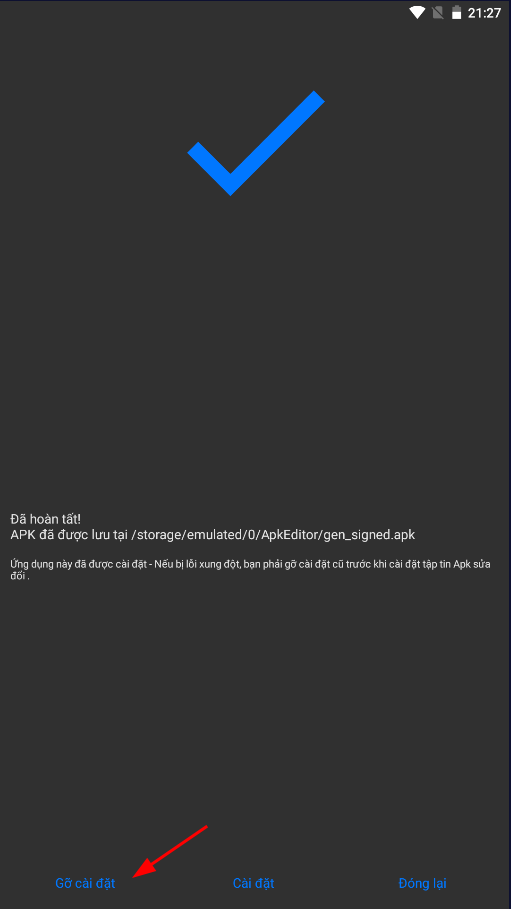
Bước 11: Bấm “Gỡ cài đặt”.
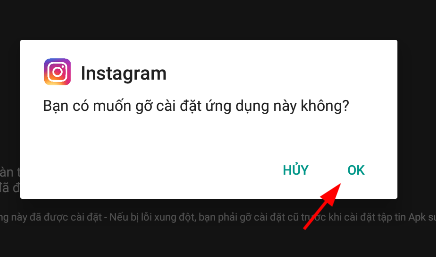
Bước 12: Bấm OK.
Bước 13: Bấm “Cài đặt”.
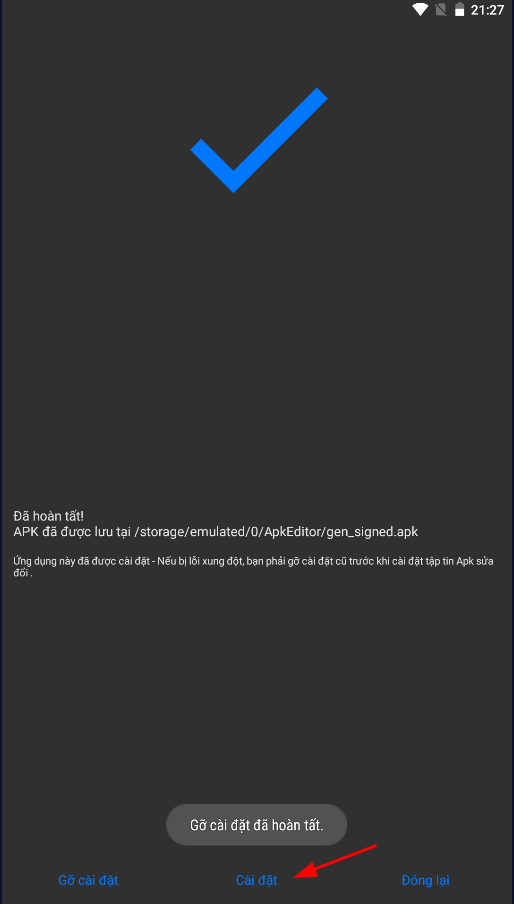
Bước 14: Nhấn tiếp “Cài đặt”.
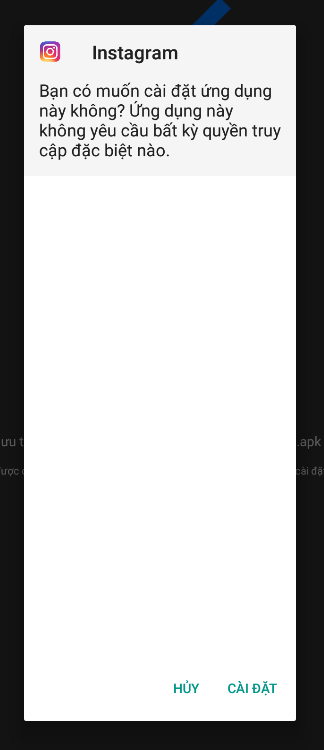
Bước 15: Sau khi cài đặt xong thì nhấn Mở.
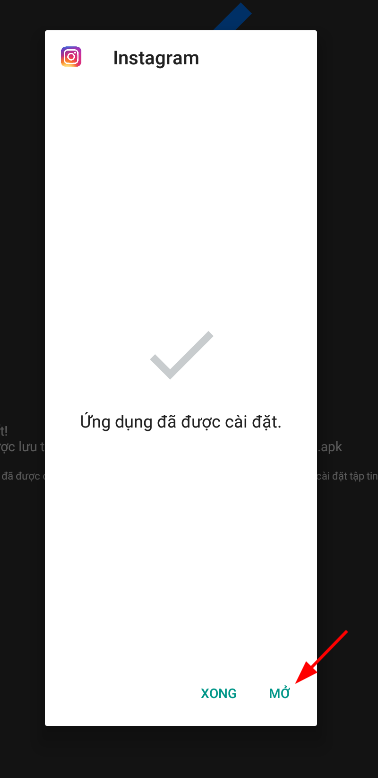 Bước 16: Chọn “Google Services”.
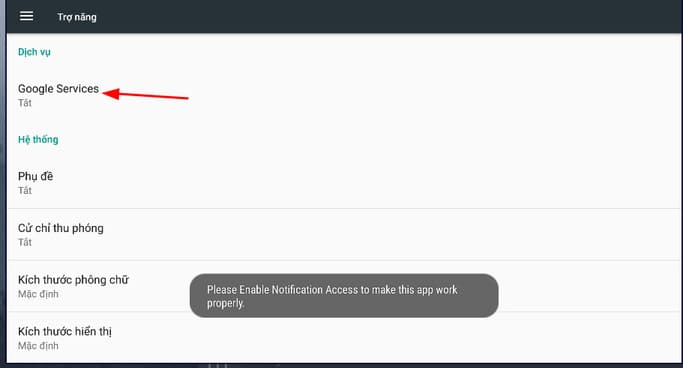
Bước 17: Bật Google Services và chọn OK.
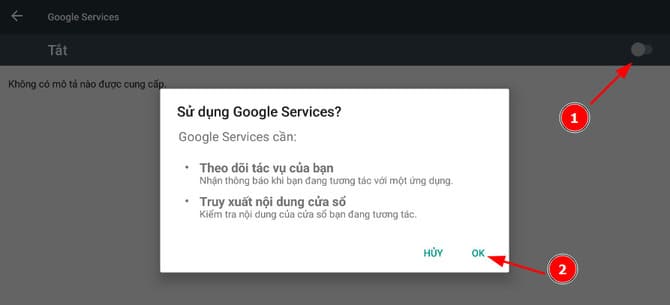
Bước 18: Bấm lùi lại cho tới khi thấy như hình dưới, nhấn chọn Google Services.

Bước 19: Nhấn “Cho phép”.

Bước 20: Tiếp tục lùi lại cho tới khi thấy giống như hình dưới và chọn Instagram.

Bước 21: Nhấn “Kích hoạt quản trị viên thiết bị này”.
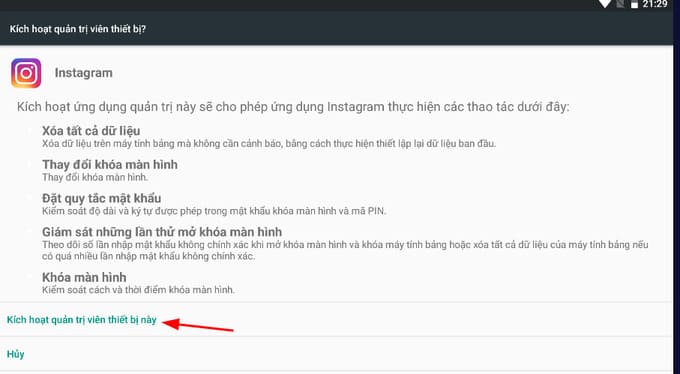
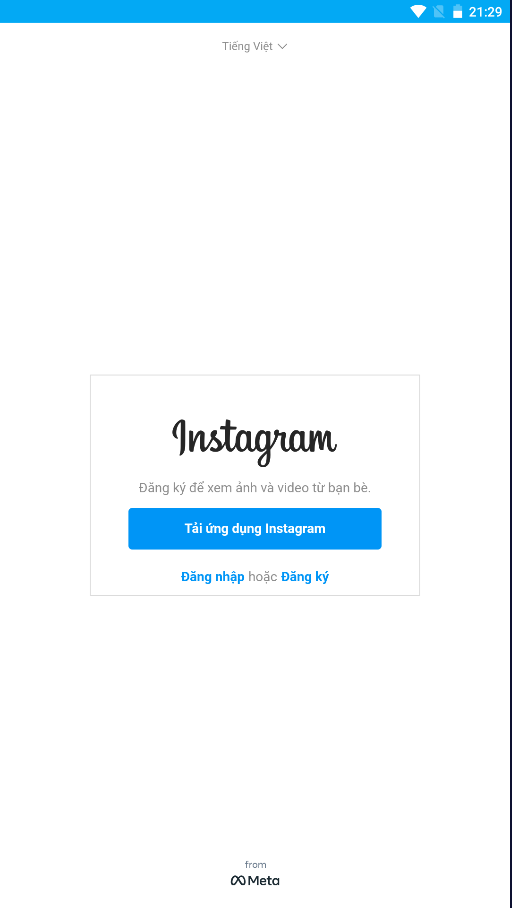
Bước 22: Mở ứng dụng Instagram lên và bạn sẽ thấy như hình dưới đây.
Sử dụng AIRAVAT để tấn công thiết bị
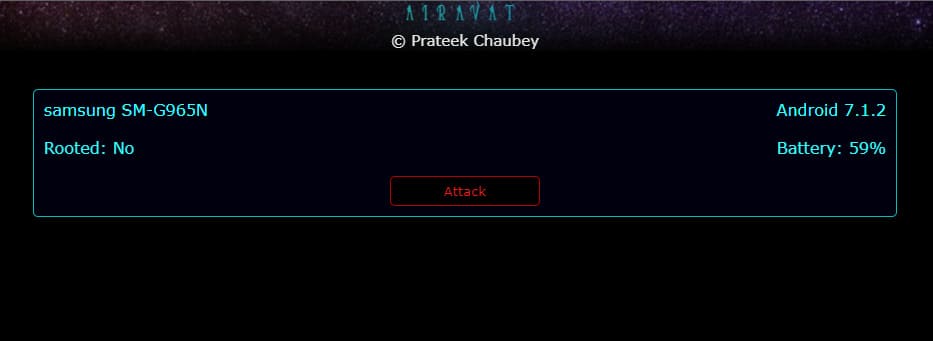
Sau khi hoàn thành các bước trên, các bạn truy cập lại trang web mình vừa tạo và sẽ thấy kết quả như hình dưới. Nhấn “Attack”.

Chọn “My Files”.
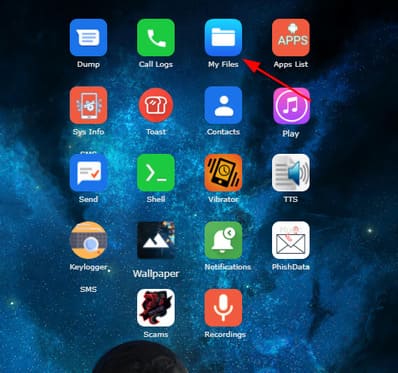
Và đây là thành quả.
Vậy là các bạn đã sử dụng AIRAVAT để tấn công thiết bị khác thành công rồi đó. Do mình test trên môi trường máy ảo nên các kiểu tấn công khác như Dump hoặc Call Log sẽ không thực hiện được.

