• Home
  • News
  • Software
  • Knowledge
  • MMO
  • Tips
  • Security
  • Network
  • Office
AnonyViet - English Version
  • Home
  • News
  • Software
  • Knowledge
  • MMO
  • Tips
  • Security
  • Network
  • Office
No Result
View All Result
  • Home
  • News
  • Software
  • Knowledge
  • MMO
  • Tips
  • Security
  • Network
  • Office
No Result
View All Result
AnonyViet - English Version
No Result
View All Result
Home Network

How to Install SNIPE-IT on Windows for IT Asset Management

AnonyViet by AnonyViet
June 20, 2023
in Network
0
0
SHARES
Share on FacebookShare on Twitter

Snipe-IT is an open source software for managing Information Technology (IT) assets. With a user-friendly interface and high flexibility, Snipe-IT provides users with a perfect tool to monitor, control and optimize IT asset management in the work environment.

Join the channel Telegram belong to AnonyViet ???? Link ????

Snipe-IT . Features

Snipe-IT offers many important features that make IT asset management easier including:

  1. Asset List Management: Snipe-IT allows you to create detailed property listings with information such as name, serial number, date of purchase, value and current status.
  2. Mark and label: Using labels and barcodes, you can easily identify and track IT assets.
  3. Maintenance and repair management: Snipe-IT helps you keep track of the maintenance, repair and warranty history of each asset.
  4. Inventory of assets: The inventory feature helps to confirm the existence and condition of assets in the warehouse.

Advantages of Snipe-IT

Snipe-IT offers many important advantages in IT asset management:

  1. Free and Open Source: Snipe-IT is free and open source software that allows users to customize and develop according to their own needs.
  2. Friendly interface: With a simple and easy to use interface, Snipe-IT is an ideal tool for both novice and expert users.
  3. Flexible integration: Snipe-IT supports integration with other systems such as Active Directory, Single Sign-On (SSO), and open source software such as Jira and GLPI.
  4. Asset History Tracking: Snipe-IT stores asset movement, maintenance, and repair histories, enhancing control and optimizing asset utilization.

Disadvantages of Snipe-IT

Technical knowledge required: Installing and configuring Snipe-IT can require technical knowledge, especially in interacting with databases and servers.

INSTRUCTIONS TO INSTALL SNIPE-IT ON WOMEN WINDOW SERVER 2016 (100% SUCCESSFUL)

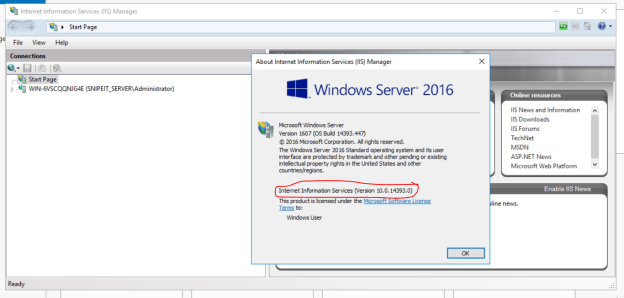
NOTE SOFTWARE CURRENTLY RUNS ON IIS 10 & WINDOW SERVER 2016 64BIT. You can try other versions of Windows Server.

First you need to download the installer and necessary tools of Snipe-IT to install on Windows.

Download

The components required before installation are Snipe-IT, should be installed on Vmware or Esxi virtualized environment and set static IP before installation.
How to Install SNIPE-IT on Windows for IT Asset Management 223

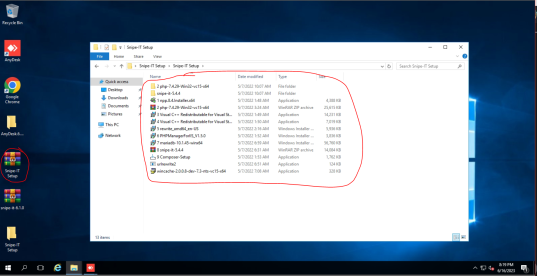
Step 1: Extract the SnipeIT installer.
How to Install SNIPE-IT on Windows for IT Asset Management 224

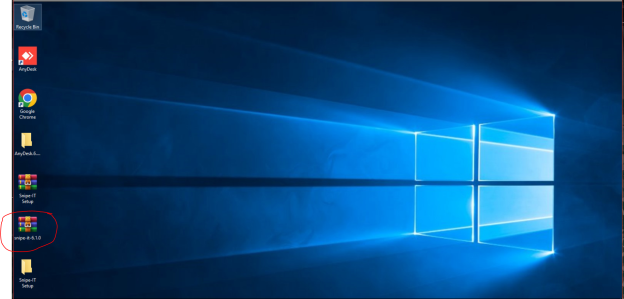
Unzip the SnipeIT installer, in the folder with the snipe-it 5.4.4 kit like the picture I don’t use it because it’s old, then I use the snipe-it 6.1.0 version available inside. You use it by yourself.
How to Install SNIPE-IT on Windows for IT Asset Management 225

SnipeIT 6.1.0 . Kit

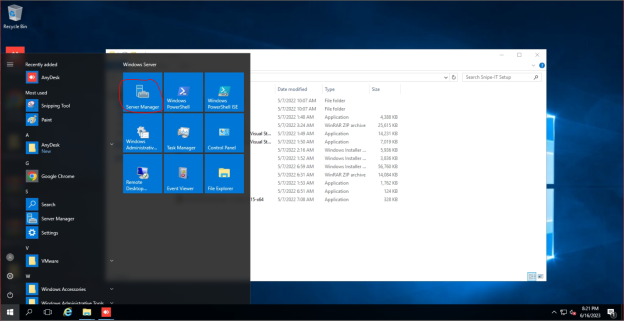
Step 2: Enable IIS Server function to run web.
How to Install SNIPE-IT on Windows for IT Asset Management 226

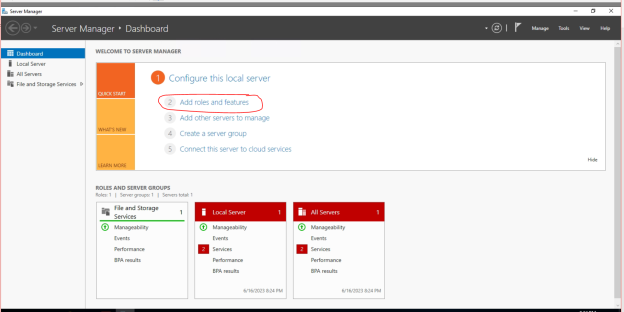
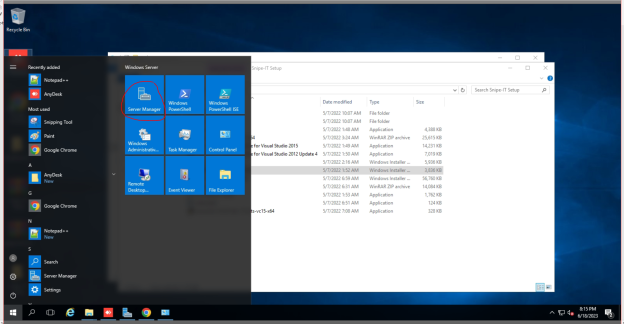
Click Window -> Server Manager

How to Install SNIPE-IT on Windows for IT Asset Management 227

Select Add Roles and Features

How to Install SNIPE-IT on Windows for IT Asset Management 228

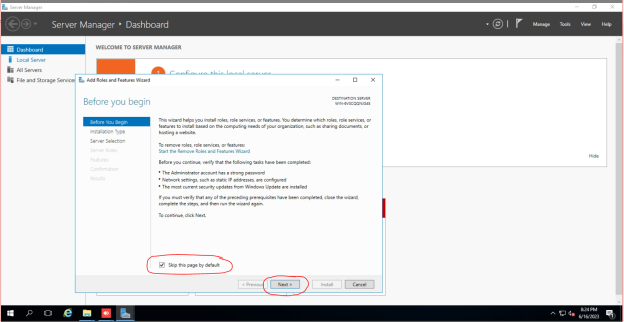
Select Skip this page by default -> select next
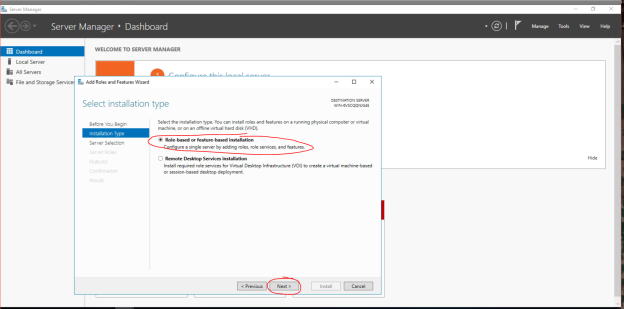
How to Install SNIPE-IT on Windows for IT Asset Management 229

Select as shown in the picture -> next
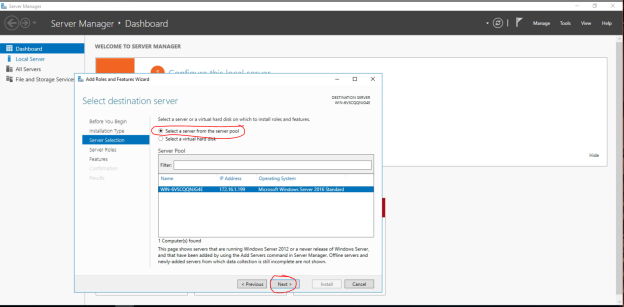
How to Install SNIPE-IT on Windows for IT Asset Management 230

Next next

How to Install SNIPE-IT on Windows for IT Asset Management 231

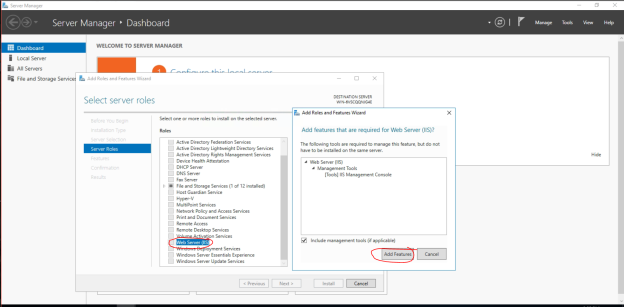
Select IIS Webserver -> a dialog box appears, select Add Features.
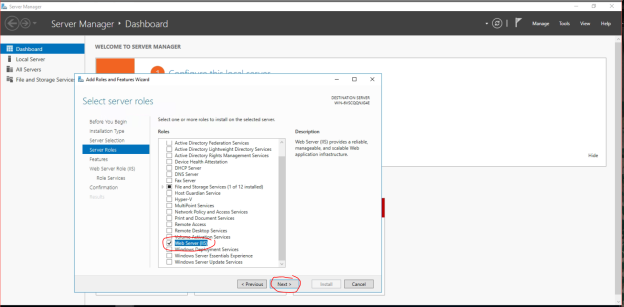
How to Install SNIPE-IT on Windows for IT Asset Management 232

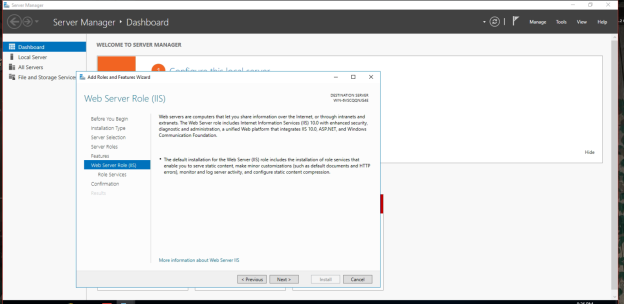
Select next

How to Install SNIPE-IT on Windows for IT Asset Management 233

Select next

How to Install SNIPE-IT on Windows for IT Asset Management 234

Continue next

How to Install SNIPE-IT on Windows for IT Asset Management 235

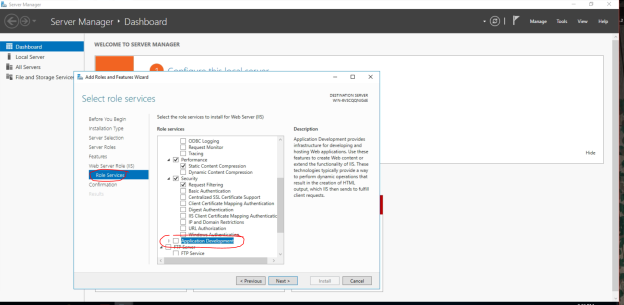
Find the item with the word Application near the word FTP Service like the picture
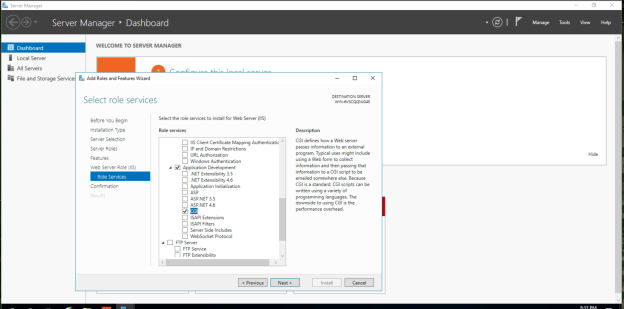
How to Install SNIPE-IT on Windows for IT Asset Management 236

Sitck select CGI and select Next.

How to Install SNIPE-IT on Windows for IT Asset Management 237

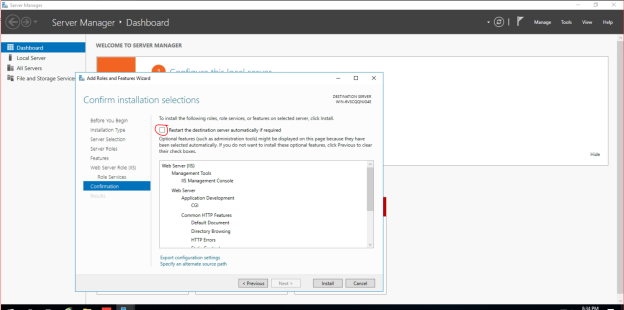
Stick to the restart check mark after installing the service (This is lucky, sometimes it starts automatically, sometimes it doesn’t, My advice is to reboot after the installation is complete)

How to Install SNIPE-IT on Windows for IT Asset Management 238

Select Yes

How to Install SNIPE-IT on Windows for IT Asset Management 239

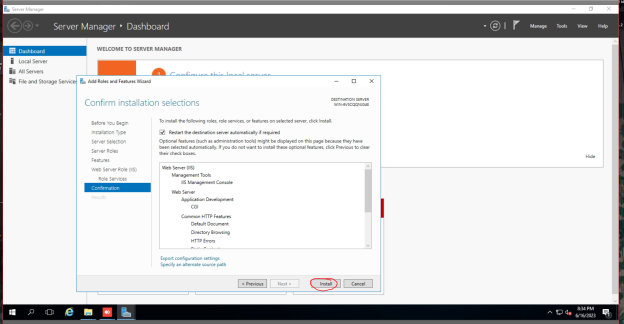
Click Install Install

How to Install SNIPE-IT on Windows for IT Asset Management 240

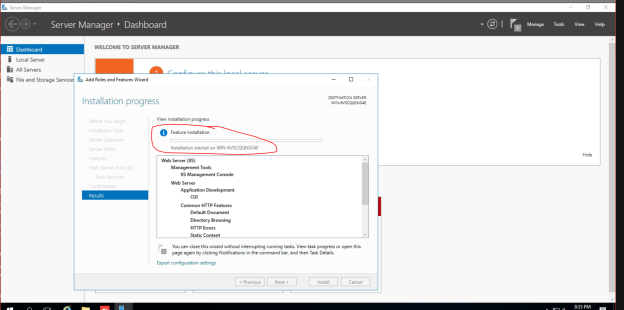
Installation begins

How to Install SNIPE-IT on Windows for IT Asset Management 241

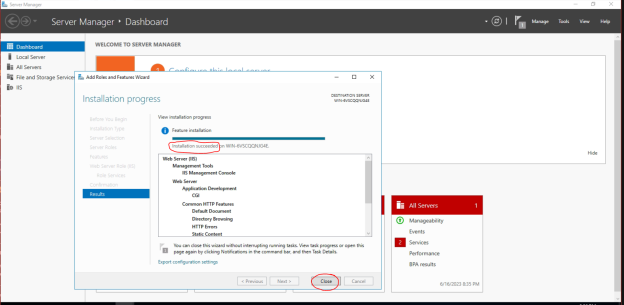
After the installation is complete, it will say succeeded but it will not restart the machine, right, click close and restart.
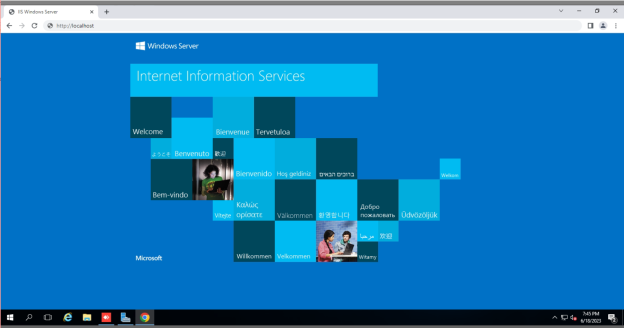
How to Install SNIPE-IT on Windows for IT Asset Management 242

Visit page http://localhost

Step 3: Install Notepad++ file editing software
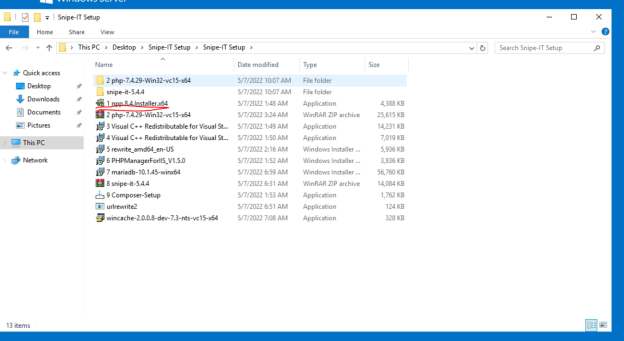
How to Install SNIPE-IT on Windows for IT Asset Management 243

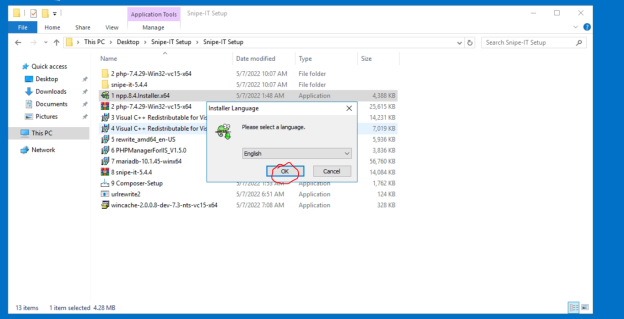
Click on the blue PM in the photo

How to Install SNIPE-IT on Windows for IT Asset Management 244

Click Ok

How to Install SNIPE-IT on Windows for IT Asset Management 245

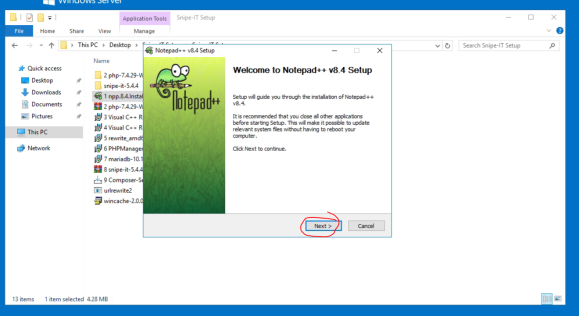
Click Next

How to Install SNIPE-IT on Windows for IT Asset Management 246

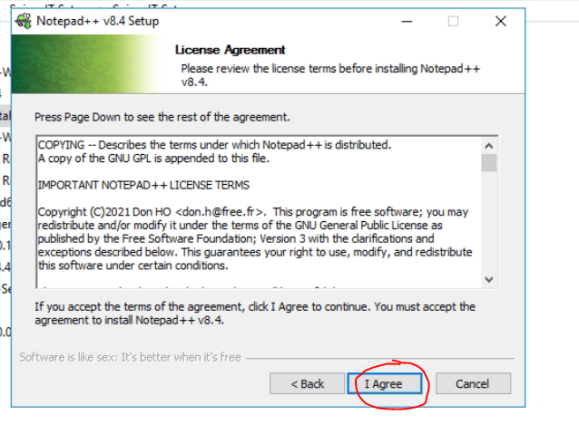
Click I Agree to install.

How to Install SNIPE-IT on Windows for IT Asset Management 247

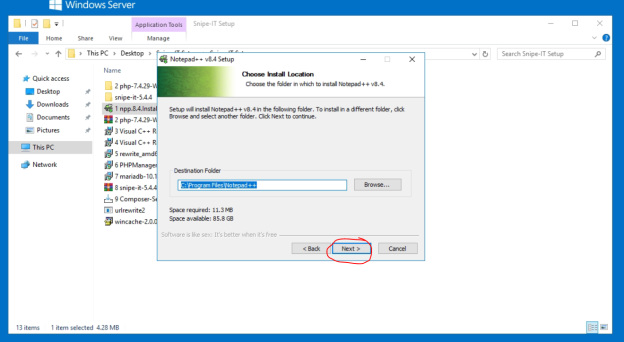
Click Next

How to Install SNIPE-IT on Windows for IT Asset Management 248

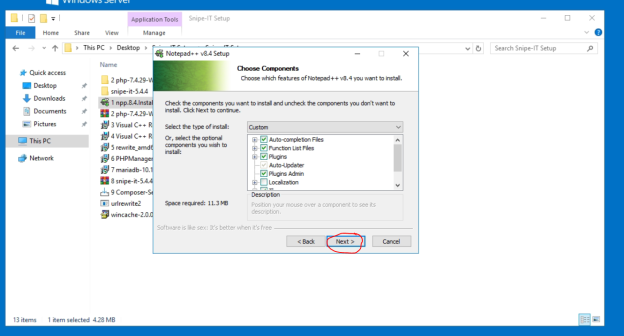
Click Next

How to Install SNIPE-IT on Windows for IT Asset Management 249

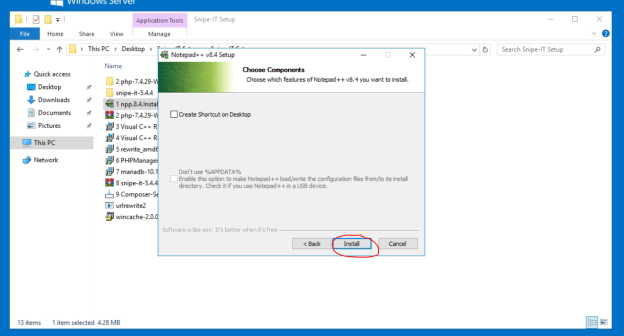
Click Install

How to Install SNIPE-IT on Windows for IT Asset Management 250

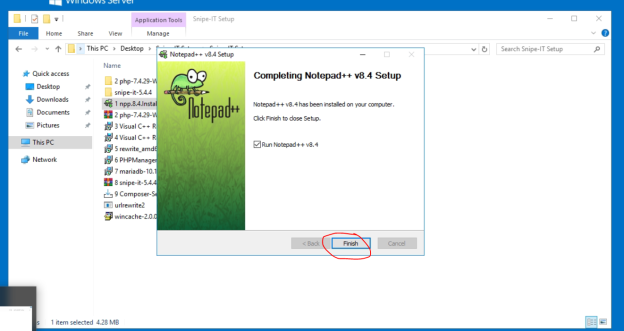
Click Finish

Step 4: Install Snipe IT
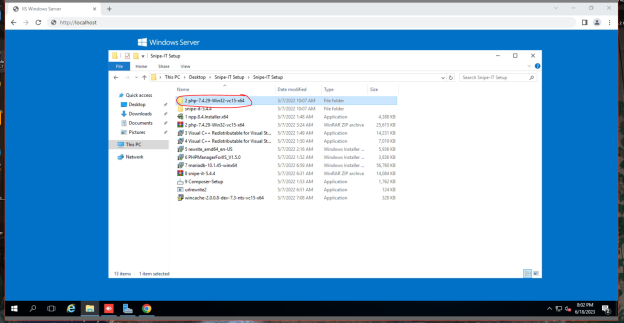
How to Install SNIPE-IT on Windows for IT Asset Management 251

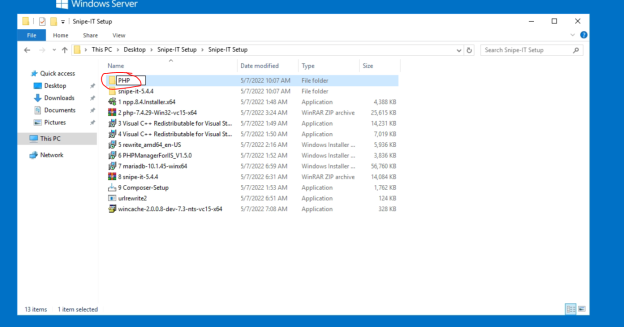
Access the directory containing the installation file and find the directory with the word PHP as shown in the image
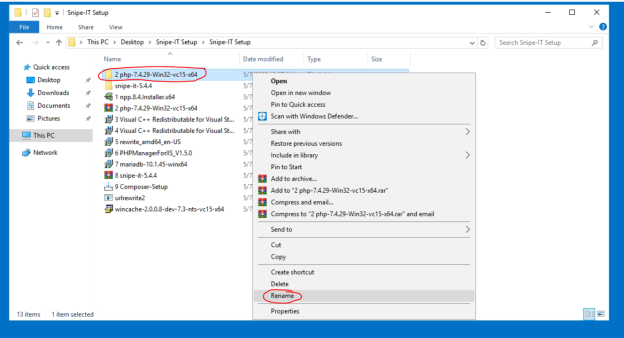
How to Install SNIPE-IT on Windows for IT Asset Management 252

Rename to PHP

How to Install SNIPE-IT on Windows for IT Asset Management 253

Rename as in the picture

How to Install SNIPE-IT on Windows for IT Asset Management 254

Copy the file and throw it in C:/

How to Install SNIPE-IT on Windows for IT Asset Management 255

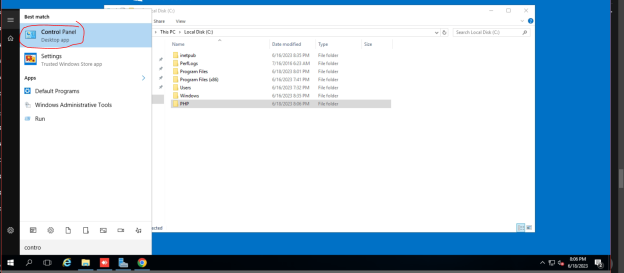
Access Control Panel

How to Install SNIPE-IT on Windows for IT Asset Management 256

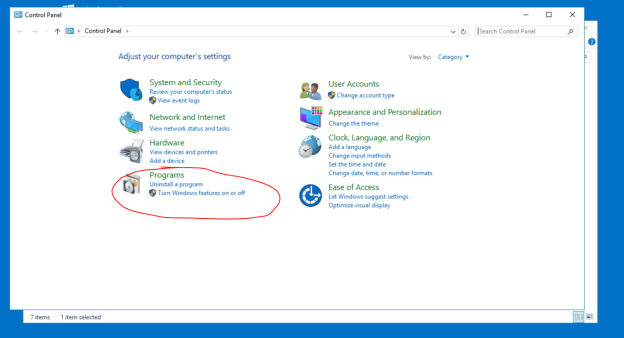
Go to Programs

How to Install SNIPE-IT on Windows for IT Asset Management 257

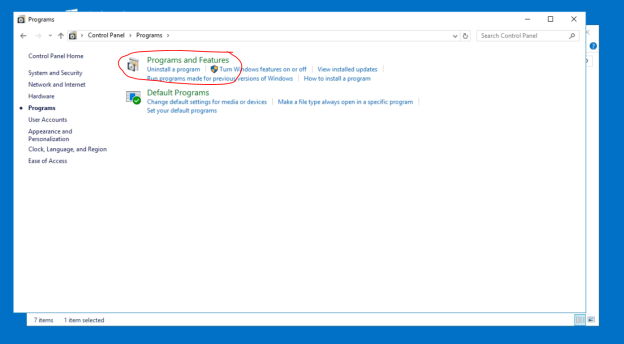
Choose as photo

How to Install SNIPE-IT on Windows for IT Asset Management 258

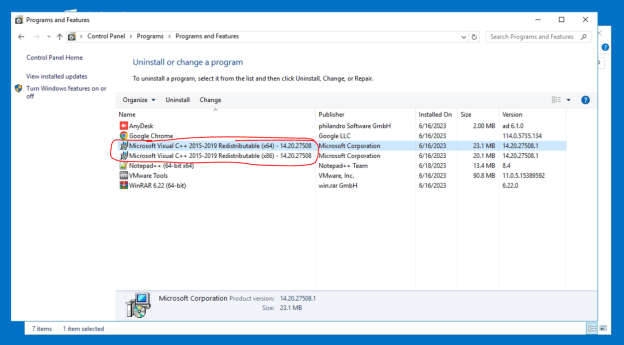
Check which version of C++ is available, here we are missing the 2012 version
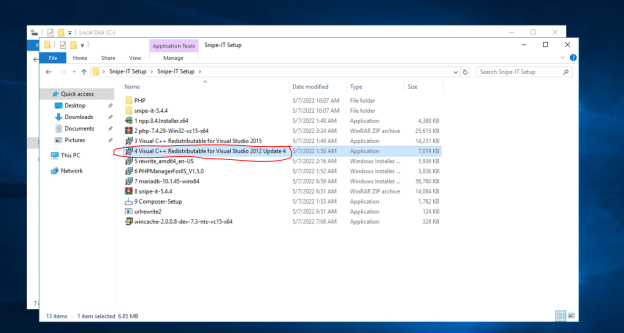
How to Install SNIPE-IT on Windows for IT Asset Management 259

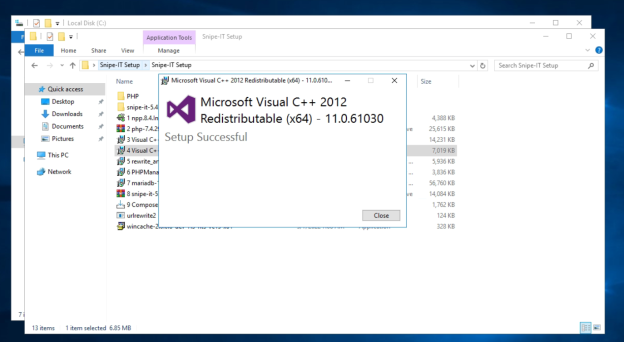
Go back to Snipe-IT to install and install C++ 2012
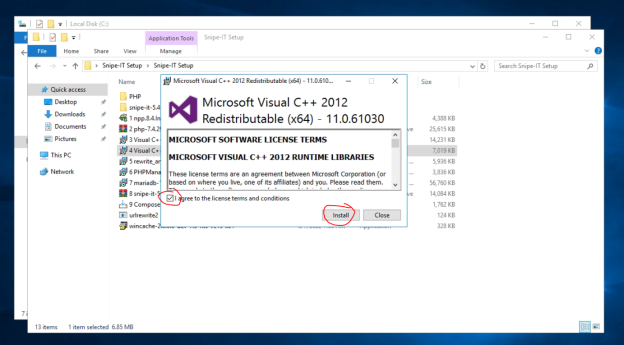
How to Install SNIPE-IT on Windows for IT Asset Management 260

Click Accept and Install

How to Install SNIPE-IT on Windows for IT Asset Management 261

The installation is successful

How to Install SNIPE-IT on Windows for IT Asset Management 262

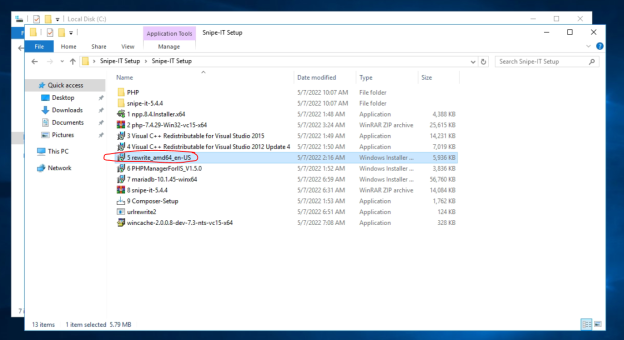
Install the URL Rewrite software, select the installer as shown in the picture
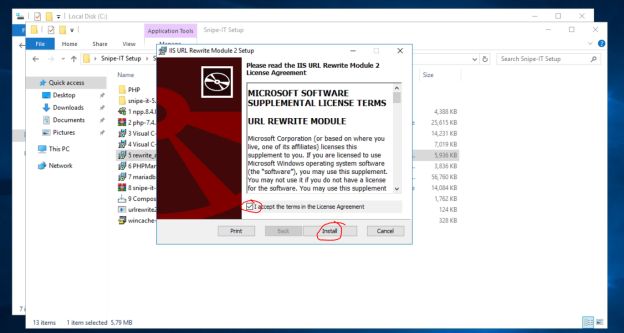
How to Install SNIPE-IT on Windows for IT Asset Management 263

Select Install

How to Install SNIPE-IT on Windows for IT Asset Management 264

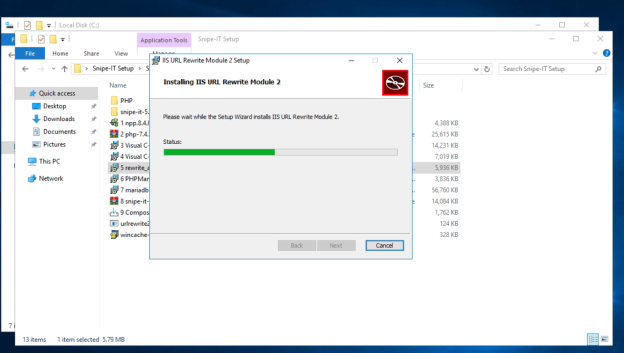
Installation is in progress

How to install SNIPE-IT on Windows for IT Asset Management 265

Complete installation

How to Install SNIPE-IT on Windows for IT Asset Management 266

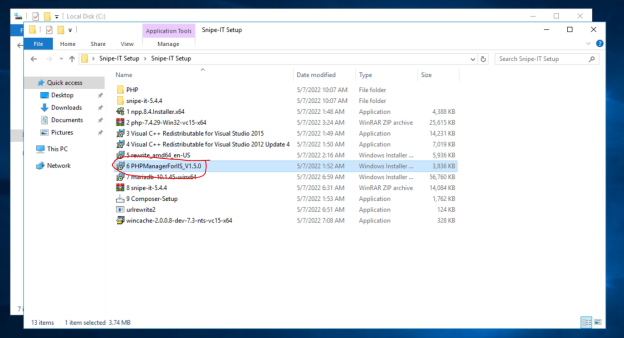
Install PHP Manager

How to Install SNIPE-IT on Windows for IT Asset Management 267

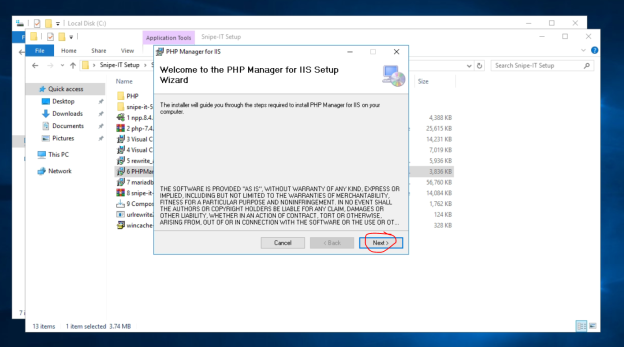
Select Next

How to Install SNIPE-IT on Windows for IT Asset Management 268

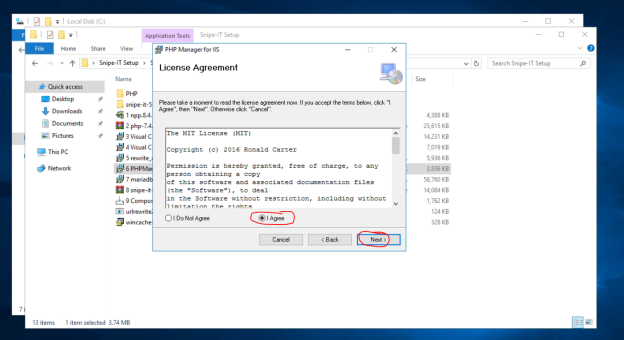
Select I Agree and Next

How to Install SNIPE-IT on Windows for IT Asset Management 269

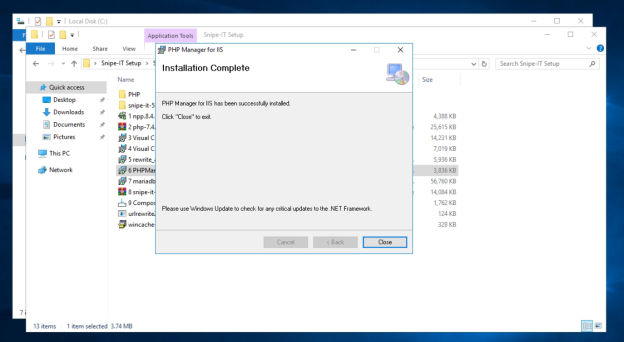
Installation is complete

How to Install SNIPE-IT on Windows for IT Asset Management 270

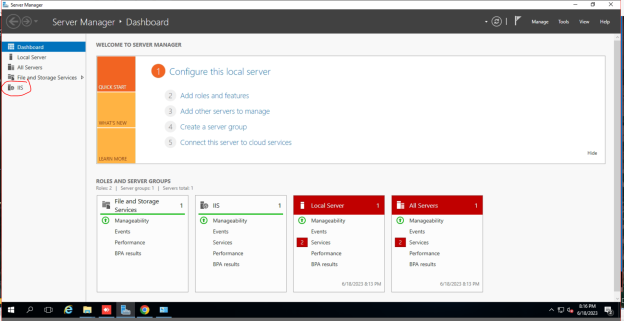
Go back to Server Manager

How to Install SNIPE-IT on Windows for IT Asset Management 271

Select IIS

How to Install SNIPE-IT on Windows for IT Asset Management 272

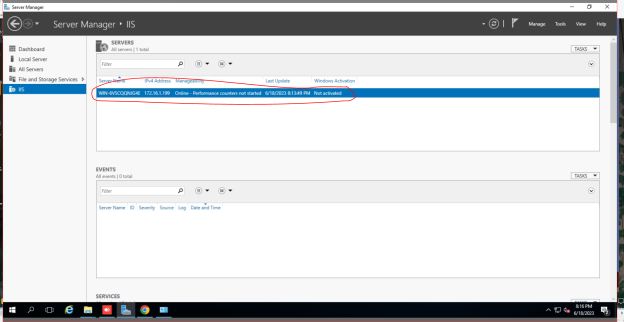
Right click on the text as shown in the picture
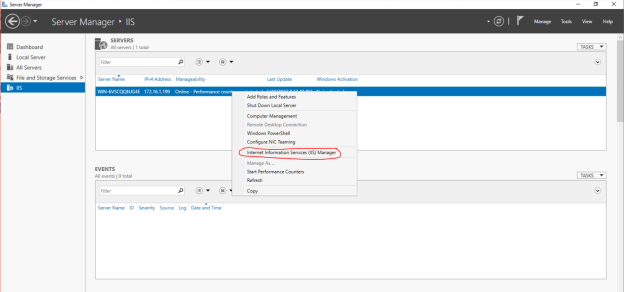
How to Install SNIPE-IT on Windows for IT Asset Management 273

Select Internet Information Services (IIS) Manager
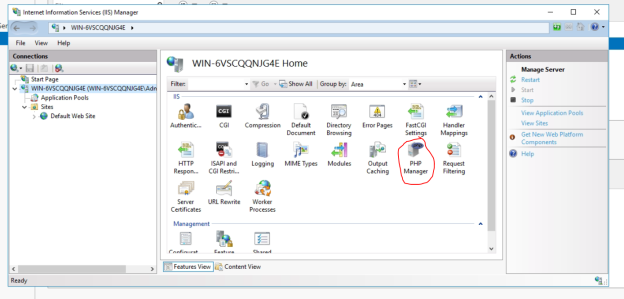
How to Install SNIPE-IT on Windows for IT Asset Management 274

Select the PHP Manager item

Requirements SnipeIT only uses PHP >= 7.4 < 8.0 (Pay close attention to this, dear) should use the installer included in the Folder Install SnipeIT, do not use another PHP version.
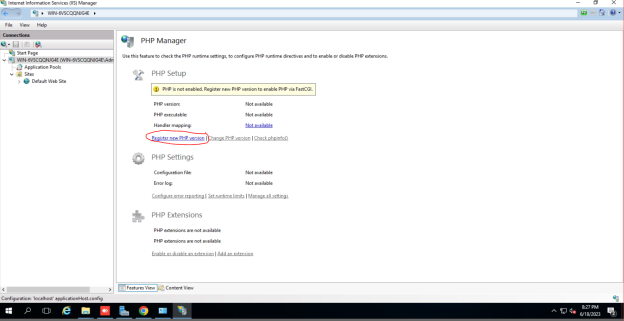
How to Install SNIPE-IT on Windows for IT Asset Management 275

Select register PHP as shown in the picture
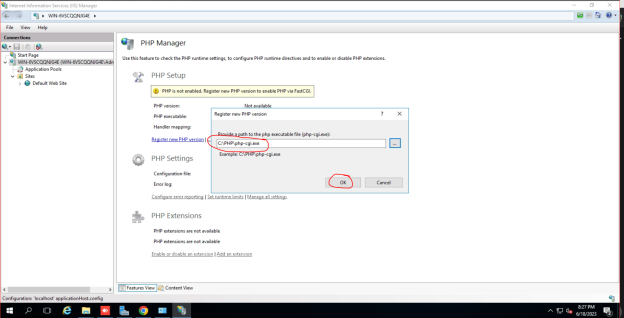
How to Install SNIPE-IT on Windows for IT Asset Management 276

Select the path C:\PHP\php-cgi.exe and then click Ok
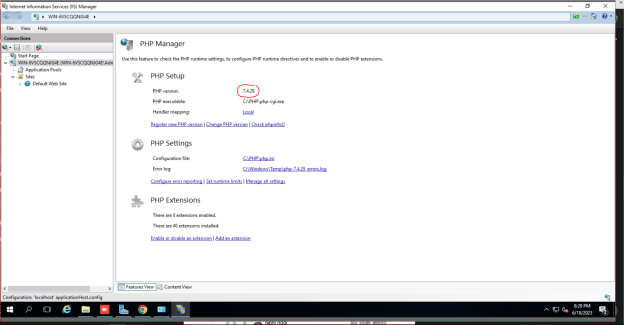
How to Install SNIPE-IT on Windows for IT Asset Management 277

The registration is successful and you will see the version of PHP displayed
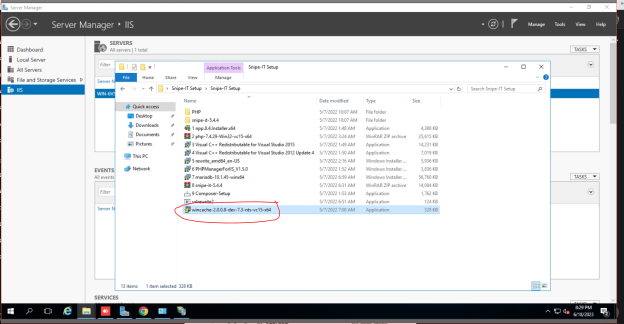
How to Install SNIPE-IT on Windows for IT Asset Management 278

Install wincache (this is installed to run that snipe-it website)

The article achieved: 5/5 – (1 vote)

Tags: AssetinstallmanagementSNIPEITWindows
Previous Post

How to Register for Free Hosting with Unlimited Bandwidth

Next Post

How to Crack Adobe to use AI of Photoshop, Illustrator

AnonyViet

AnonyViet

Related Posts

How to choose the right VPS to make MMO games
Network

How to choose the right VPS to make MMO games

August 19, 2023
How to register .id.vn domain name for free on iNet
Network

How to register .id.vn domain name for free on iNet

June 1, 2023
Learn the IP address 192.168.1.1 and its role in computer networks
Network

Learn the IP address 192.168.1.1 and its role in computer networks

May 8, 2023
How to Install Docker on Windows and Linux
Network

How to Install Docker on Windows and Linux

April 28, 2023
How to configure Netdata to monitor Server performance
Network

How to configure Netdata to monitor Server performance

April 18, 2023
How to find the largest File/Folder on Linux
Network

How to find the largest File/Folder on Linux

March 23, 2023
Next Post
How to Crack Adobe to use AI of Photoshop, Illustrator

How to Crack Adobe to use AI of Photoshop, Illustrator

Leave a Reply Cancel reply

Your email address will not be published. Required fields are marked *

Recent News

How to Comment on a smiley face with a long mouth on Facebook

How to Comment on a smiley face with a long mouth on Facebook

September 23, 2023
How to use StandBy mode of iPhone iOS 17

How to use StandBy mode of iPhone iOS 17

September 22, 2023

Use Aquarium on the browser to check if the computer configuration is strong

September 22, 2023
Download Panel TMV: Free photo editing panel for Photoshop

Download Panel TMV: Free photo editing panel for Photoshop

September 21, 2023
How to Comment on a smiley face with a long mouth on Facebook

How to Comment on a smiley face with a long mouth on Facebook

September 23, 2023
How to use StandBy mode of iPhone iOS 17

How to use StandBy mode of iPhone iOS 17

September 22, 2023

Use Aquarium on the browser to check if the computer configuration is strong

September 22, 2023
AnonyViet - English Version

AnonyViet

AnonyViet is a website share knowledge that you have never learned in school!

We are ready to welcome your comments, as well as your articles sent to AnonyViet.

Follow Us

Contact:

Email: anonyviet.com[@]gmail.com

Main Website: https://anonyviet.com

Recent News

How to Comment on a smiley face with a long mouth on Facebook

How to Comment on a smiley face with a long mouth on Facebook

September 23, 2023
How to use StandBy mode of iPhone iOS 17

How to use StandBy mode of iPhone iOS 17

September 22, 2023
No Result
View All Result
  • Home
  • News
  • Software
  • Knowledge
  • MMO
  • Tips
  • Security
  • Network
  • Office

© 2023 JNews - Premium WordPress news & magazine theme by Jegtheme.