
Before implementing Steganography in python, we need to understand exactly what Steganography is.
| Join the channel Telegram of the AnonyViet 👉 Link 👈 |
Steganography is a method of hiding information in plain data. The word steganography comes from the Greek words: steganos meaning “protected” or “secret” and graphein, meaning “to write”.
“Digital” steganography can involve hiding information in images, audio files, and even videos. The advantage of “digital” Steganography over traditional methods is that the message can be hidden in a file that is already visible to the eye. For example, someone could hide the text of a message in an image posted on a website. The recipient can only see the message if it knows how to decode it.
To increase the level of security, the sender can encrypt the message before using some Steganography techniques.
Steganography can be used for a variety of purposes, including sending confidential messages, sharing sensitive information, and copyrighting digital data.
Overview of Steganography technique
Looking at the hexadecimal (hex) of the image, we can see that the files png and jpg always end with the same sequence of bytes.
If using Linux, so we will check with the command xxd or or use software HxD . hex editing on Windows.
When using the Linux command to see the hex system of the file jpg: xxd -i image.jpg
The result will look like this:
.....
0xef, 0x47, 0xf7, 0x94, 0x70, 0x51, 0xec, 0xa2, 0x9f, 0x4a, 0x7d, 0xe6, 0xa8, 0x73, 0xff, 0x00, 0xc7, 0x3f, 0xff, 0xd9
When using HxD to open images on Windows.
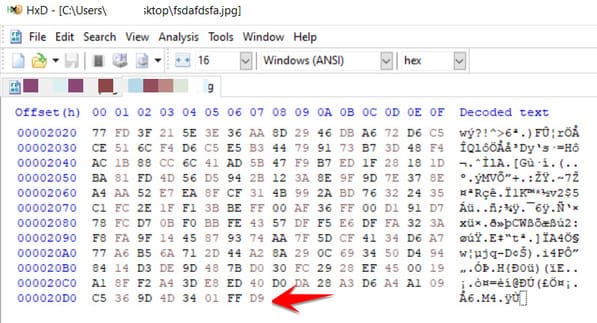
Either way you can see it FF and D9 at the end, for the image, the following content FF D9 will not be read. Therefore, it is easy to add hidden messages after these locations.
The same process can be done with png and we will see results similar to this
...
0xfc, 0xab, 0x38, 0x9d, 0x9d, 0xa2, 0xee, 0x3d, 0xc0, 0x77, 0xfe, 0xd1, 0xef, 0xbf, 0xe8, 0x1f, 0x77, 0xc3, 0x86, 0x0d, 0x1b, 0x36, 0x6c, 0xb8, 0x3c, 0xfc, 0x6f, 0x44, 0x3a, 0x0e, 0x7e, 0xe2, 0x52, 0x24, 0x49, 0x00, 0x00, 0x00, 0x00, 0x49, 0x45, 0x4e, 0x44, 0xae, 0x42, 0x60, 0x82
For files pngthe terminating string consisting of the last 12 bytes is: 0x00, 0x00, 0x00, 0x00, 0x49, 0x45, 0x4e, 0x44, 0xae, 0x42, 0x60, 0x82
Implement Steganography in Python
To script for steganography in python, we only need Python 3 and no extra libraries are needed.
The next step is to create a dictionary containing the terminating strings to distinguish between .png and .jpg files.
file_end = {
    ".png": b'\x00\x00\x00\x00\x49\x45\x4e\x44\xae\x42\x60\x82',
    ".jpg": b'\xff\xd9'
}
Method:
The code below opens a file in “append binary” mode and writes secret content to it.
def append_secret(filename, file_extension, secret):
    with open(f"{filename}{file_extension}", "ab") as f:
        f.write(bytes(secret, encoding="utf-8"))
This function will check if the file extension (png, jpg) of the image is in the dictionary “file_end” or not.
If true, this function will open the file and read it as a byte array.
It will then find the location of the file ending in the byte array.
After it finds the position, it decodes the byte array from that location on (after that location the secret message) and returns it as a string.
def retrieve_secret(filename, file_extension):
    if not file_extension in file_end:
        print("Format not supported!")
    else:
        with open(f"{filename}{file_extension}", 'rb') as f:
            buff = bytes(f.read())
            index = buff.index(file_end[file_extension])

            return buff[index+len(file_end[file_extension]):].decode('utf-8')
This function will read the content of the image file, find the end position of the image file, delete all content at the end position of the image file (delete the secret code)
Now we just need to use them for the main thing.
def clear_secret(filename, file_extension):

    if not file_extension in file_end:
        print("Format not supported!")
    else:
        buff=""
        with open(f"{filename}{file_extension}", 'rb+') as f:
            buff = bytes(f.read())
            index = buff.index(file_end[file_extension])

            f.truncate(index+len(file_end[file_extension]))
Main function
Basically, we have the following 3 features:
- Append: will add a secret message to the image
- Retrieve: will show secret message
- Clear: will delete secret messages
if __name__=="__main__":
    request = sys.argv[1]
    filename, file_extension = os.path.splitext(sys.argv[2])

    if request == "r":
        secret = retrieve_secret(filename, file_extension)
        print(secret)

    elif request == "a":
        append_secret(filename, file_extension, sys.argv[3])

    elif request == "c":
        clear_secret(filename, file_extension)

    else:
        print("[!] Wrong request, please use 'r' or 'a'")
Putting the functions together gives us a complete Python image-message program:
Create files main.py with content:
import sys
import os

file_end = {
    ".png": b'\x00\x00\x00\x00\x49\x45\x4e\x44\xae\x42\x60\x82',
    ".jpg": b'\xff\xd9'
}

def retrieve_secret(filename, file_extension):
    if not file_extension in file_end:
        print("Format not supported!")
    else:
        with open(f"{filename}{file_extension}", 'rb') as f:
            buff = bytes(f.read())
            index = buff.index(file_end[file_extension])

            return buff[index+len(file_end[file_extension]):].decode('utf-8')

def append_secret(filename, file_extension, secret):
    with open(f"{filename}{file_extension}", "ab") as f:
        f.write(bytes(secret, encoding="utf-8"))

def clear_secret(filename, file_extension):

    if not file_extension in file_end:
        print("Format not supported!")
    else:
        buff=""
        with open(f"{filename}{file_extension}", 'rb+') as f:
            buff = bytes(f.read())
            index = buff.index(file_end[file_extension])

            f.truncate(index+len(file_end[file_extension]))

if __name__=="__main__":
    request = sys.argv[1]
    filename, file_extension = os.path.splitext(sys.argv[2])

    if request == "r":
        secret = retrieve_secret(filename, file_extension)
        print(secret)

    elif request == "a":
        append_secret(filename, file_extension, sys.argv[3])

    elif request == "c":
        clear_secret(filename, file_extension)

    else:
        print("[!] Wrong request, please use 'r' or 'a'")
How to use Python to add/read/delete messages in image files
Prepare a photo and name it anonyviet.jpg or anonyviet.png
Add a secret message to the image:
Linux:python main.py a anonyviet.jpg "tin nhắn bí mật"
Read secret messages in image files:
python main.py r anonyviet.jpg
Delete added messages in photos:
python main.py c anonyviet.jpg
This is a Steganography technique that helps to hide the text of the message into the image in Python, you can invent the encryption of the code so that other people can’t decode it when reading the content unless you have a Private Key. This is an advanced exercise, you can try to apply it yourself.
Award:
05 you found “Secret Content” and in the picture below and write the solution Then comment below this article and you will be given a 10K phone card.