A) Introduction
| Join the channel Telegram of the AnonyViet 👉 Link 👈 |
If in Windows Server 2008 R2 you can move virtual machines using Live Migration, you must first turn off the virtual machines (Turn off). For Hyper-V in Windows Server 2012/2012 R2, you can easily move the storage of virtual machines while they are running.
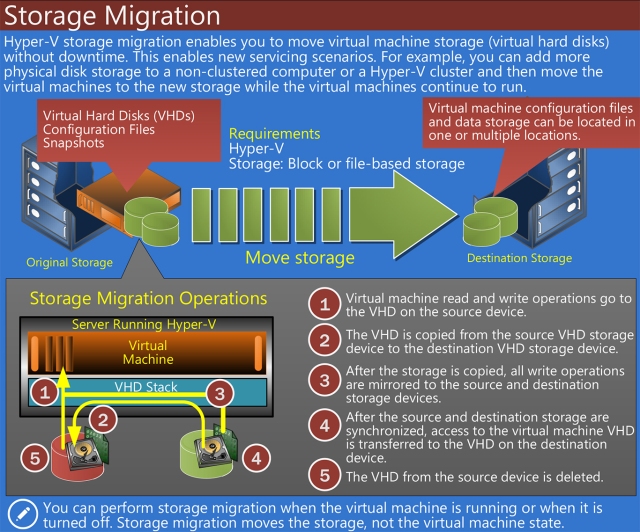
Hyper-V Storage Migration allows you to perform move storage of virtual machines (VHDs, Snapshots, Current Configuration, Smart Paging) with very little perceived downtime. Users still use the virtual machine normally and without interruption.
The purpose of this is to upgrade your Storage system. For example, you install some new physical disk storage (hard drive) to expand the storage space for your Hyper-V Physical machine. And now you just need to move the virtual machine’s hard drive to this new storage drive.
Storage Migration allows you to move storage of running virtual machines to: a new path in the machine or to a shared storage (SAN, SMB.30 Share Folder). Storage Migration between 2 physical Hyper-V machines is only possible in a Domain environment
B) Working principle
- First of all, virtual machines are still read / written normally (running) on the physical Hyper-V machine when performing Storage Migration.
- VHDs, Snapshots, Current Configuration, Smart Paging files will be copied to the Destination Folder (either via the new hard drive of the physical machine or through a Share folder SMB 3.0 of another Hyper-V host in the Domain).
- After you have moved Storage to the Destination folder. The system will continue to perform the Write (what the user is using or saving from the time of copy until now) through the Destination Folder.
- The copy between the Source folder and the Destination folder has been synchronized, now the system will redirect to the storage folder of the virtual machine on the destination to perform normal read/write.
- Finally, after read/write inside destination folder . The Storage folder of the virtual machine inside the source folder will be deleted.
C) Lab Storage Migration with SMB3.0 Share Folder (Move the virtual machine’s storage from the Hyper-V1 host to the Hyper-V2 host’s SMB 3.0 directory)
- First, let’s go to the Hyper-V2 host and create a folder and share the permissions Full control for Hyper-V1 machine (my folder here is “C:\Storage of Windows 8.1 VM”)
- Getting Started move storage of virtual machine
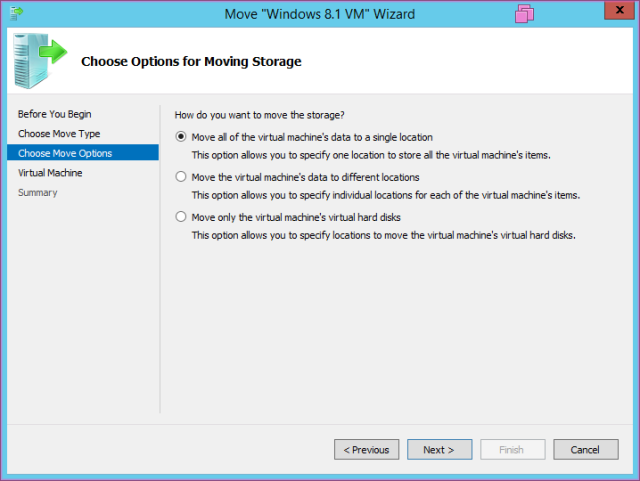
- Select “Move the virtual machine’s storage”
- There are 3 mechanisms: move all to one place, move (VHD,Current config, smart paging, snapshot) in different places, move only (VHD,Snapshot) of the virtual machine.
- Declare destination folder (note: by network path)
- The system is in the process of moving
- Once done, go to the Settings of the virtual machine and check the Hard Drive section, you will see the path is now Hyper-V2 host


