In this comprehensive guide, we will dive into the process of recovering data from Mac disk image, providing detailed step-by-step instructions to help users in their recovery journey.
| Join the channel Telegram belong to AnonyViet 👉 Link 👈 |
Whether you're using macOS Vеntura 13, macOS Sonoma, or any other version of MacBook, our guide ensures that you can restore a disk image to your Mac smoothly.
What is a disk image on Mac
A disk image typically represents a copied version of optical media, although it can also originate from a USB flash drive. Faronics, a provider of software solutions for multi-user computing environments, highlights a number of benefits associated with disk imaging, including:
Rational화 deploys the same systems across multiple computers, eliminating the need for individual setups or new operating system installations on each device.
Facilitates incremental backups by allowing users to create multiple image variations.
Saving an image as a file allows you to preserve your Mac data without keeping the physical hardware. Create an image of your drive and store it for future use.
A disk image is a compressed copy of the contents of a disk or folder, known as a dmg filerecognizable by the .dmg extension in its name.
Restore Disk Image on Mac with Software
Don't worry about data loss if the disk image is lost or deleted by accident! Consider professional data recovery software to recover disk image on Mac.
EaseUS Data Recovery Wizard for Mac is a powerful disk data recovery tool that can help you recover deleted disk data with just a few clicks. Try the following steps to recover Mac data from disk image:
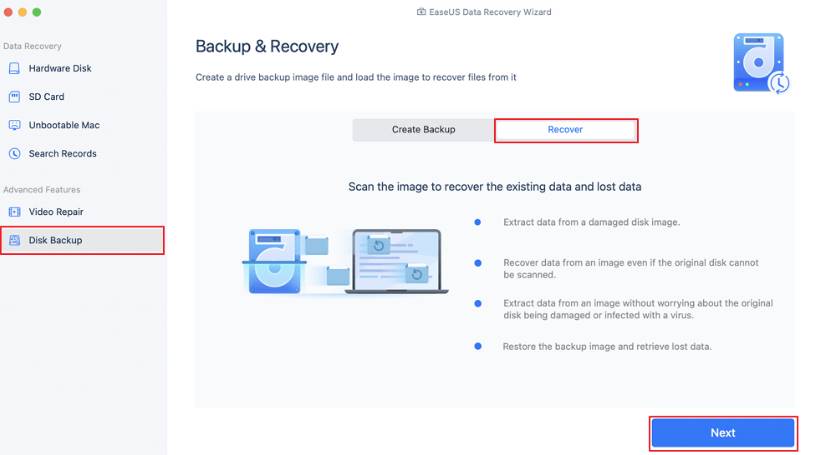
Step 1. Launch EaseUS Data Recovery Wizard for Mac when you are ready to extract data from the disk image. Select “Disk Backup” in the sidebar, and click “Recover” > “Next”.
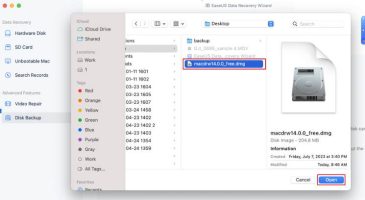
Step 2. Find the DMG file you created earlier and click “Open”. If you save the disk image on an external hard drive, you need to connect the backup drive to your iMac/MacBook.
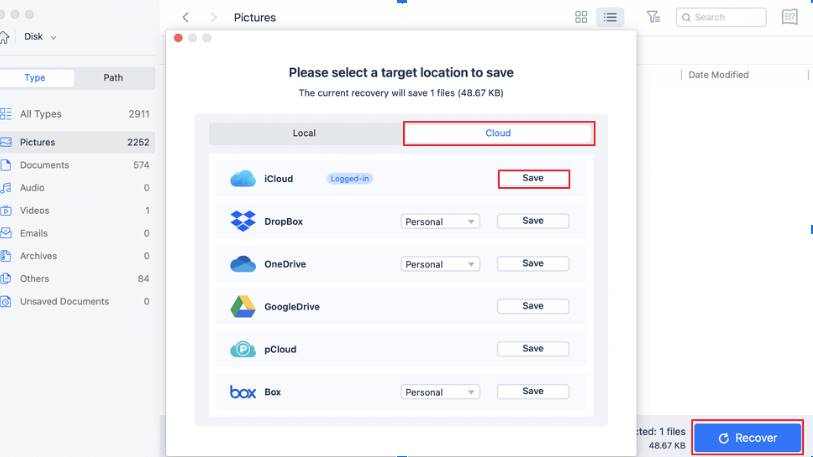
Step 3. EaseUS data recovery software will start scanning immediately, and you can filter the lost files on the left side of the window. Select all the photos/documents/videos/emails you want to recover, and click “Recover”. You are allowed to save your files to local/cloud, and you can also restore files to iCloud by clicking the “Save” button.
EaseUS software can help you mount the disk image and access the stored data, which is the most effective way to recover disk image contents on a Mac, even if your dmg file cannot be opened. In addition to using the software, you can recover disk image on Mac by following the methods below.
How to Use Disk Images on Mac [3 Giải Pháp]
We provide three common uses for disk images on Mac: inspecting the contents of a disk image, restoring a single disk image, and restoring multiple disk images on Mac. Read on for detailed steps if needed.
Check the disk image contents:
To examine the contents of a disk image, you need to initiate its opening, causing it to appear on the desktop or in a Finder window.
Here's how to view the contents of a disk image on your Mac:
Double-click the disk image to initiate its opening.
Once opened, double-click the disk image again to reveal its contents.
If you encounter any problems with the disk image, you can use Disk Tools to check and fix them, such as running First Care to repair it. Or, consider EaseUS software for DMG recovery.
To begin the recovery process, you must first erase the disk. If the disk contains multiple partitions, you will need to restore each partition separately.
Restore disk image on Mac with a single volume:
Here are the steps to restore a disk image on Mac with a single volume:
Step 1. Open the “Disk Tools” application on your Mac.
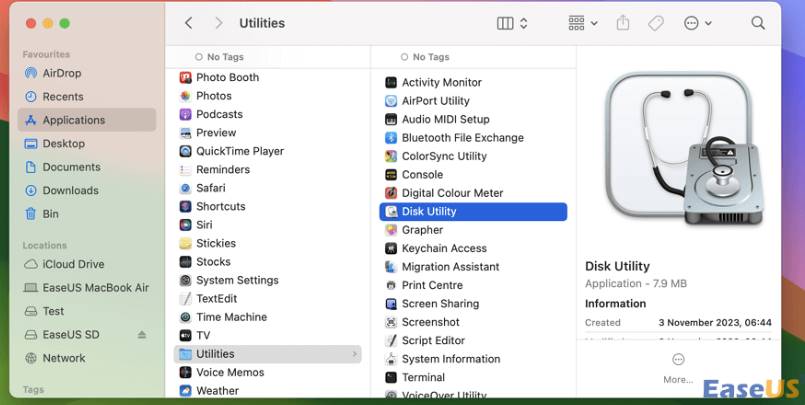
Step 2. Select the volume you want to restore from the sidebar after clicking “Show all devices”.
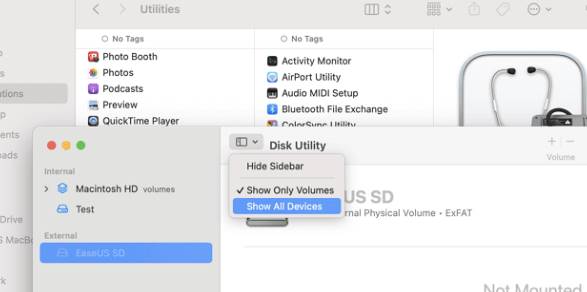
Step 3. Click the “Recover” button once you have made your selection. This will convert the deleted volume into a copy.
Step 4. Select the appropriate volume you want to clone from the restore pop-up menu. Click the “Restore” button.
Restore disk image on Mac with multiple volumes:
To restore a disk image with multiple volumes to a single disk on your MacBook, you will first need to partition the destination disk.
You will then need to reinstall each volume individually. Here are the steps to restore a disk image on a Mac with multiple volumes:
Step 1. Open “Finder” on your MacBook and double-click the disk image. In Finder, the volumes of the disk image appear as separate disks.

Step 2. In the “Disk Tools” application, select the target disk from the sidebar. Click the “Partition” button and partition the target disk accordingly.
Make sure the destination disk has the same number of partitions as the disk image, with each partition being at least as large as its counterpart in the disk image.
Step 3. Select the volume you want to restore, then click the “Restore” button. The volume will be erased and turned into an exact copy.
Step 4. Proceed with one of the following options:
To reinstall from a disk image, select “Image”, select the desired disk image and click “Open”.
To reinstall from a volume, select the “Restore from” pop-up menu and select the copied volume.
Step 5. Click the “Recover” button to start the recovery process. Repeat steps 3 to 5 for each remaining partition on the target disk.
Conclude
In conclusion, this tutorial has provided a detailed guide on how to restore Mac from disk image, covering both single volume and multiple volume cases. By following the instructions described in this article, users can effectively restore disk image to their Mac system, ensuring a smooth recovery process. EaseUS Data Recovery for Mac software is the best solution to ensure comprehensive data recovery solutions. You have a wide range of data recovery possibilities, thanks to its user-friendly interface.


