You’ve probably heard of a website like datathaga.zyx or something similar once, right? The purpose of these sites is to use its bandwidth traffic to be able to provide you with 4G hack files and sell them for profit. So if you are also someone who has a surplus of VPS but you don’t know what to do, this is the guide for you. Right now I will guide you how to sell 4G hacked FIles through V2board!
| Join the channel Telegram of the AnonyViet 👉 Link 👈 |
Prepare
- 1 VPS has aaPanel available (you can read the article on how to install aaPanel here)
- SSH Connector (I use MobaXterm)
- Does the device use Viettel’s 4G?
Installation Instructions
Install V2board
With this article will be the continuation of the article on installing aaPanel, so I will also let the number of steps be the number of steps of the article. aaPanel always!
Step 8: You go to Appstore > Find the PHP version you installed (For me, it’s PHP 7.4) > Select Settings > Select Install Extensions > proceed to install redis and fileinfo
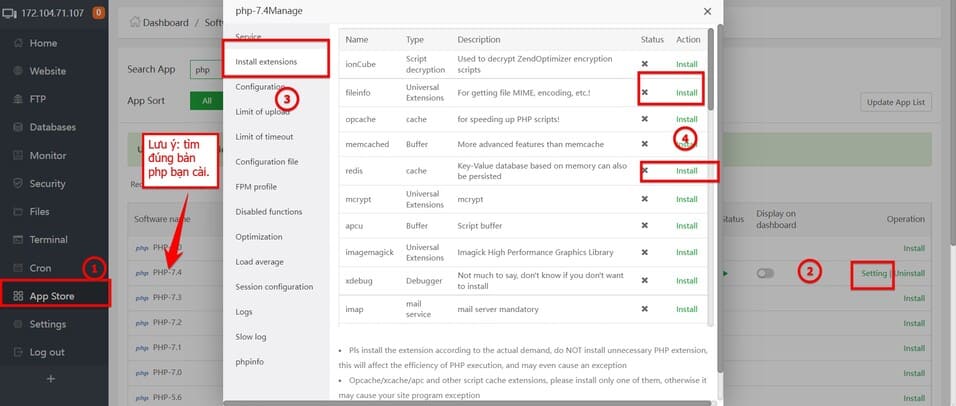
Step 9: Still in PHP, you guys go in disable function and lock yourself the following 4 functions: putenv proc_open pcntl_alarm pcntl_signal
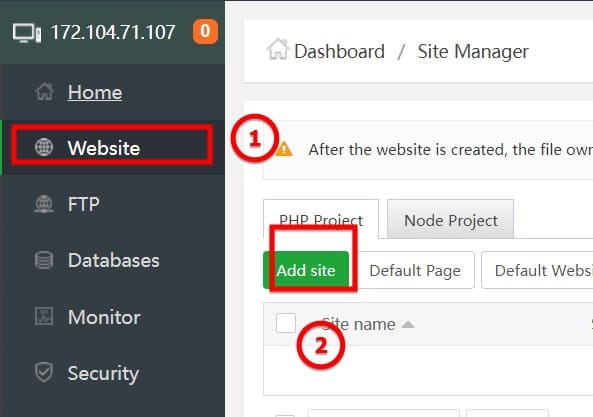
Step 10: you proceed to add a website by going to Website > Add site to create a V2board
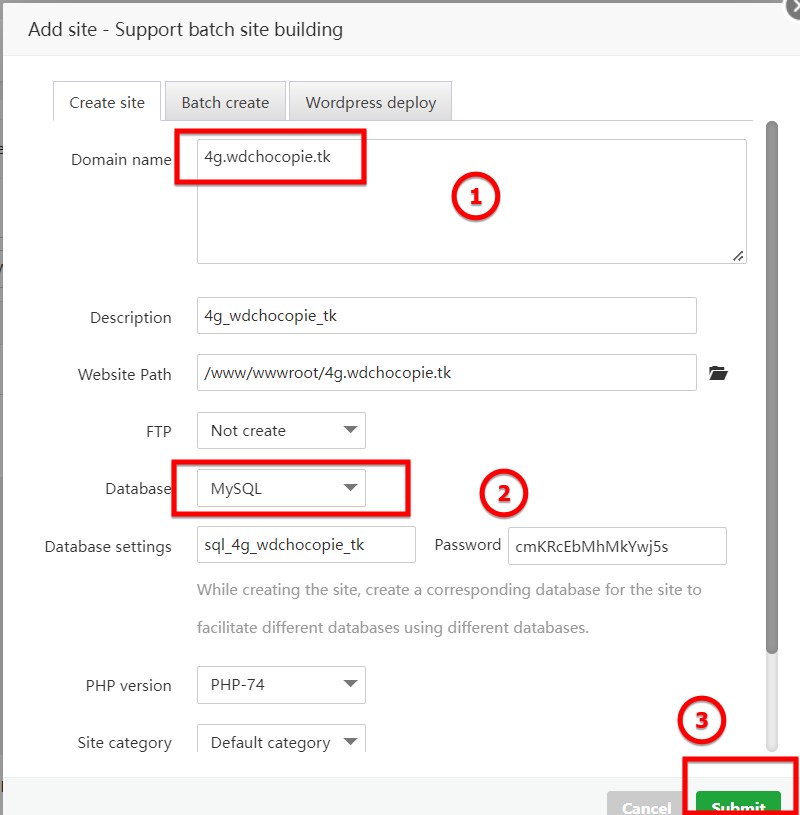
Step 11: You install the following options:
- Domain name: your domain name. You can see how to get a free domain name and guide to point DNS to the server here
- Database: Please proceed to change to MySQL for me
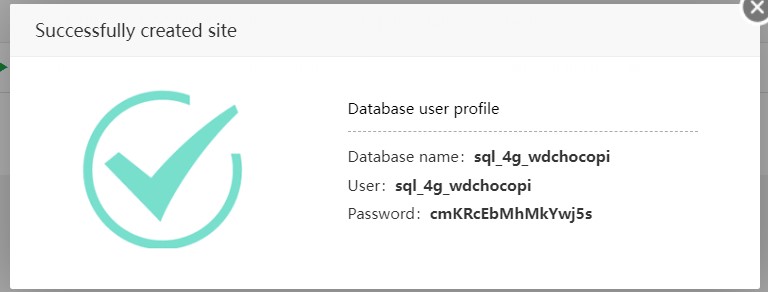
Step 12: You proceed to save the following information in your notepad
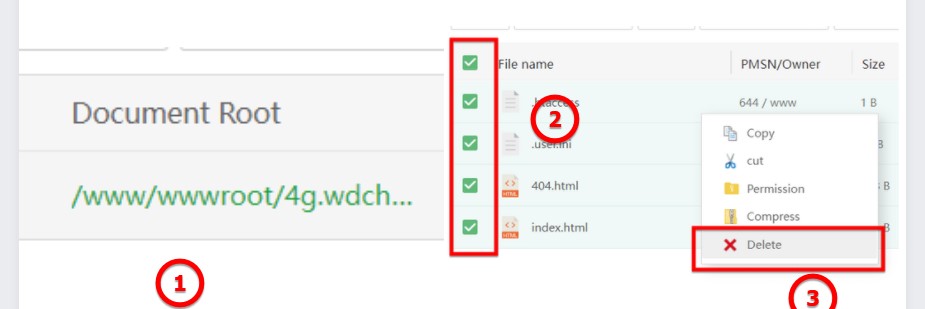
Step 13: You proceed to delete all files in the document root of the newly created website!
Step 14: You go back to SSH to connect to the VPS and proceed to the path as above in the document root section with the following command
cd cd /www/wwwroot/[tên miền của bạn]
For my example, the command is:
cd /www/wwwroot/4g.wdchocopie.tk
Step 15: Run the command below in your newly entered directory
git clone https://github.com/v2board/v2board.git ./
Step 16: You proceed to run the following .SH file:
sh init.sh
Step 17: After V2Board has finished running, run the following command:
localhost
Step 18: You enter the Database name of the database that you got in step 12. For mine it will be: sql_4g_wdchocopi
Step 19: You enter the Username of the database that you got in step 12. For mine it will be: sql_4g_wdchocopi
Step 20: You enter the password of the database. Mine would be: cmKRcEbMhMkYwj5s
Step 21: You proceed to create an admin account with the order being asked: email (no need to be real mail) > password
Note: Password for V2board needs 8 characters or more)
My account
- Email: [email protected]
- Password: Anonyviet1@
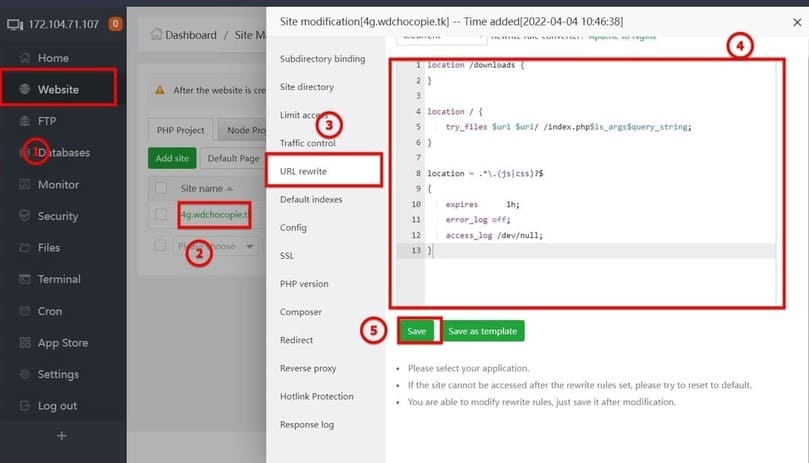
Step 22: You go to Website > [Website của bạn] > URL Rewrite and copy the following code
location /downloads {
}

location / {
    try_files $uri $uri/ /index.php$is_args$query_string;
}

location ~ .*\.(js|css)?$
{
    expires      1h;
    error_log off;
    access_log /dev/null;
}
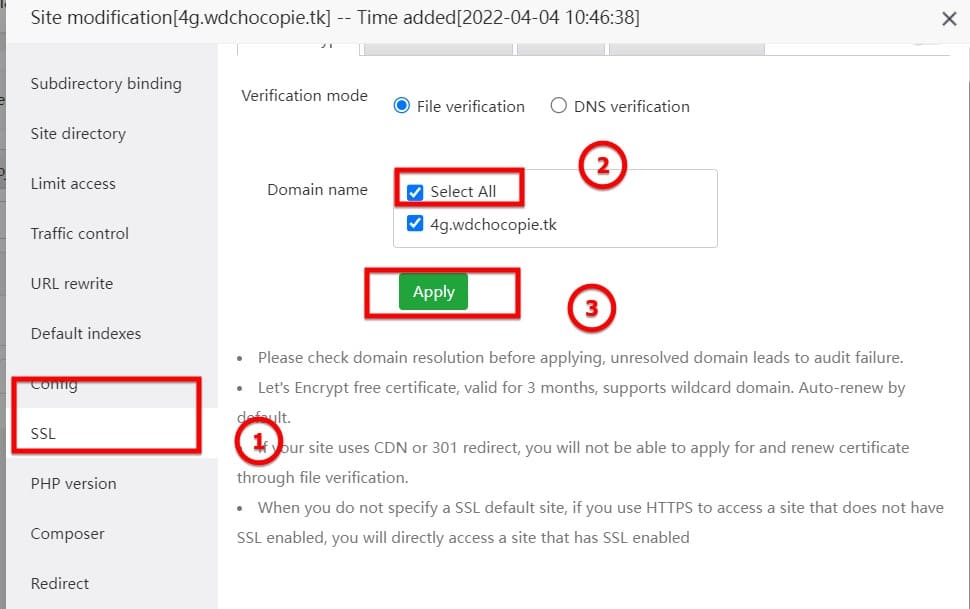
Step 23: You choose SLL> select all> apply
Step 24: Please enable Force HTTPS option
Step 25: You go to the Site Directory section. In the Running directory section, choose /public for yourself.

Step 26: You go to the Document root file and return to the www file with the toolbar at the top.

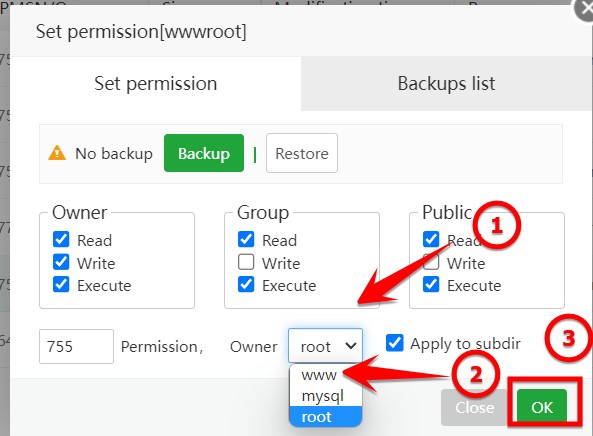
Step 27: at wwwroot, select PMSN

Step 28: Please change the file permissions to www (default is root)
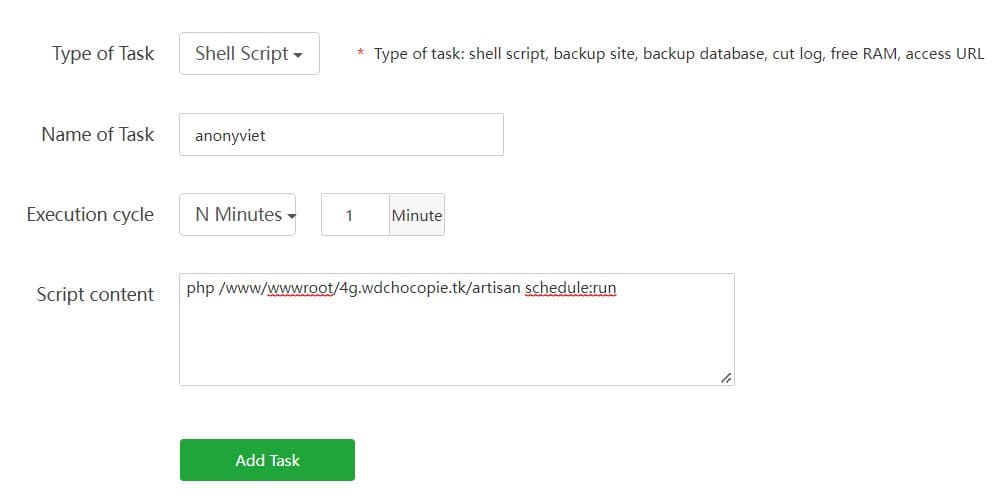
Step 29: You select Cron on the toolbar and fill in the information:
- Name of task: You can leave whatever name you want
- Execution cycle: You give yourself N minutes: 1 minute
- Script content: php /www/wwwroot/[thay tên miền của bạn vào]/artisan schedule:run
Step 30: You try your website with the domain name registered at first and proceed to login. Mine will be wdchocopie.tk
Step 31: Go back to aaPanel and go to Appstore > Find and download PM2 Manager

Setup guide Sell 4G hack file
Step 32: You go to the admin page of V2Board with the following address: [tên miền]/admin and proceed to login with the provided account
Step 33: you go to (you can see below picture) and create a group
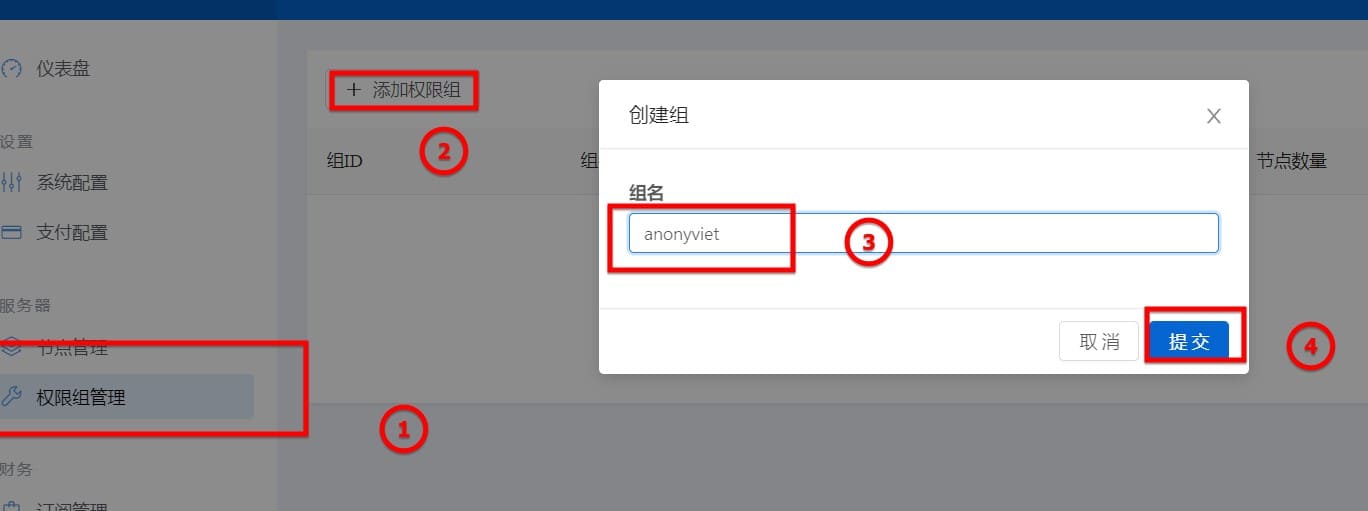
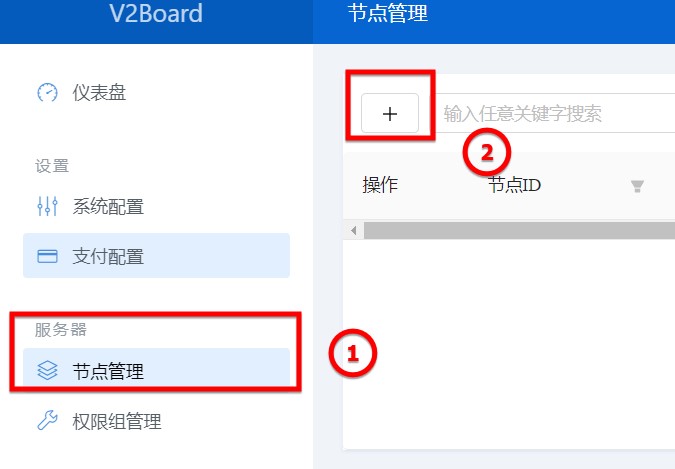
Step 34: You go to 节点管理 (you can see in the picture for easy) and select the “+” sign. After choosing, you choose the connection software
Step 35: Please fill in the information as shown!
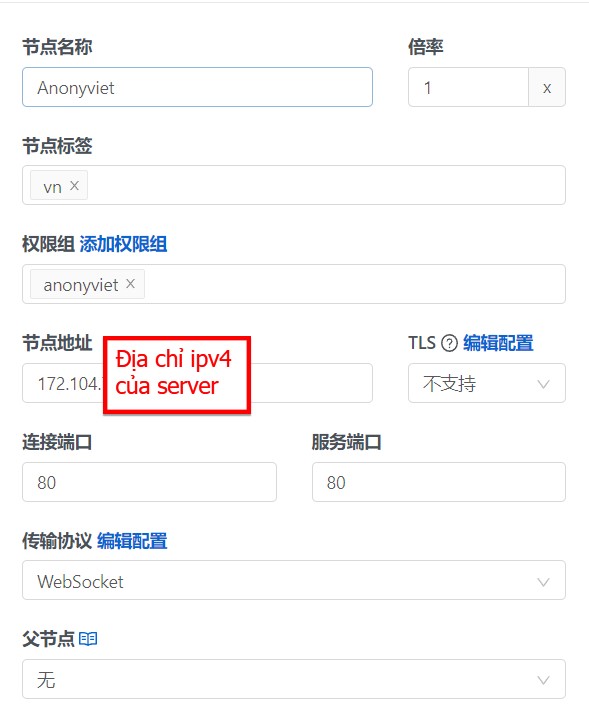
Step 36: Above the Websocket there is a green text, please click and copy the code below
{
  "path":"/anonyviet",
  "headers":
  {
    "Host":"Livestream2.tv360.vn"
  }
}
Step 37: Back to the SSH part, you go back out of the /www directory with the following command
cd
Step 38: You proceed to run the command below to install XRayR
bash <(curl -Ls https://raw.githubusercontent.com/XrayR-project/XrayR-release/master/install.sh)
Step 39: You change the config file with the command below
nano /etc/XrayR/config.yml
And make the following change
- PanelType series : Web style name (e.g. V2board, SSpanel, etc. capital letters)
- ApiHost Series : Web address you want to link (eg https://domain.com/)
- ApiKey Series : key of the web (get it on the web admin / system configuration / server communication key) (this part, you go through and set the APIKey yourself on the V2board admin!)
- NodeID Series : server ID (get on web admin / Manage node / node ID name)
- certdomain line : IP of the server you want to post on the web
Step 40: You run the following command to start XrayR
xrayr start
And you go back to your admin page and check. If you see a yellow light as shown below, it’s successful!

At this point, you just need to set the price and you’re done! Wish you success with V2board and run the hack file successfully!

