Hello friends of AnonyViet, as promised today I will guide you to install Ubuntu operating system in parallel with the latest Windows operating system without affecting the system.
| Join the channel Telegram of the AnonyViet 👉 Link 👈 |
As we all know, Ubuntu is an open source operating system with a Linux kernel. Widely used by young people, especially companies concerned about royalty costs. Particularly, AnonyViet uses parallel Ubuntu to Windows to facilitate administration, use and test the system.
Installing Ubuntu in parallel with Windows is very useful for students. When you are just starting to get used to the new operating system. You can easily test the application or operating system operations.
GENERAL ASSESSMENT OF INSTALLING UBUNTU WITH WINDOWS
Advantage:
- Easy to administer.
- Does not consume a lot of resources on RAM, CPU.
- Limited legal issues and royalties.
Defect:
- Must divide 1 more partition to install Ubuntu.
- Takes a few seconds to select the operating system on startup
PREPARATION STEPS TO INSTALL UBUNTU WITH WINDOWS
- A source set (ISO file) of Ubuntu operating system
- A USB at least 2Gb to create USB Boot
Minimum configuration:
- 2 GHz dual core processor
- 2 GB RAM (system memory)
- 25 GB hard drive
HOW TO DOWNLOAD UBUNTU OS ISO FILE
All Ubuntu versions are free
To download the Ubuntu operating system, you need to go to Ubuntu’s homepage and select the appropriate version to download.
On the Ubuntu Website, there will be versions such as:
Ubuntu Desktop: This is the version with interface, used for office, study and entertainment purposes. Similar to Windows Client (Windows XP/7/8/10).
Ubuntu Server: Version using configuration for network services. This version will not have a interface, so we will configure it using the command line
Ubuntu Cloud: Version support for cloud computing system. You can refer to OpenStack.
Ubuntu flavours: Many different variant versions are Modified according to the user’s wishes
Ubuntu Core: Version for programmers, want to study in depth about the Ubuntu operating system. Used to develop your own versions of Ubuntu.
In this tutorial, I will guide you to create USB Boot Ubuntu version Ubuntu 16.04.3 LTS Desktop. This version is widely used in schools, offices, enterprises, and companies.
First you need to download the Ubuntu Desktop ISO File at the address below:
You click the Download button in the Web page.
If the money support bar appears, you drag all to the left, to show 0 $. Then there will be a Download button below.
The file size of Ubuntu Desktop 16 is about 1.6Gb.
HOW TO CREATE USB BOOT UBUNTU WITH WINDOWS parallel installation
Step 1: Download the USB Boot Ubuntu creation software called Rufus at https://rufus.akeo.ie/
Step 2:
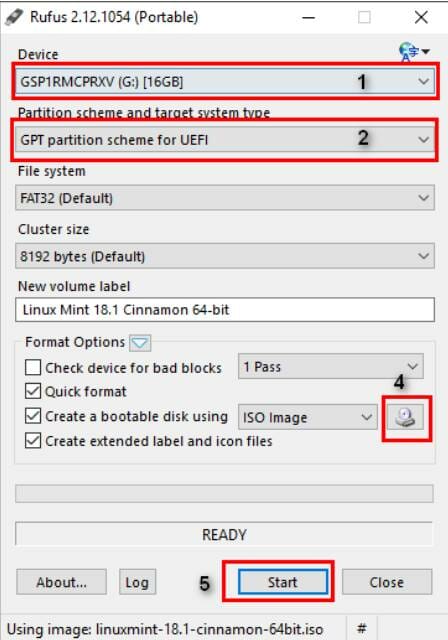
Follow in the image below:
- Select the USB drive where you want to create the Linux installer
- Partition type for installer GPT nice UEFI
- Click on the drive image to select the file .Iso that you downloaded above
- Press Start
Then press the button Create.
When creating your USB, the installation files will appear as shown below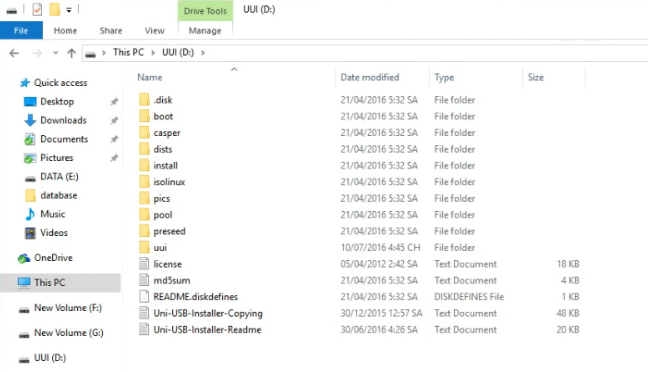
HOW TO DISTRIBUTE A DISTRIBUTION TO INSTALL UBUNTU
To install Ubuntu parallels Windows you need 1 drive (partition) to hold Ubuntu’s system data. Therefore this partition is located separately from other partitions.
To divide more partitions. You follow these steps:
- Right click on Computer select Manager
2. In the table Computer Management select Disk Management
Or:
How to open Disk Management: Go to Run -> type the command: diskmgmt.msc
Next you will select the drive you want to split into 2.
The drive you choose must have a slightly larger capacity, to ensure that it is still enough when divided capacity to store files and space to install Ubuntu
As shown in the picture below, I will separate the G: drive into 2 drives, by right click on WOOD drive: in Disk Management select Shrink Volume
Then enter the capacity of the new Drive (the drive will contain Ubuntu)
Enter the amount of space to shrink in MB: 50000
(50000Mb approx.: 50Gb)
Then press the button Shrink to start splitting the new drive
The newly created partition will be named Unallowcated
HOW TO BOOT USB TO INSTALL UBUNTU
Now you restart the computer. Enter BIOS to adjust Boot priority by USB. Depending on the computer company, we will have different ways of Booting into the BIOS.
Usually, when you restart your computer at the first screen repeatedly clicking the . button Del
Or check out the list of ways to Boot BIOS of brands in the box below
[toggle title=”Danh sách cách khởi động vào BIOS của các hãng”]
Acer
- Boot Option: Usually F12. There are also Esc, F9.
- Bios: Usually F2. There is also DEL
Asus
Group 1: VivoBook f200ca, f202e, q200e, s200e, s400ca, s500ca, u38n, v500ca, v550ca, v551, x200ca, x202e, x550ca, z202e
- Boot Option: ESC
- Bios: DELETE
Group 2: N550JV, N750JV, N550LF, Rog g750jh, Rog g750jw, Rog g750jx, Zenbook Infinity ux301, Infinity ux301la, Prime ux31a, Prime ux32vd, R509C, Taichi 21, Touch u500vz, Transformer Book TX300, Eee PC 1015, 1025c
- Boot Option: ESC
- Bios: F2
Group 3: k25f, k35e, k34u, k35u, k43u, k46cb, k52f, k53e, k55a, k60ij, k70ab, k72f, k73e, k73s, k84l, k93sm, k93sv, k95vb, k501, k601, r503c, x32a, x35u, x54c x64c, x64v, x75a, x83v, x83vb, x90, x93sv, x95gl, x101ch, x102ba, x200ca, x202e, x301a, x401a, x401u, x501a, x502c, x750ja:
- Boot Option: F8
- Bios: DEL
Compaq
- Boot Option: Esc, F9
- Bios: F10
Dell
- Boot Option: F12
- Bios: F2
eMachines
- Boot Option: F12
- Bios: Tab, Del
Fujitsu
- Boot Option: F12
- Bios: F2
HP
- Boot Option: ESC, F9
- Bios: ESC, F10, F1
Lenovo
- Boot Options: F12, F8, F10. Particularly for IdeaPad P500, F12 or Fn + F11
- Bios: F1, F2
Samsung
- Boot Option: ESC. With Ativ Book 2, 8, 9 is F2
- Bios: F2. With Ativ Book 2, 8, 9 is F10
Sony
Group 1: VAIO Duo, Pro, Flip, Tap, Fit
- Boot Option: assist button
- Bios: assist button
Group 2: VAIO, PCG, VGN
- Boot Option: F11
- Bios: F1, F2, F3
Group 3: VGN
- Boot Option: Esc, F10
- Bios: F2
Toshiba
- Boot Option: F12
- Bios: F2. Rieeng with Protege, Satellite, Tecra then F1, Esc
[/toggle]
After entering the BIOS screen, select the Boot menu prioritized put USB on Boot on top.
- Boot Option #1 : Your USB Name
- Boot Option #2 : Hard drive or CD/DVD drive
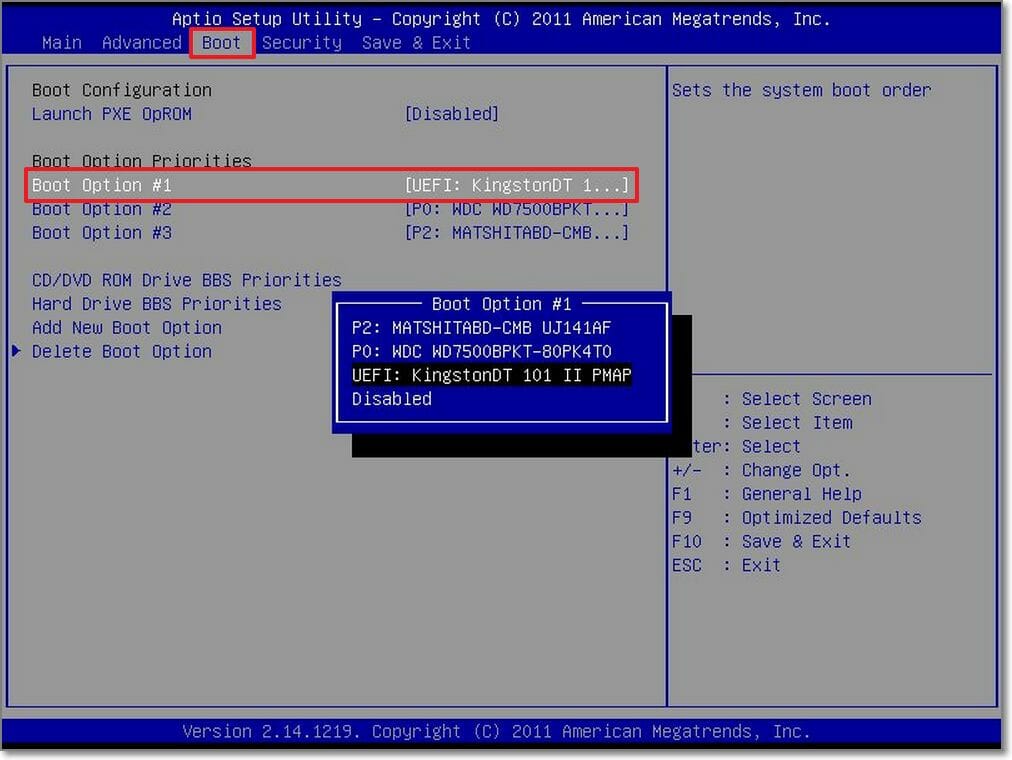
Afterward Save and Exit from the BIOS.
If you can get in Boot Options In the first boot screen of the computer, choose directly to USB Boot to start setting.
HOW TO INSTALL LATEST UBUNTU
At this time, remember that the USB is still plugged into the computer.
When starting the computer, you choose to enter USB Boot to install Ubuntu.
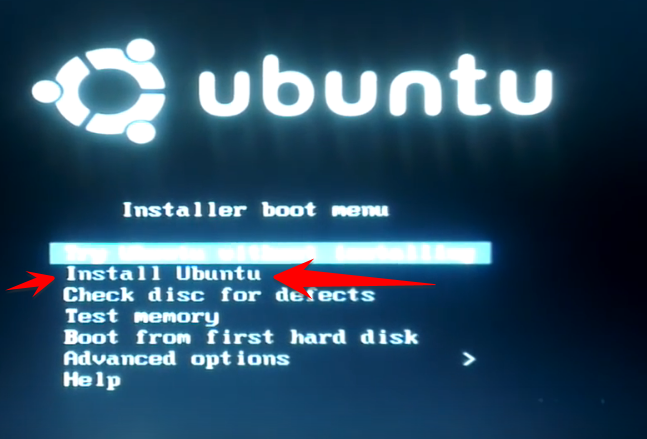
In the first screen select Install Ubuntu.
Next select the language, then press Tiếp tục.
Click select Install third-part software then press Tiếp tục.
This step is very important, so you need to read it carefully.
Install Ubuntu alongside Windows 10: Installed in parallel with Windows 10, when Win 10 is damaged, Ubuntu also dies with Win 10.
Erase disk and install Ubuntu: Delete Win 10 and install Ubuntu on the partition of the previous Win 10.
To install Ubuntu in parallel with Win 10, but the operation of these two operating systems independently does not affect each other. Then you choose:
Something else.
The next screen is that you choose the partition to install Ubuntu on. Select partition Free Space
Then click on the sign + as shown below.
A window will then appear allowing you to choose the Swap capacity. The Swap partition will have twice the amount of RAM currently in your computer.
Eg:
- 2GB RAM then SWAP is 4GB ~ 4000MB.
- 4GB RAM then SWAP is 8GB ~ 8000MB.
Select use as: swap area.
Press OK. You will see a Swap partition created.
Continue pressing the sign + to create more partitions Ext4
Note Click on:
- Type for the new partition: Primary
- Use as: Ext4 hounrnaling file system
- Mount points: /
Result in this step
You will create 2 partitions:
- Swaps: used in case of emergency, lack of ram, Ubuntu will take this Swap partition to support memory for RAM
- Ext4: contains the Ubuntu operating system
Now you click on the partition Ext4 and press Install to start installing Ubuntu.
Press tiếp tục.
Select Ho Chi Minh time zone, then Tiếp tục.
Select the language for the keyboard. Should stay the same, keep going tiếp tục.
Set Username, Password, computer name for Ubuntu. Remember your account information to log in later.
Ready to reap the rewards. Wait for the Ubuntu installation screen to complete.
After the installation is complete, restart your computer. The Boot Menu will appear. You can choose to Boot into Ubuntu or Windows 10 by using the arrow keys to move to the operating system you want to boot and press Enter.
So the process of installing Ubuntu is done in parallel with Windows. AnonyViet wishes you success.


