As everyone knows Bluestack is a virtualization software that helps us run Android Apps on Windows, but with the hardware rigor, we can hardly install Bluestacks on Windows as well as low-profile VPS, In this article, I will show you how to install BlueStacks on a Windows Server VPS virtual machine
| Join the channel Telegram of the AnonyViet 👉 Link 👈 |
Introducing Android Emulator on PC
There are quite a few tools that support Android mobile / tablet emulators on computers, typically Bluestacks and Genymotion. In which, BlueStacks is the most widely used because of its outstanding features and advantages, and Genymotion is more often used by Developers (integrated with Android Studio IDE).
BlueStacks is widely used to emulate Android phones on computers to serve many different purposes, such as:
– Play Android games on your computer
– Test Android apps on your computer
– Push app (increase app download/review on Google Play market)
– Other cheat/bot purposes.
BlueStacks installation environment requirements
+ RAM: Minimum 2GB
+ At least 4GB of free hard drive space
+ Video card: Dirext X 9.0 or higher
+ OS: Only supports Windows Vista SP2, Windows XP SP3 and newer operating systems (Windows 7, Windows 10…)
+ Environment: Windows Installer, .Net Framework and Vcredist (Windows 7, Windows 10 machines mostly have this environment pre-installed)
Detailed video on how to install Bluestacks on a Windows Server VPS without a video card
=> The normal installation of BlueStacks is quite simple, but because BlueStacks requires strict computer configuration (although it may not be necessary in reality), some old personal computers (RAM <=) 1GB) and virtual servers and servers that do not meet the requirements of BlueStacks (dedicated servers and VPS often do not have a video card)
Instructions for Installing Bluestacks on Windows Server Virtual Machine (VPS without video card)
To install BlueStacks on machines with little RAM or no video card, we must edit the installation file of Bluestacks to skip those minimum configuration checks. You can use the edited BlueStacks installation file (do not check RAM, Video card) shared on the internet or edit the BlueStacks installation file yourself:
Note: When downloading the edited installation file from the internet, you should choose a reputable download source, and only use it on a virtual machine because it is very likely that the file contains viruses or malicious software.
Download BlueStack version running Stable, can be installed even on VPS without video card or low RAM machine
– Download link: BlueStacks-Installer.msi
– Version 9.27: This is a stable, smooth, rooted version for Android, without ads in BlueStacks. Personally, I should use this version, not the newly released 2.x version of BlueStacks because it contains very annoying ads & the stability has not been evaluated by many people.
Manually edit the BlueStacks MSI installation file with the Orca tool
The advantage when you manually edit the Bluestacks installation file is: the files are downloaded from the official source and done by yourself, ensuring that no viruses or malware are added => Peace of mind to use on personal computer.
Prepare:
first. Standard BlueStacks Installer, Offline MSI from BlueStacks:
– Link to download BlueStacks:
2. Editing Tool Orca:
– Download: Orca is part of the toolkit Windows SDK by Microsoft. If you want, you can also download the full set of tools from Microsoft.
– Backup link (I have downloaded and uploaded to Mediafire): Orca.Msi
Conduct:
– Step 1: Setting Orca (the installation process is very simple, just click NEXT that’s it, I don’t guide here)
– Step 2: Right click on the file BlueStacks-Installer.MSI => Select Edit with Orca
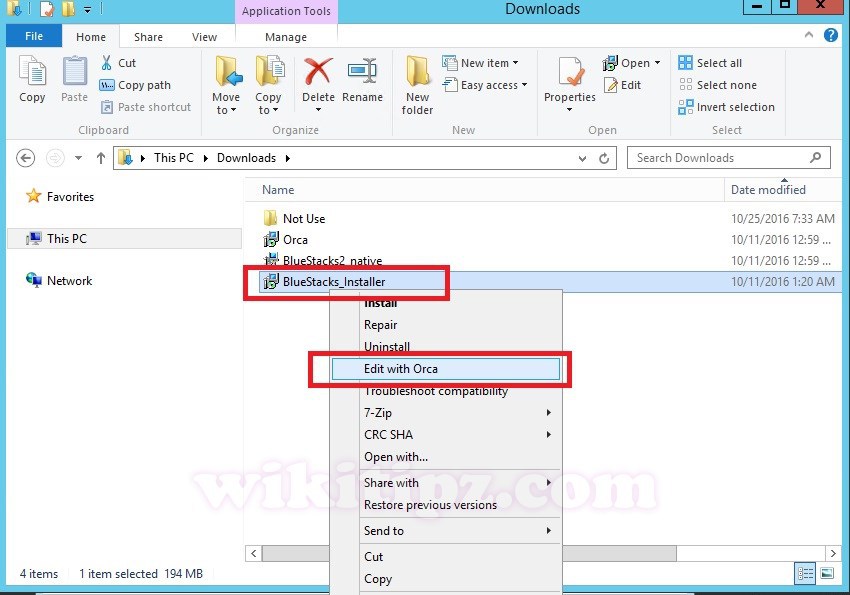
Manually edit BlueStacks MSI installation files with Orca
In the Orca interface, perform the following 3 steps in turn:
2.1. Fixing MSI file allows Installing BlueStack on computers with < 2GB RAM
Frame side Table (right of Orca)you choose the “Launch Condition” => Go to the right pane, find the section “Installed OR Physical Memory >= 1024” => Press the key Delete => OK to delete it.
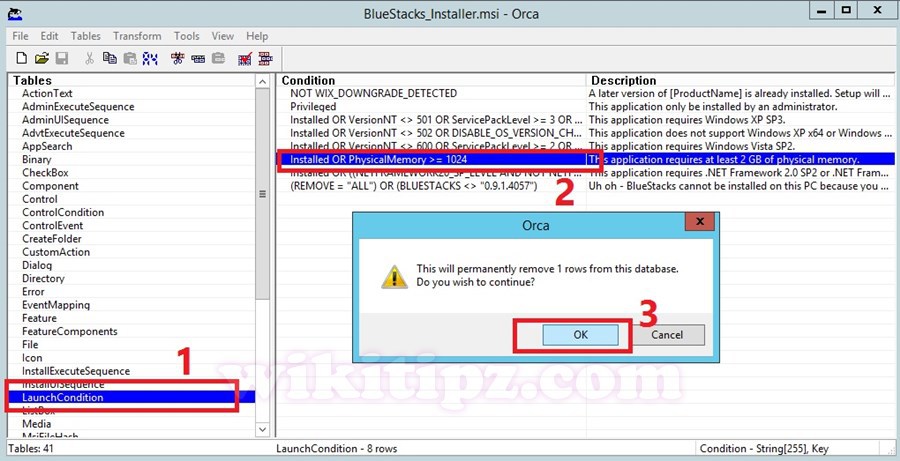
Fixing MSI file allows Installing BlueStack on computers with < 2GB RAM
2.2. Fixing MSI file allows Installing BlueStack without a video card
Continued in Orcain frame Tableselect item Property => Go to the right pane, item GLMODEyou enter the value as FALSE then press Enter.
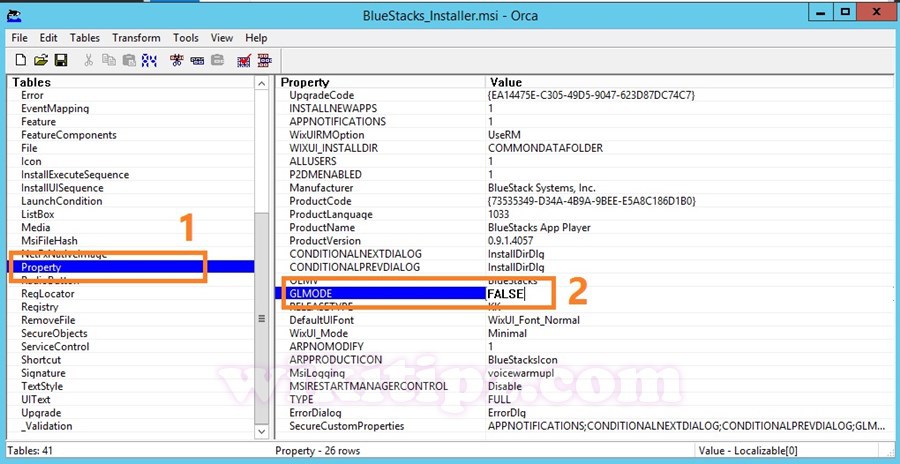
Fixing MSI file allows Installing BlueStack without a video card
2.3. Uncheck MSI Signature
Because we have used Orca to fix the MSI installation file of BlueStacks (not intact) => When installing this file, Windows will report an error that it is not a standard installation file (based on digital signatures).
To fix this problem, continue in the interface Orcaside frame Tableclick on the item InstallExecuteSequence => Go to the right frame, you will find the item CheckMsiSignature to delete it.
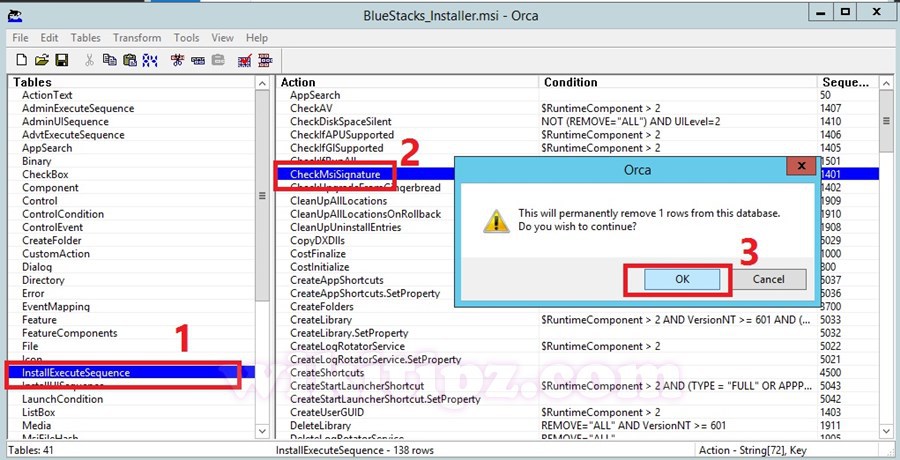
Uncheck MSI Signature
Finally, Save the file BlueStacks-Installer-New.MSI done again.
Now you can bring files BlueStacks-Installer-New.MSI for installation on machines with little RAM or machines without a comfortable video card.
- So the Guide to Installing Bluestacks on Windows Server Virtual Machine (VPS without video card or RAM < 2GB) is done. In the next part, I will guide you to use BlueStacks and use BlueStaks Tweaker to manage multiple Android Profiles.
Note:
If during use, you encounter an error BlueStacks requires updating the Graphic Driver ( Your Graphic Drivers seem to be out of date. BlueStacks requires updated driver to run…), then you just need to edit the following key in the Registry:
[HKEY_LOCAL_MACHINE\SOFTWARE\BlueStacks\Guests\Android\Config]
“SkipGraphicsDriverCheck”=dword:00000001
If you are not very familiar with Registry editing, you can download this file and run it: skip-graphics-driver-check.reg


![How to restore deleted files on USB flash drive [2025] How to restore deleted files on USB flash drive [2025]](https://anonyviet.com/wp-content/uploads/2025/02/word-image-81877-1.jpeg)
