Currently, Vietnam fiber optic cable is having problems due to broken cable and so it makes it difficult to access a website with foreign servers and if you want to create a blog or want to host a game server, buy raspberry. pi is the best choice today with cheap price and extremely small hardware, but the problem in Vietnam is that the IP address is not a fixed IP address, so when we point the DNS back, it will be 1 time later. have to check the ip and point again. This problem is time consuming and if you are not at home accessing the raspberry pi is almost impossible. And so, DDNS was born and today I will guide DDNS on Raspberry Pi with Cloudflare API.
| Join the channel Telegram of the AnonyViet 👉 Link 👈 |
What is DDNS?
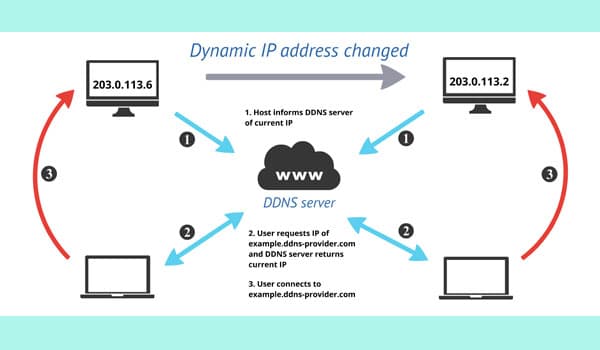
Dynamic DNS, Dynamic Domain Name System or DDNS is a method of automatically updating name servers in the Domain Name System, usually in real time, with active DDNS configuration of hostnames, addresses, or other information. configure it. DDNS was created to replace static IP addresses. It helps users to access the system remotely without using the static IP address generated by the ISP (Internet Service Provider – Internet Service Provider).

Each domain name will have to point to a static IP (static IP), but the network addresses provided by the network operators in Vietnam and some other countries are usually dynamic IP (dynamic IP) and they will be changed accordingly. 1 certain period. In case you want to point DNS to that IP, it is not possible. That’s why DDNS is put into practice.
The way DDNS works is extremely simple. DDNS creates a special program that runs on the user’s computer called a Dynamic DNS Client. This program is responsible for monitoring and checking the change of IP address at the server (host). When a change occurs, Dynamic DNS Client will notify the DNS system. At the same time update new information to the previous database. Even if the server frequently changes its IP address, the DNS system can still find and point the domain name address to the correct new IP address.
Usually DDNS is often used for webserver hosting services, home game server hosting, using IoT devices or installing security devices to protect your home through your wifi NAT port. At that point, your devices will use the public IP to be able to access it, but as mentioned, this IP address is not a static IP address.
Requires supplies to perform
- 1 Computer running Linux and capable of being maintained 24/7 and connected to your home network. Recommended to use Raspberry Pi because its hardware is capable of running 24/24
- 1 domain name is not a Free domain (domain names ending in .tk, .ml, .ga, .cf, .gq)
- 1 account CloudFlare
Instructions for making DDNS client on Raspberry Pi
Basic set up
After creating a CloudFlare account, please read the article Create a free domain for 1 year with the latest Freenom and go to the DNS pointing section to point DNS to your home network!
I will use Raspberry Pi 4 4GB ram to run
Step 1: After pointing the DNS, go to the terminal and write the following command:
git clone https://github.com/K0p1-Git/cloudflare-ddns-updater.git
Step 2: Enter that directory with the command
cd cloudflare-ddns-updater
Step 3: You rename the file by
mv cloudflare-template.sh cloudflare.sh
From this paragraph onwards, the file I will use under the file name I just set. If you put it differently, remember to rename it in the command!
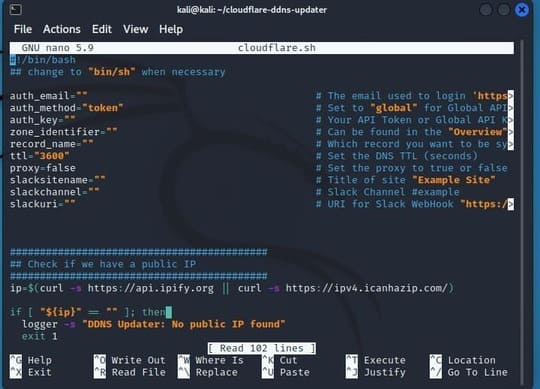
Step 4: You guys Edit files Cloudflare.sh
sudo nano Cloudflare.sh

Step 5: Replace the following information in the file
Note: replace the quotation marks
- auth_email: enter the email you registered with Cloudflare
- Auth_key: Enter API token (See how to get API token and Zone ID below)
- Zone_identifier: Enter Zone Identifier (In the How to get API token and Zone ID section below)
- Record_name: enter your record name. it will take the form
tenrecord.tenmiencuaban.
Eg: website.anonyviet.com
Step 6: Press the key combination Ctrl + x > bấm y > press enter to save the file again
Get API and Token Zone
Step 1: Go to page https://dash.cloudflare.com/
Step 2: Select your domain name

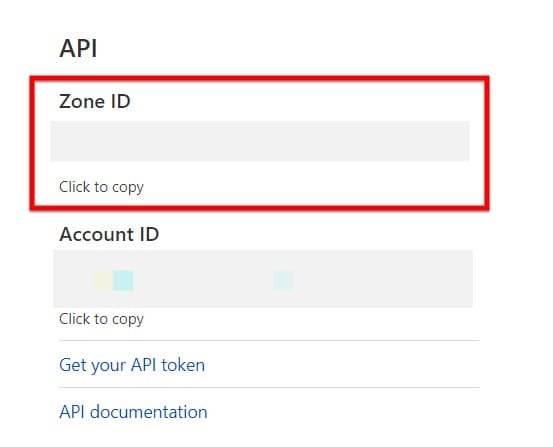
Step 3: Scroll down and you will see Zone ID In the API section. Take it and copy it to your SH file

Step 4: Go to Get Your API token
Step 5: In the Global API key section, click view. After doing the capcha, you take that key and copy it in as step 5 of the basic setup item

Setup time to run the script
Step 1: Go to Terminal and type
Crontab -e
Step 2: You choose your editor. Choose which one, write down its number!
Step 3: You write the following command
* * * * * /bin/bash [vị trí file Cloudflare.sh]
The asterisks are equivalent to 1 date and time unit and you just need to change the asterisk to a number. Their order is: minute > hour > day > month > day of the week (Monday to Sunday)
Step 4: Press the key combination Ctrl + x > bấm y > press enter to save the file again.
Step 5: Run the following command to boot
systemctl restart cron
