Docker It’s like a virtual machine for product development on its own, and it’s easy to switch environments between real machines using containers. How to install Docker on Ubuntu is also very simple, let’s find out.
| Join the channel Telegram of the AnonyViet 👉 Link 👈 |
Containers contain everything an application, tool or service needs to run, including all libraries, dependencies, and configuration files. Containers are also isolated from each other (and the real machine), but can communicate through predefined channels.
Since Docker is open source software, not only is it free to use, but you can also tweak, extend, hack, or build new features. In this article, I will guide you to install Docker on Ubuntu 20.04 LTS (Focal Fossa), the same steps may also work on older versions of Ubuntu, including Ubuntu 18.04 LTS.

More specifically, you’ll learn how to install Docker from the regular Ubuntu repositories, how to let Docker start automatically when you log into your system, and how to install Docker images and run them.
But this is not a deep dive. This article only helps you quickly install Docker to start learning.
Install Docker from Ubuntu Repository
To install Docker on Ubuntu, you need to meet the following 2 requirements:
- You must have access to sudo
- You must have an internet connection
If you’re managing or setting up an Ubuntu server, you’ve (probably) met both of these requirements, but check them out before you start.
Step 1: Install docker from Ubuntu’s repositories. The repository I use here is apt and the installation package name is docker.io:
sudo apt install docker.io - y
Ubuntu will download the latest Docker version from the apt repository, then extract and install it on your system.
Step 2: Allow Docker to start automatically when you log on to the system:
sudo systemctl enable --now docker
Step 3: Docker test
Now that Docker is installed and running on your system, you should verify that everything is working properly. What you need to do is run a new image named hello world:
sudo docker run hello-world
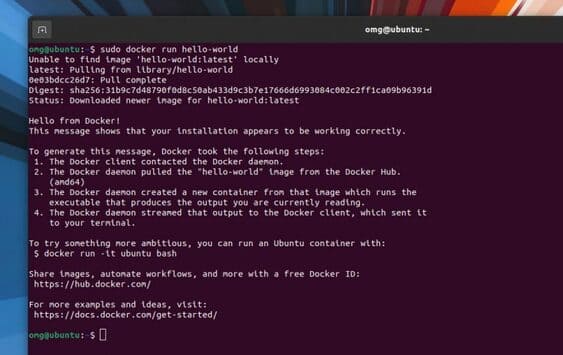
When you run this command, you will see a long message saying “installation appears to be working correctly”.
Like this:
Notice the first line, you will see the words Docker “cannot find” image “hello-world”. But instead of exiting, it searched and downloaded from Docker Hub.
So we have…
Step 4: Find and install Docker images.
You are now setting up the world or rather the Docker ecosystem, and Docker Hub is your home. Docker Hub is billed as “the world’s largest library and community of container images”. Any images available on Docker Hub can also be installed on your system.
Let’s see if the ad is correct.
To search for images on Docker Hub, simply use the command search in docker:
sudo docker search term-goes-here
For example, I want to search for Alpine Linux on Docker Hub, so I run the command docker search alpine. A list of matching images (matching the term alpine) will appear. The official alpine image will have the text OK on column “OFFICIAL“.

Once you find the image you want to use, you can download it using the command pullFor example, to install Alpine Linux, I run the command: sudo docker pull alpine
To run a downloaded image, simply run this command and include the image name: sudo docker run alpine
If you want to run an image as a container and get shell access immediately, add the -it flag. Example: I run sudo docker run -it alpine and Docker throws itself straight into the Alpine container:

To exit, simply type exit and press enter:
Some useful commands you need to know:
docker ps -a: List all the images you have used (and see their container IDs/names)docker stop {container id}: To close the imagedocker rm ID/name-container:To delete containers


