
How to install Liquid Glass on Linux This is a topic that many penguin operating system users are curious about these days. Personally, when I saw Apple’s new frosted glass style, I also felt itchy to try it and see what it would look like on Ubuntu. Thanks to programmer Ryosuke Watanabe, this interface has been brought to GNOME with extremely realistic refraction effects. Let’s go together AnonyViet Learn and install this interesting utility right here.
📢 Join the channel Telegram belong to AnonyViet
Update new articles, cool tools and IT tips fastest
What does the Liquid Glass effect look like on Linux?
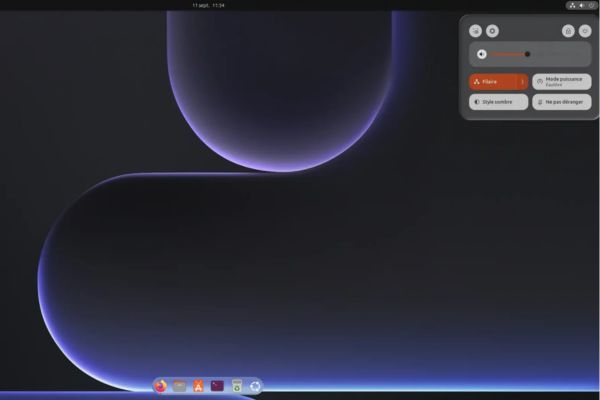
Apple’s brand new Liquid Glass interface is clearly loved by some and criticized by others. But it’s different for programmer Ryosuke Watanabe, he got really interested and decided to make an extension of the same name for GNOME on Linux. This utility allows you to apply that transparent glass effect everywhere, from the dock bar, menu bar, notification panel to the quick control panel or volume and brightness bar. You can even apply it to software windows.
I was so curious that I had to take the device out to try it immediately. I installed it above Ubuntu 26.04.1 LTS running GNOME 50.1sat back and adjusted for a while and saw that the result looked satisfactory. It cannot be called perfect, but overall it is very pleasing to the eye.
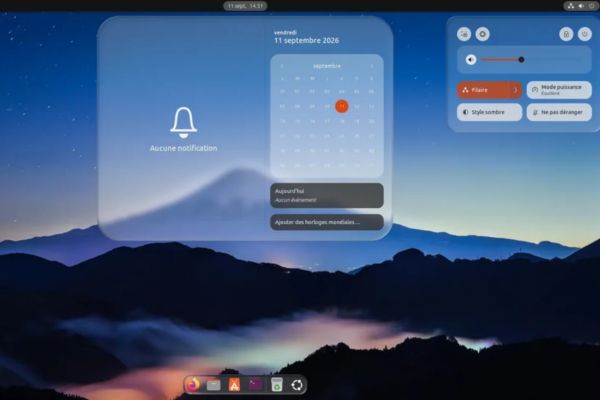
So is it exactly like Apple’s product? The answer is yes, but not 100% copied. You will still see the clear glass revealing what lies behind, along with blurriness, light reflection streaks and especially background image distortion.
This is the most profitable point of the game Liquid Glass. This deformation is not unusual. The author has personally written a set of shaders that simulate the phenomenon of light refraction based entirely on Snell’s law in physics. Thanks to that, every time you open a menu, the things behind are actually bent through the glass, not just the usual monotonous blurred background.
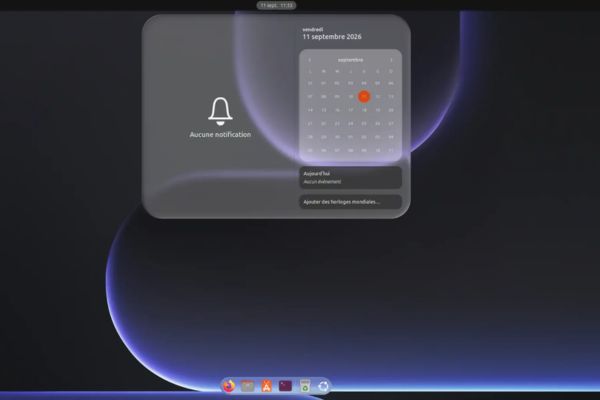
Countless customizations when installing Liquid Glass on Linux
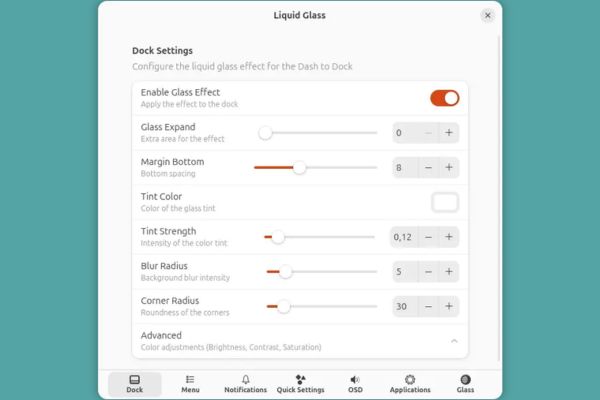
What I like most is that this effect can be applied independently to each position. You can enable it on the dock, menu, notification panel, quick settings, or the volume and brightness display bars. Therefore, leave it on wherever it looks nice, turn it off wherever it looks confusing, no one is forcing you to turn it all on.
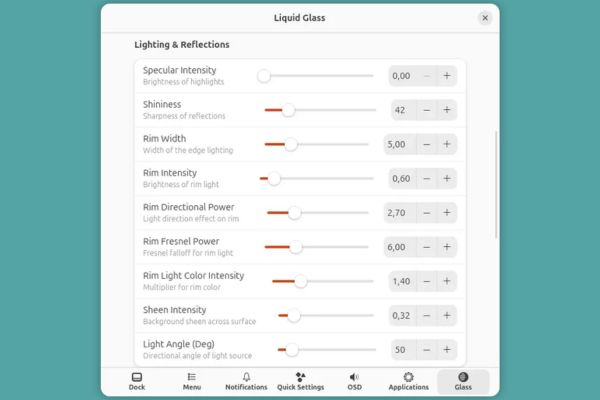
If the default color tone is not pleasing to the eye, that’s okay. The author stuffed in here a bunch of options for each component. You have the right to adjust the opacity, rounded corners, change the color of the glass or increase or decrease the intensity of the effects. In particular, the Glass tab is the most time-consuming place. There are enough sliders there for you to adjust:
- Refraction and distortion of glass.
- Light reflection streaks and chromatic aberrations.
- Surrounding light and shadows.
Honestly, I’ve been sitting and pulling these sliders all day, just by moving my hand a little bit, my appearance has changed completely. The motion effects can also be adjusted, but I personally choose to turn it off because I find it not really necessary, so that static viewing is less painful to the eyes. As for the feature of applying glass to the application window, I tried it and found it not very good. It looks fun, but when actually used on some software, it still looks awkward and not very smooth.
If the graphics are good, will the computer slow down?
Obviously, if the graphics are sparkling, the hardware will have to take the burden. This utility continuously uses shaders to render real-time images from opacity and shadow to the underlying background image warping. When I tested in the virtual machine, the system still ran smoothly and did not encounter any significant jerks, everything responded quite smoothly. But I have to say frankly that my main computer’s configuration is relatively strong, so I generously allocated so many resources to the virtual machine.
If you own a newer computer with good configuration, the impact of this utility on the system will not be too great. However, the author himself also admitted that the current source code is still quite demanding on the hardware and he is prioritizing performance optimization in future versions. Therefore, those who use old office machines or low-battery laptops should consider carefully before installing.
Instructions on how to install Liquid Glass on Linux
Before you start typing commands, you must check the GNOME version on your device. At this time, the utility can only run on GNOME 49 and GNOME 50 only.
I sincerely advise you not to try to circumvent the law. Initially, I tried it on Ubuntu 24.04 LTS running GNOME 46 by manually editing the metadata.json file to trick the system into thinking it was supported. As a result, as soon as I clicked activate, the entire GNOME Shell crashed and then restarted itself, wow! After that, I had to switch to the Ubuntu 26.04.1 LTS virtual machine with GNOME 50.1 available for everything to go smoothly.
Currently this extension has not been posted on the official GNOME Extensions website, so you must pull the source code from GitHub about the machine. Then open Terminal and follow these steps:
Step 1: Install the Git tool on the system with the command:
sudo apt install git
Step 2: Download the entire source code of the utility from the GitHub repository to your computer:
git clone https://github.com/ryohsuke1231/liquid-glass.git
Step 3: Create a folder containing GNOME extensions if you have never created one before:
mkdir -p ~/.local/share/gnome-shell/extensions/
Step 4: Copy the downloaded utility folder to the correct location on the system:
cp -r liquid-glass/[email protected] ~/.local/share/gnome-shell/extensions/
Step 5: Log out of your current user account and then log back in so that the system recognizes the new extension. Then, you just need to open the Extensions application available on your device, turn on the switch for Liquid Glass and start dragging custom sliders to your liking.
Conclusion
In short, How to install Liquid Glass on Linux brings a new visual experience to those who like Apple’s transparent glass style. Although there are still a few glitches in the application window and requires a fair amount of device configuration, this utility is still worth a try.
Frequently Asked Questions (Q&A)
1. Does Liquid Glass Utility support Ubuntu 24.04 with GNOME 46?
Not supported. If you intentionally edit the metadata.json file to force it to run on GNOME 46, the GNOME Shell interface will crash and automatically restart immediately.
2. Does this utility cause lag for low-configuration computers?
May be slow. Because the utility uses shaders to calculate background blur and refraction distortion in real time, weak models or weak graphics cards will see obvious stuttering.
3. Can I only turn on the glass effect for the Dock and turn it off for software windows?
Absolutely. Components such as dock, menu, notification, quick panel and application window all have independent customization switches, if you don’t like it, just turn it off.