The camera, also known as the webcam on the computer, is often used to make video calls. However, if you have trouble making video calls with Messegner, Skype or other software on Windows 10, it may be a Camera error. We will learn 6 ways to fix the Camera not working error on Windows 10.
| Join the channel Telegram of the AnonyViet 👉 Link 👈 |
If the camera on Windows 10 is not working, you can try the following camera fixes
Check the camera connection again
It is important to remember that your camera is connected to the computer first. If you are using a USB camera, make sure that the USB end is securely connected to the computer’s USB port. If that still doesn’t work, try plugging the USB camera into other ports on your computer.

For Bluetooth camera, you need to double check that it is connected and Bluetooth is working on your PC.
- Tap the icon Action center in the bottom right corner of the taskbar. From there, select the icon Bluetooth to enable Bluetooth, then right-click and select Go to Settings for quick access to the Bluetooth settings menu.

- The Bluetooth camera will be listed in the menu. If not, select Add Bluetooth or other device to pair the camera with your PC and follow the on-screen procedure. Once paired, your camera will be available in the app you selected.
The built-in camera will always be used by default (unless privacy settings are blocked). You can test this for yourself by opening the app Windows 10 Camera pre-installed which you can find in the Start menu.
Lens check
A common camera error is that the camera lens is dirty or covered, your camera will look like it is damaged or not working. A common way to protect your privacy is to tape the camera lens (especially if you’re using a laptop’s built-in camera) with duct tape or something similar.

If you see black or blurry camera video, check the camera lens. If the lens is dirty or sticky, wipe it off.
Configure camera security in Windows
It’s important to protect your privacy, especially when it comes to your camera or microphone data. Thankfully, Microsoft knew this in advance, so they already have easy-to-use privacy settings to block unnecessary camera and microphone use on Windows 10.
However, if these settings are active, you may not be able to use your camera in third-party apps or services (or with other Microsoft apps). You can change these settings and enable camera access in Settings.
1. First, right click on Start menu and choose Settings.
2. In Settings, select Privacy > Camera. To enable camera access, select the . button Change in section Allow access to the camera on this deviceslide the button to On.
 3. You will also need to grant camera access to apps by enabling the function Allow apps to access your camera.
 5. If you want the default apps to have camera access, scroll down to Allow desktop apps to access your camerathen slide the button to On.
Close camera apps and try other apps
Most users will find that once the camera is detected and active in the built-in camera app on Windows 10, it will be accessible in any other camera app or web calling app you have installed. put. However, that’s not always the case, with unknown bugs and app conflicts that will sometimes prevent you from using your camera.
If there are two open apps trying to use the camera, either app won’t work. Make sure that only your app is accessing the camera and has been granted access to the camera.
If the camera is working, but the app of your choice is still not working, then I show you a way to determine if the problem is software or hardware. For example, if Windows 10’s Camera app works but the video calling app doesn’t, it’s likely the problem is with the app and not your hardware.
Restart the device in Device Manager
If the camera doesn’t work, you can force it to restart by turning it off and back on again in Device Manager.
- To access Device Manager, right-click on the Start menu and select Device Manager.

- In the Device Manager menu, find your camera device in the Cameras category. If you’re using a Bluetooth camera, you might see it listed in the Bluetooth category. When you find your camera, right click on it then select Properties.

- In the menu Propertiesselect tab Driverthen select Disable Device. Windows will ask you to confirm, so select Yes.

- After disabling, select Enable Device to turn your camera back on.

Update Windows system and Driver
Microsoft regularly releases new system updates for Windows, introducing new features and fixing bugs. Problems with the Windows 10 camera can be caused by a previously unknown bug, so installing updates may solve the problem.
Likewise, device manufacturers often release new driver updates that resolve issues between hardware (the camera) and software (Windows itself, as well as any camera apps). installed). You can install new drivers and update your system using Windows Update.
- To access Windows Update, right-click the Start menu and select Settings.

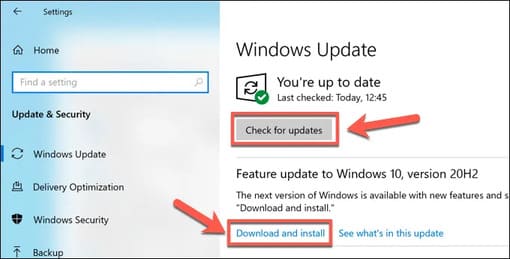
- In the Settings menu, select Update & Security > Windows Update. Select Check for Updates to find new driver and system updates and allow Windows Update to start downloading and installing them. If a new feature update is available, select Download and Install.

If your device is brand new, the supported driver may not be available in the Windows Update system. If that’s the case, download the driver from your device’s home page to install it.
Fix Camera error on Windows 10
When the Windows 10 camera is not working, the steps above (in most cases) should help resolve the issue. If not, you may need to try a new camera or consider alternative options for your video calls. Also check it out Has your camera been hacked? no.


![How to bring the old Facebook interface back [Update T11/2020] How to bring the old Facebook interface back [Update T11/2020]](https://anonyviet.com/wp-content/uploads/2020/09/54.jpg)


